
Why is my kitchen sink leaking underneath? The most common reasons for a kitchen sink leaking underneath are problems with connections, such as loose nuts, worn-out washers, or corroded pipes. The location of the leak will help determine the source and how to fix it.
A kitchen sink leak can be a homeowner’s nightmare. Not only is it annoying, but if left unattended, a seemingly small drip can lead to significant under sink water damage, including mold growth and structural problems. This article will provide an in-depth look at kitchen sink leak causes, common kitchen sink leaks, and guide you through the process of diagnosing sink leak underneath your kitchen sink. It will also provide practical advice on how to fix kitchen sink leak and address kitchen sink plumbing problems. We’ll explore everything from leaking drain pipes and faucet supply line leak issues to garbage disposal leak sources and problems with the sink strainer leaking.
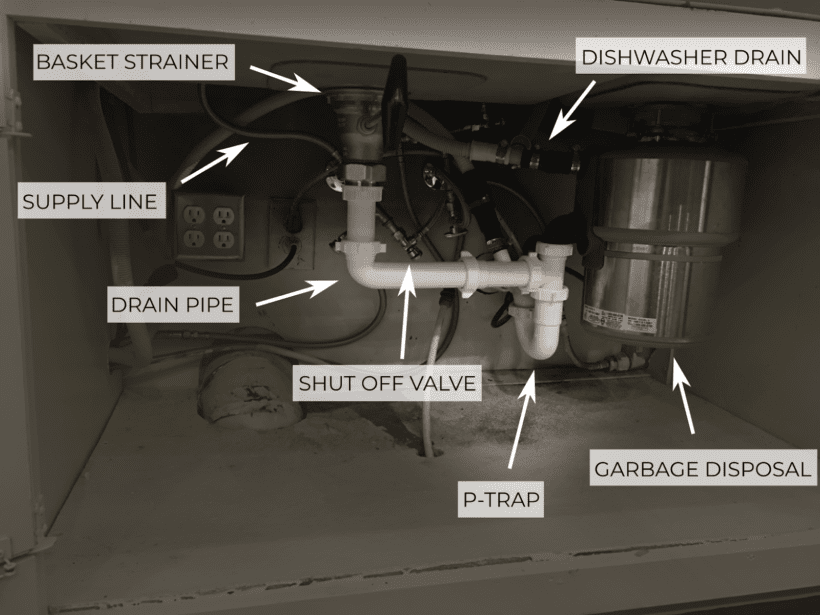
Image Source: legacyplumbing.net
Fathoming the Common Sources of Kitchen Sink Leaks
Identifying the source of the leak is the first crucial step to fixing it. Common culprits include issues with the drain, faucet connections, garbage disposal, and the sink basin itself.
Pinpointing Leaks in Drain Pipes
Drain leaks are among the most frequent kitchen sink plumbing problems. These often occur at joints or where pipes have corroded.
- Loose Connections: The nuts connecting drain pipes often loosen over time.
- Corroded Pipes: Older pipes are susceptible to rust and corrosion, leading to holes and leaks.
- Damaged Washers/Seals: The rubber or plastic washers that create a watertight seal can dry out, crack, or deteriorate.
- Clogged Drains: A blockage in the drain can cause pressure to build up, forcing water to escape at weaker points in the system.
Addressing Faucet Supply Line Leaks
The faucet supply lines connect your faucet to the hot and cold water supply. They are another common source of leaks. A faucet supply line leak can happen due to several reasons:
- Loose Connections: Similar to drain pipes, the connections at the faucet or shut-off valves can loosen.
- Worn-Out Hoses: The hoses themselves can crack or become brittle with age, leading to leaks.
- Damaged Washers: The washers within the supply line connections can fail.
- High Water Pressure: Excessively high water pressure can strain the supply lines and cause leaks.
Investigating Garbage Disposal Leaks
A garbage disposal leak can be tricky to pinpoint, as the disposal unit has multiple potential leak points.
- Sink Flange: The point where the disposal connects to the sink drain is a common leak location.
- Dishwasher Connection: If your dishwasher drains into the disposal, the connection point can leak.
- Disposal Housing: Cracks can develop in the disposal housing itself, especially in older units.
- Internal Seals: The internal seals within the disposal can wear out over time, resulting in leaks.
Identifying Sink Strainer Leaks
The sink strainer, which sits in the sink basin, is another potential source of leaks. A sink strainer leaking usually stems from the following:
- Loose Locknut: The large nut that secures the strainer to the sink basin can loosen.
- Plumber’s Putty Failure: The plumber’s putty used to seal the strainer to the sink can dry out and crack.
- Worn-Out Rubber Gasket: The rubber gasket between the strainer and the sink can deteriorate.
- Corrosion: Rust or corrosion can damage the strainer assembly.
Other Leak Locations
While the above are common, leaks can also originate from:
- Faucet Base: Water can leak from the base of the faucet if the sealant around it has failed.
- Sink Basin: Cracks can develop in the sink basin itself, especially in older porcelain or cast iron sinks.
- Sprayer Hose: The sprayer hose can leak, especially where it connects to the faucet or sprayer head.
Tools You’ll Need
Before you start any repairs, gather these essential tools:
- Basin wrench
- Adjustable wrench
- Pliers
- Screwdrivers (Phillips and flathead)
- Plumber’s tape (Teflon tape)
- Plumber’s putty
- Bucket or container
- Towels or rags
- Flashlight or work light
- Safety glasses
- Gloves
A Step-by-Step Guide to Diagnosing and Fixing Sink Leaks
Here’s a step-by-step guide to finding and fixing your kitchen sink leak.
Step 1: Preparation
- Clear the Area: Remove everything from under the sink to provide clear access.
- Dry the Area: Use towels to dry the area under the sink thoroughly. This will help you spot the leak more easily.
- Turn Off the Water: Locate the shut-off valves under the sink and turn them clockwise to shut off the water supply. If you don’t have shut-off valves, you’ll need to turn off the main water supply to your house.
Step 2: Locating the Leak
- Visual Inspection: Carefully inspect all pipes, connections, the garbage disposal (if present), the faucet base, and the sink strainer.
- Dry Test: With the area completely dry, turn on the faucet briefly and watch closely for any signs of water.
- Paper Towel Test: Wrap paper towels around connections and pipes. If a paper towel gets wet, you’ve likely found the source of the leak.
- Garbage Disposal Test: Fill the sink with a few inches of water and then activate the garbage disposal. Check for leaks around the disposal housing, sink flange, and dishwasher connection.
Step 3: Fixing Common Leaks
Here are some solutions for common leak locations:
A. Tightening Loose Connections:
- Use a wrench to gently tighten any loose nuts or connections. Be careful not to overtighten, as this can damage the pipes or fittings.
B. Replacing Washers and Seals:
- Turn off the water supply.
- Disconnect the leaking pipe or fitting.
- Remove the old washer or seal.
- Install a new washer or seal of the same size and type.
- Reconnect the pipe or fitting and tighten securely.
C. Fixing Leaking Drain Pipes:
- Loose Connections: Tighten the slip nuts connecting the pipes.
- Corroded Pipes: Replace the corroded section of pipe. Cut out the damaged area with a pipe cutter or hacksaw. Use a coupling and pipe cement to connect a new section of pipe.
- Damaged Washers: Replace the worn-out washers inside the slip nuts.
D. Repairing Faucet Supply Line Leaks:
- Loose Connections: Tighten the connections at the faucet and shut-off valves.
- Worn-Out Hoses: Replace the entire supply line. Disconnect the old line and connect a new one, making sure to tighten the connections securely.
- Damaged Washers: Replace the washers inside the connections.
E. Correcting Garbage Disposal Leaks:
- Sink Flange: Loosen the screws or bolts holding the disposal to the sink flange. Remove the disposal and clean the flange and sink opening. Apply a new layer of plumber’s putty to the underside of the flange. Reinstall the disposal and tighten the screws or bolts evenly.
- Dishwasher Connection: Tighten the clamp connecting the dishwasher drain hose to the disposal. If the hose is damaged, replace it.
- Disposal Housing: Unfortunately, if the disposal housing is cracked, the unit usually needs to be replaced.
- Internal Seals: Replacing the internal seals can be complex. Consult your owner’s manual or consider replacing the entire unit.
F. Mending Sink Strainer Leaks:
- Loose Locknut: Use a sink strainer wrench or pliers to tighten the locknut underneath the sink.
- Plumber’s Putty Failure: Remove the strainer assembly. Clean the sink opening and the strainer base. Apply a fresh layer of plumber’s putty to the underside of the strainer flange. Reinstall the strainer and tighten the locknut.
- Worn-Out Rubber Gasket: Replace the rubber gasket between the strainer and the sink.
G. Solving Other Leak Locations:
- Faucet Base: Remove the faucet. Clean the area around the faucet base and apply a bead of silicone caulk. Reinstall the faucet.
- Sink Basin: Small cracks may be patched with epoxy designed for sinks. Larger cracks usually mean replacing the entire sink.
- Sprayer Hose: Replace the sprayer hose. Disconnect the old hose and connect a new one, making sure to tighten the connections securely.
Step 4: Testing the Repair
- Turn on the water supply slowly and carefully.
- Check all the repaired areas for any signs of leaks.
- Run the faucet and check again for leaks.
- If you still see leaks, repeat the troubleshooting process or call a plumber.
Preventative Measures to Minimize Future Leaks
Taking preventative measures can help you avoid future kitchen sink leaks:
- Regular Inspections: Check under your sink periodically for any signs of leaks or moisture.
- Proper Maintenance: Tighten loose connections and replace worn-out washers and seals promptly.
- Avoid Overloading the Disposal: Be mindful of what you put down the garbage disposal. Avoid hard or fibrous materials that can cause clogs and strain the unit.
- Use a Strainer: Use a sink strainer to catch food scraps and debris, preventing clogs in the drain pipes.
- Flush Drains Regularly: Flush your drains with hot water periodically to help prevent buildup and clogs. You can also use a mixture of baking soda and vinegar followed by hot water.
- Professional Plumbing Inspections: Schedule regular plumbing inspections to identify and address potential problems before they become major leaks.
When to Call a Professional Plumber
While many kitchen sink leaks can be fixed with DIY methods, there are times when it’s best to call a professional plumber:
- You can’t identify the source of the leak.
- The leak is severe or causing significant water damage.
- You’re uncomfortable working with plumbing.
- You lack the necessary tools or experience.
- You suspect a more serious plumbing problem, such as a burst pipe.
- The repairs involve complex plumbing work.
The Cost of Ignoring a Kitchen Sink Leak
Ignoring a kitchen sink leak can lead to several costly problems:
- Water Damage: Water leaks can damage cabinets, flooring, walls, and ceilings.
- Mold Growth: Moisture from leaks can create a breeding ground for mold, which can cause health problems and require professional remediation.
- Structural Damage: Over time, water damage can weaken the structure of your home.
- Increased Water Bills: Even a small leak can waste a significant amount of water over time, leading to higher water bills.
- Appliance Damage: Water leaks can damage appliances located under the sink, such as dishwashers or water filters.
Table: Common Kitchen Sink Leak Causes and Solutions
| Leak Location | Possible Cause | Solution |
|---|---|---|
| Drain Pipes | Loose connections, corroded pipes, damaged washers | Tighten connections, replace pipes, replace washers |
| Faucet Supply Lines | Loose connections, worn-out hoses, damaged washers | Tighten connections, replace hoses, replace washers |
| Garbage Disposal | Sink flange leak, housing leak, dishwasher connection leak | Tighten flange, replace disposal, tighten connection, replace hose |
| Sink Strainer | Loose locknut, putty failure, worn gasket | Tighten locknut, replace putty, replace gasket |
| Faucet Base | Failed sealant | Remove faucet, clean surface, apply new sealant, reinstall faucet |
| Sink Basin | Cracks | Patch with epoxy (small cracks), replace sink (large cracks) |
| Sprayer Hose | Leaking hose | Replace sprayer hose |
FAQ: Frequently Asked Questions About Kitchen Sink Leaks
- What is the most common cause of leaks under a kitchen sink?
The most common cause is loose connections at the drain pipes or faucet supply lines. - Can I fix a kitchen sink leak myself?
Yes, many leaks can be fixed with basic tools and DIY knowledge. However, complex problems require a professional plumber. - What is the best way to find a leak under my kitchen sink?
Dry the area thoroughly, then turn on the water and watch carefully for any signs of water. Wrap paper towels around connections to help pinpoint the source. - Who is responsible for fixing a kitchen sink leak in a rental property?
Typically, the landlord is responsible for fixing plumbing issues in a rental property. However, it’s important to check your lease agreement for specific terms. - What are the signs of under sink water damage?
Signs include stains, discoloration, mold growth, musty odors, warped wood, and peeling paint. - What do I do if I can’t find the source of the leak?
If you can’t locate the leak, it’s best to call a professional plumber for assistance.
Fixing leaks right away and taking steps to prevent them can save your home from serious water damage. It helps keep your kitchen running smoothly. Always put safety first, and don’t be afraid to call a professional if you need a hand.

Hi, I’m Larry Fish, the mind behind MyGrinderGuide.com.. With a passion for all things kitchen appliances, I created this blog to share my hands-on experience and expert knowledge. Whether it’s helping you choose the right tools for your culinary adventures or offering tips to make your kitchen more efficient, I’m here to guide you. My goal is to make your time in the kitchen not only easier but also enjoyable! Welcome to my world of kitchen mastery!