
How long does it take to repaint kitchen cabinets? Repainting kitchen cabinets can take anywhere from 3 to 10 days, depending on whether you DIY or hire professionals, the size of your kitchen, and the complexity of the project.
Painting your kitchen cabinets is a smart way to give the whole room a fresh look without spending a fortune on a total remodel. Just a heads-up, though: this isn’t something you can just knock out in a single weekend. To get it right, you need a good plan and a lot of prep work. This guide will help you figure out exactly how long the job will take and what to expect during each step. We’ll look at what makes the project go faster or slower and how to make sure the paint looks great and stays that way for years.
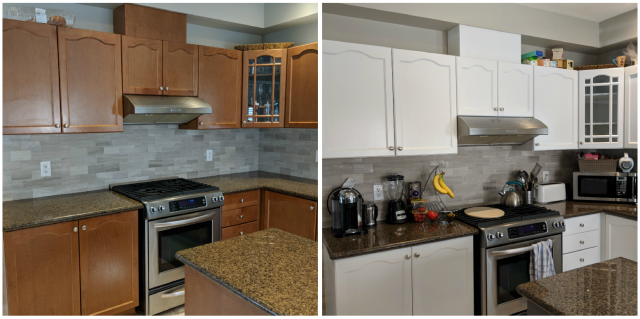
Image Source: www.paintmycabinets.ca
Decoding the Kitchen Cabinet Refinishing Timeline
The amount of time needed for kitchen cabinet refinishing is a multifaceted issue. Several components influence how long the project will take. From the prep work to the final coat, each step adds to the total timeline. Let’s examine the average time to paint cabinets and the details behind the process.
Cabinet Painting Time: DIY vs. Professional
The most significant factor influencing the timeline is whether you choose to DIY or hire professional painters.
- DIY Cabinet Painting Time: A DIY project typically takes longer. You’re learning as you go, and you’re likely fitting the work around your existing schedule. Expect a DIY cabinet painting time of 5-10 days. This allows time for each step and any unexpected delays.
- Professional Cabinet Painting Frameframe: Professionals have the experience, tools, and manpower to complete the job more quickly. A professional cabinet painting timeframe is generally 3-7 days. The speed of painting kitchen cabinets is much faster with a crew.
Estimated Timelines: A Detailed Breakdown
To provide a clearer picture, here are estimated timelines for both DIY and professional cabinet painting, breaking down each stage:
DIY Cabinet Painting Timeline (Estimated 5-10 Days)
| Stage | Time (Days) | Description |
|---|---|---|
| Planning & Gathering Supplies | 1 | Researching techniques, choosing paint, buying supplies (brushes, rollers, primer, sandpaper, cleaner, etc.) |
| Cabinet Removal & Hardware Removal | 0.5-1 | Carefully removing cabinet doors and drawers. Removing hinges, knobs, and handles. Labeling everything clearly to ensure easy reassembly. |
| Cleaning & Degreasing | 1 | Thoroughly cleaning all cabinet surfaces to remove grease, dirt, and grime. Using a degreasing cleaner and a scrub brush. Rinsing and allowing to dry completely. |
| Sanding | 1-2 | Sanding all surfaces to create a slightly rough texture for better paint adhesion. Using different grit sandpaper (e.g., 120-grit for initial sanding, 220-grit for smoothing). Dusting off all surfaces thoroughly. |
| Priming | 1-2 | Applying a high-quality primer to all surfaces. Priming helps the paint adhere better, blocks stains, and provides a uniform base coat. Allowing the primer to dry completely according to the manufacturer’s instructions. |
| Painting (1st Coat) | 1-2 | Applying the first coat of paint. Using a brush for detailed areas and a roller for larger surfaces. Ensuring even coverage and avoiding drips or runs. |
| Drying Time | 1 | Allowing the first coat of paint to dry completely. The cabinet paint drying time will depend on the type of paint and the environmental conditions. |
| Painting (2nd Coat) | 1-2 | Applying the second coat of paint. This coat provides added durability and ensures full color coverage. |
| Drying Time | 1 | Allowing the second coat of paint to dry completely. |
| Reassembly | 1 | Reattaching hardware (hinges, knobs, handles). Reinstalling cabinet doors and drawers. Making any necessary adjustments to ensure proper alignment. |
Professional Cabinet Painting Timeline (Estimated 3-7 Days)
| Stage | Time (Days) | Description |
|---|---|---|
| Preparation & Masking | 0.5-1 | Covering countertops, appliances, and floors with protective materials. Removing cabinet doors and drawers. Removing hardware. |
| Cleaning & Sanding | 1 | Thoroughly cleaning and degreasing all cabinet surfaces. Sanding to create a smooth, paint-ready surface. |
| Priming & Painting (Spraying) | 1-2 | Applying primer and multiple coats of paint using a professional sprayer. This ensures a smooth, even finish and reduces drying time. |
| Drying Time | 1 | Allowing adequate drying time between coats. Professionals often use techniques to accelerate drying. |
| Reassembly & Touch-Ups | 0.5-1 | Reattaching hardware and reinstalling cabinet doors and drawers. Performing any necessary touch-ups. |
Factors Affecting Cabinet Painting Time
Many things change the cabinet painting project duration. The overall speed of painting kitchen cabinets isn’t the same for everyone. Here’s a detailed look at what impacts the timeline:
1. Kitchen Size and Number of Cabinets
The larger your kitchen, the more cabinets you have. This naturally increases the time required for each step, from cleaning and sanding to priming and painting. A small kitchen with only a few cabinets will be significantly faster than a large kitchen with many cabinets, drawers, and islands.
2. Cabinet Material and Condition
- Wood Type: Different wood types have varying levels of porosity and require different preparation techniques. Some woods may require more sanding or priming to achieve a smooth finish.
- Existing Finish: The existing finish on your cabinets plays a crucial role. Cabinets with a glossy or heavily varnished finish require more extensive sanding to ensure proper adhesion. Laminate cabinets can be more challenging and may require specialized primers.
- Damage and Repairs: Cabinets with existing damage (dents, scratches, chips) require repair work before painting. Filling holes, repairing damaged edges, and addressing any structural issues will add time to the project.
3. Paint Type and Drying Time
- Oil-Based vs. Water-Based: Oil-based paints typically require longer drying times than water-based (latex or acrylic) paints. However, oil-based paints offer greater durability.
- Paint Quality: High-quality paints tend to have better coverage, potentially reducing the number of coats required. They also often have faster drying times than cheaper paints.
- Humidity and Temperature: Environmental conditions significantly affect paint drying time. High humidity and low temperatures slow down the drying process, while low humidity and high temperatures accelerate it.
4. Painting Method
- Brush and Roller vs. Sprayer: Using a brush and roller is more time-consuming than using a professional sprayer. A sprayer provides a smoother, more even finish and significantly reduces the time required to apply each coat of paint. However, spraying requires more extensive masking and preparation to protect surrounding surfaces.
- Number of Coats: The number of coats of primer and paint needed will directly impact the total cabinet painting time. Darker colors or cabinets with strong underlying stains may require additional coats for full coverage.
5. Skill Level and Experience
- DIY Novice: If you’re new to DIY painting, expect the project to take longer. You’ll need time to learn techniques, troubleshoot problems, and correct mistakes.
- Experienced DIYer: Those with prior painting experience will be more efficient and may be able to complete the project faster.
- Professional Painters: Professionals have the skills, tools, and experience to complete the job quickly and efficiently. They know how to properly prepare surfaces, apply paint evenly, and achieve a professional-looking finish.
6. Detailing and Hardware
- Intricate Designs: Cabinets with intricate designs, raised panels, or decorative moldings require more time and effort to paint. These areas are more difficult to reach with a brush or roller and may require more detailed work.
- Hardware Complexity: The type of hardware on your cabinets can also affect the timeline. Intricate or difficult-to-remove hardware can add time to the removal and reinstallation process. Choosing to replace hardware can also extend the project if you need to source new pieces.
Optimizing Your Cabinet Painting Project Timeline
Here are some tips to help speed up your cabinet painting project without sacrificing quality:
- Thorough Planning: Plan your project in detail before you begin. This includes researching techniques, choosing your paint and supplies, and creating a detailed schedule.
- Proper Preparation: Invest time in proper preparation. Thorough cleaning, sanding, and priming are essential for a long-lasting and beautiful finish. Skipping these steps will lead to problems down the road and may require redoing the work.
- Quality Materials: Use high-quality paints, primers, and brushes. Quality materials will provide better coverage, durability, and ease of application, ultimately saving you time and effort.
- Efficient Techniques: Learn efficient painting techniques. Watch videos, read tutorials, and practice your technique before you start on your cabinets.
- Dedicated Workspace: Set up a dedicated workspace for painting. This will help you stay organized and avoid clutter. Make sure the workspace is well-ventilated and protected from dust and debris.
- Proper Drying Times: Allow adequate drying time between coats. Rushing the drying process can lead to problems with adhesion and finish.
- Organization: Keep all your supplies organized. Label all cabinet doors and drawers to ensure easy reassembly.
- Consider Spraying: If you’re comfortable using a paint sprayer, consider using one for the project. A sprayer will significantly reduce the time required to apply paint and will provide a smoother, more even finish. If you don’t own a sprayer, you can rent one from a local hardware store.
- Enlist Help: Enlist the help of a friend or family member. Having an extra pair of hands can speed up the process significantly, especially for tasks like cleaning, sanding, and painting.
- Hire Professionals: If you’re short on time or uncomfortable with DIY projects, consider hiring professional painters. They have the experience, tools, and manpower to complete the job quickly and efficiently.
Deciphering Drying Times: The Key to a Smooth Finish
Cabinet paint drying time is a vital part of the entire process. Don’t skip it. Rushing this phase can cause sticky surfaces, uneven colors, and a final look that’s far from perfect. Here are key factors to consider:
Paint Type Matters
- Latex Paints: These dry faster, often touchable within hours, but waiting 24 hours before the next coat is best.
- Oil-Based Paints: These take longer, sometimes needing a full day or more to fully dry.
Environment is Important
- Temperature: Warmer rooms help paint dry faster.
- Humidity: High humidity slows drying, while low humidity speeds it up. Aim for moderate conditions.
Following the Manufacturer’s Advice
Always check the paint can for the best drying times. Paint makers know their products best.
Tips for Drying
- Good Airflow: Open windows or use fans to help air circulate.
- Even Coats: Don’t apply paint too thickly; thin layers dry quicker.
- Patience: Wait the full recommended time before adding another coat or putting cabinets back together.
FAQ: Frequently Asked Questions
Q: Can I paint my cabinets without sanding?
A: While it’s possible to paint cabinets without sanding by using specialized primers and paints designed for adhesion, sanding is generally recommended. Sanding creates a slightly rough surface that allows the primer and paint to adhere better, resulting in a more durable and long-lasting finish. Skipping sanding may lead to peeling or chipping down the road.
Q: What is the best type of paint for kitchen cabinets?
A: The best type of paint for kitchen cabinets is typically a high-quality acrylic latex or alkyd (oil-based) paint. Acrylic latex paints are durable, easy to clean, and have low VOCs (volatile organic compounds). Alkyd paints provide a harder, more durable finish but require longer drying times and more careful cleanup. Consider a paint specifically formulated for cabinets and trim for optimal results.
Q: How long should I wait between coats of paint on my cabinets?
A: Always follow the manufacturer’s recommendations for drying times between coats. Generally, you should wait at least 4-6 hours between coats of latex paint and 24 hours between coats of alkyd paint. Ensure the first coat is completely dry to the touch before applying the second coat.
Q: Can I paint my laminate cabinets?
A: Yes, you can paint laminate cabinets, but it requires careful preparation. Start by thoroughly cleaning the cabinets and sanding them lightly to create a slightly rough surface. Apply a bonding primer specifically designed for laminate surfaces. This will help the paint adhere properly. Then, follow with your chosen paint.
Q: Who is best to hire for painting kitchen cabinets?
A: You should hire an experienced painter with knowledge of cabinet painting. Check online reviews and ask for references to find a professional.
Q: What tools are needed for painting kitchen cabinets?
A: Essential tools include:
* Sandpaper
* Cleaning supplies (degreaser, cloths)
* Primer
* Paint
* Paintbrushes & Rollers or sprayer
* Painter’s tape
* Drop cloths
* Screwdrivers (for hardware removal)
* Safety glasses
* Gloves
Q: How long cabinet project should take professionals?
A: A professional project typically takes 3-7 days to complete, which is generally faster than doing it yourself. The timeline can depend on the amount of cabinets, layout and size of the kitchen.

Hi, I’m Larry Fish, the mind behind MyGrinderGuide.com.. With a passion for all things kitchen appliances, I created this blog to share my hands-on experience and expert knowledge. Whether it’s helping you choose the right tools for your culinary adventures or offering tips to make your kitchen more efficient, I’m here to guide you. My goal is to make your time in the kitchen not only easier but also enjoyable! Welcome to my world of kitchen mastery!