
Are you wondering how to build your own kitchen base cabinets? The answer is yes, you can definitely do it yourself! This guide walks you through the entire process, step by step. We’ll cover everything you need to know to fix up your kitchen, from drawing up the plans and building the boxes and frames to finally putting the cabinets in place. Let’s get started!
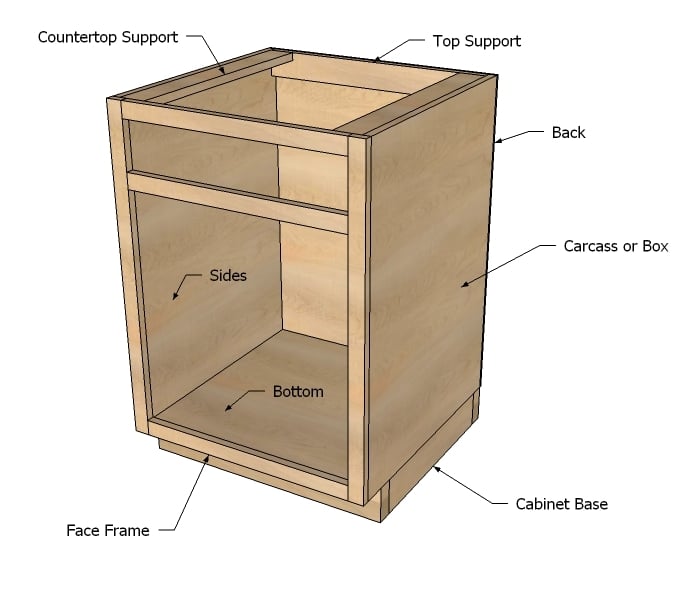
Image Source: www.ana-white.com
Preparing to Build Your Base Cabinets
Before you even think about picking up a saw, careful planning is critical. This stage will save you time, money, and frustration in the long run.
Developing Your Kitchen Cabinet Design
Accurate measurements and a well-thought-out design are essential.
- Measure Your Space: Precisely measure the dimensions of your kitchen. Note the location of plumbing, electrical outlets, and appliances.
- Create a Layout: Sketch out your kitchen layout, indicating the placement of each cabinet. Consider functionality, workflow, and aesthetic appeal. Use graph paper or online design tools to help visualize your design.
- Choose Your Cabinet Style: Decide on the style of your cabinets (e.g., shaker, flat-panel, raised-panel). This will influence your material choices and construction methods.
- Plan for Special Features: Consider including features like pull-out shelves, spice racks, or trash can compartments.
Selecting Materials and Tools
The right materials and tools will make the construction process smoother and produce professional-looking results.
- Plywood: High-quality plywood (¾-inch for the cabinet carcass and ½-inch for the back) is a standard choice. Consider birch, maple, or oak plywood.
- Lumber: Select solid wood (e.g., poplar, maple, or oak) for the face frame.
- Fasteners: Use wood screws, pocket hole screws, and construction adhesive.
- Hardware: Choose hinges, drawer slides, knobs, and pulls that complement your cabinet style.
- Essential Tools:
- Table saw or circular saw
- Miter saw
- Drill/driver
- Pocket hole jig
- Clamps
- Measuring tape
- Level
- Square
- Safety glasses
- Hearing protection
Creating Base Cabinet Plans
A detailed plan ensures accurate cuts and assembly.
- Determine Cabinet Dimensions: Decide on the width, height, and depth of each cabinet. A standard base cabinet height is 34.5 inches (without countertop). Standard depths are 24 inches, but can be customized.
- Sketch Detailed Drawings: Create detailed drawings of each cabinet, including dimensions for all parts.
- Cut List: Prepare a cut list that specifies the dimensions and quantity of each piece of plywood and lumber. This will help minimize waste and ensure accuracy.
Building the Cabinet Carcass
The cabinet carcass is the main body of the cabinet. Accurate construction is crucial for a sturdy and functional cabinet.
Cutting the Plywood Components
Precision is key to ensuring your cabinets fit together properly.
- Follow Your Cut List: Use your cut list as a guide to cut the plywood components for the cabinet sides, bottom, back, and top (if applicable).
- Table Saw or Circular Saw: A table saw provides the most accurate cuts, but a circular saw with a guide can also be used.
- Safety First: Always wear safety glasses and hearing protection when operating power tools.
Assembling the Carcass
Proper assembly techniques will result in a strong and square cabinet box.
- Pocket Hole Joinery: Use a pocket hole jig to drill pocket holes along the edges of the cabinet sides.
- Dry Fit: Before applying glue, dry-fit the components to ensure they fit together properly.
- Apply Adhesive: Apply construction adhesive to the edges of the plywood components.
- Secure with Screws: Use pocket hole screws to fasten the sides to the bottom and top (if applicable).
- Install the Back: Attach the cabinet back using screws and adhesive. The back panel helps to keep the cabinet square.
- Check for Square: Use a square to ensure the cabinet is square. Adjust as needed before the adhesive dries.
- Clamping: Use clamps to hold the cabinet together while the adhesive dries.
Adding Internal Supports
Internal supports provide additional strength and stability to the cabinet carcass.
- Corner Braces: Install corner braces in the corners of the cabinet to reinforce the joints.
- Center Supports: Add center supports to wider cabinets to prevent sagging.
Constructing the Cabinet Face Frame
The face frame adds structural integrity and a decorative element to the cabinet.
Preparing the Lumber
Select straight, knot-free lumber for the face frame.
- Cut to Size: Cut the lumber to the required lengths for the stiles (vertical pieces) and rails (horizontal pieces).
- Miter Cuts (Optional): If desired, miter the corners of the face frame for a more decorative look.
Assembling the Face Frame
Proper joinery is essential for a strong and durable face frame.
- Joinery Options:
- Pocket Hole Joinery: Use a pocket hole jig to drill pocket holes on the back of the rails and stiles.
- Mortise and Tenon: A traditional joinery method that provides exceptional strength.
- Dowel Joints: Use dowels to align and reinforce the joints.
- Apply Adhesive: Apply wood glue to the joints.
- Secure with Fasteners: Use screws or clamps to hold the frame together while the adhesive dries.
- Check for Square: Ensure the face frame is square using a square.
Attaching the Face Frame to the Carcass
Proper alignment is critical for a seamless transition between the face frame and the cabinet carcass.
- Apply Adhesive: Apply construction adhesive to the back of the face frame.
- Position the Face Frame: Carefully position the face frame on the front of the cabinet carcass.
- Secure with Screws: Use screws to attach the face frame to the carcass from the inside of the cabinet.
- Clamping: Use clamps to hold the face frame in place while the adhesive dries.
Installing Doors and Drawers
Doors and drawers add functionality and style to your base cabinets.
Choosing Doors and Drawers
Consider the style and function of your doors and drawers.
- Door Styles: Select a door style that complements your kitchen design (e.g., shaker, flat-panel, raised-panel).
- Drawer Construction: Options include dovetail drawers, butt-joint drawers, and pre-made drawer boxes.
Installing Hinges and Drawer Slides
Accurate installation is crucial for smooth operation.
- Hinge Types: Choose the appropriate hinge type (e.g., concealed hinges, face-frame hinges).
- Hinge Placement: Follow the manufacturer’s instructions for hinge placement.
- Install Hinges: Attach the hinges to the cabinet face frame and the door.
- Drawer Slide Types: Choose drawer slides based on your desired load capacity and features (e.g., side-mount, under-mount, soft-close).
- Drawer Slide Placement: Follow the manufacturer’s instructions for drawer slide placement.
- Install Drawer Slides: Attach the drawer slides to the cabinet carcass and the drawer box.
Installing Doors and Drawers
Proper alignment is key to a professional-looking finish.
- Hang Doors: Attach the doors to the hinges and adjust as needed for proper alignment.
- Install Drawers: Slide the drawer boxes into the drawer slides and adjust as needed.
Finishing Your Base Cabinets
Finishing protects the cabinets and enhances their appearance.
Sanding and Preparing the Surface
A smooth surface is essential for a professional finish.
- Sanding: Sand all surfaces of the cabinets with progressively finer grits of sandpaper (e.g., 120-grit, 180-grit, 220-grit).
- Remove Dust: Use a tack cloth or vacuum to remove all sanding dust.
- Fill Holes: Fill any holes or imperfections with wood filler.
Applying Primer and Paint or Stain
Choose a finish that complements your kitchen design.
- Primer: Apply a coat of primer to the cabinets to improve adhesion and create a uniform base for the paint or stain.
- Paint: Apply two coats of high-quality cabinet paint, allowing each coat to dry completely.
- Stain: Apply stain to the cabinets, following the manufacturer’s instructions.
- Topcoat: Apply a clear topcoat to protect the finish and add durability.
Installing Hardware
Knobs and pulls add the finishing touch to your cabinets.
- Choose Hardware: Select knobs and pulls that complement your cabinet style.
- Drill Holes: Drill holes for the hardware using a template or measuring carefully.
- Install Hardware: Attach the knobs and pulls to the doors and drawers.
Installing Base Cabinets
Proper installation ensures your cabinets are level, secure, and functional.
Locating Studs and Leveling the Cabinets
Finding wall studs is essential for secure installation.
- Locate Studs: Use a stud finder to locate the wall studs behind the drywall.
- Mark Stud Locations: Mark the stud locations on the wall.
- Leveling: Use shims to level the cabinets.
- Table: Leveling Cabinets
| Step | Action | Tools |
|—|—|—|
| 1 | Place cabinet against the wall in its designated location. | |
| 2 | Use a level to check if the cabinet is level from front to back and side to side. | Level |
| 3 | Insert shims under the cabinet as needed to achieve level. | Shims |
| 4 | Double-check level after each shim is added. | Level |
- Table: Leveling Cabinets
Securing the Cabinets to the Wall
Securely attaching the cabinets to the wall studs prevents them from shifting or falling.
- Pilot Holes: Drill pilot holes through the cabinet back and into the wall studs.
- Screws: Use long screws to attach the cabinets to the wall studs.
- Connecting Cabinets: Use screws to connect adjacent cabinets together.
Installing the Countertop
The countertop is the final element of your base cabinet installation.
- Countertop Options: Choose a countertop material that complements your kitchen design (e.g., granite, quartz, laminate).
- Countertop Installation: Follow the manufacturer’s instructions for countertop installation.
Troubleshooting Common Issues
Even with careful planning, you may encounter challenges. Here are some common issues and how to address them:
- Cabinets Not Square: Check for square during assembly and use clamps to correct any discrepancies.
- Doors Not Aligning: Adjust the hinges to align the doors properly.
- Drawers Sticking: Ensure the drawer slides are installed correctly and lubricate them if necessary.
- Uneven Cabinets: Use shims to level the cabinets during installation.
Fathoming Different Types of Kitchen Base Cabinets
There are several types of base cabinets, each designed for a specific purpose.
- Standard Base Cabinets: These are the most common type, used for general storage.
- Drawer Base Cabinets: Feature multiple drawers for storing utensils, cookware, and other items.
- Sink Base Cabinets: Designed to accommodate a kitchen sink.
- Corner Base Cabinets: Maximize storage in corner areas.
- Pull-Out Base Cabinets: Feature pull-out shelves or organizers for easy access to items.
FAQ Section
Here are some frequently asked questions about building kitchen base cabinets:
- What is the standard depth for kitchen base cabinets? The standard depth is 24 inches.
- Can I build base cabinets without a face frame? Yes, you can build frameless cabinets, but they require more precise construction.
- What type of wood is best for kitchen cabinets? High-quality plywood (birch, maple, oak) and solid wood (poplar, maple, oak) are good choices.
- How much does it cost to build your own kitchen cabinets? The cost varies depending on the materials, hardware, and tools you choose, but it is generally less expensive than buying pre-made cabinets.
- Who is best suited to undertake this project? This project is best suited for individuals with intermediate woodworking skills and experience using power tools.
Building your own kitchen base cabinets can be a rewarding DIY project. By following these step-by-step instructions, you can create custom cabinets that perfectly fit your kitchen and style. Good luck with your kitchen renovation project!

Hi, I’m Larry Fish, the mind behind MyGrinderGuide.com.. With a passion for all things kitchen appliances, I created this blog to share my hands-on experience and expert knowledge. Whether it’s helping you choose the right tools for your culinary adventures or offering tips to make your kitchen more efficient, I’m here to guide you. My goal is to make your time in the kitchen not only easier but also enjoyable! Welcome to my world of kitchen mastery!