

Ever feel like your Ender 3 prints just aren’t coming out the way you imagined? You’ve got the printer, you’ve got the filament, but something’s still missing. That “something” is often the right slicer software. It’s like the chef that turns your digital design into a real-world object, and picking the wrong one can lead to frustrating print failures, messy overhangs, and disappointing details.
Choosing a slicer for your Ender 3 can feel like navigating a maze. Do you go with the popular free options, or is a paid program worth the investment? Each slicer has its own quirks and settings, and figuring out which one will give you the best results for your specific projects can be a real headache. You want those perfect layers, strong structures, and smooth surfaces without spending hours tweaking settings that don’t make sense.
But don’t worry, we’re here to cut through the confusion! In this post, we’ll explore some of the best slicer options for your Ender 3. We’ll break down what makes each one stand out, what features are important for Ender 3 users, and how to choose the one that will help you create amazing prints every time. Get ready to unlock the full potential of your 3D printer and say goodbye to those printing woes!
Our Top 5 Slicer For Ender 3 Recommendations at a Glance
Top 5 Slicer For Ender 3 Detailed Reviews
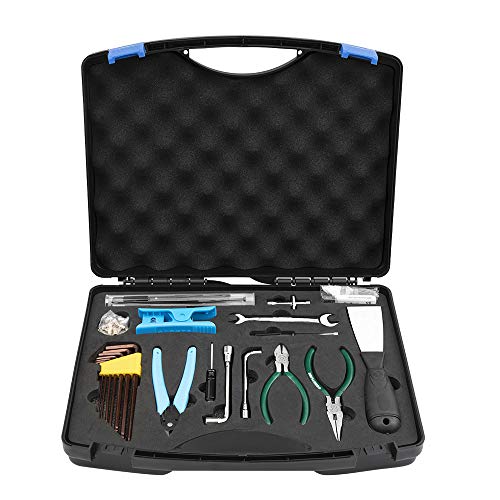
1. Creality 3D Printer Tool Kit with Case 35Pcs with Cleaners Filament Slicer Print Head Wrench Extruder Nozzles SD Card Reader Starter 3D Printer Accessories ABS Storage Box Tool Set
Rating: 9.4/10
The Creality 3D Printer Tool Kit with Case is a fantastic all-in-one solution for anyone serious about 3D printing. This 35-piece set provides everything you need to build, maintain, and fix your printer. It includes a variety of wrenches, screwdrivers, pliers, and specialized tools like cleaning needles and extruder nozzles. The kit even comes with an SD card reader, making it easy to transfer your print files. Everything is neatly organized in a tough, portable ABS storage box.
What We Like:
- It has a huge collection of 35 different tools.
- The tools are made from strong 45 carbon steel.
- All the tools fit securely in their own spots in the case, so they won’t get damaged.
- The storage box is really tough and can handle bumps and different temperatures.
- It’s great for putting printers together, cleaning them, and fixing prints.
- The kit includes 8 different extruder nozzles to try out.
- An SD card reader is included for easy file transfer.
What Could Be Improved:
- Some of the smaller tools might feel a bit basic for advanced users.
- The instructions could be a little clearer for absolute beginners.
This comprehensive tool kit makes managing your 3D printer much easier. It’s a smart investment for both beginners and experienced makers.
2. Creality Ender 3 and Creality Slicer Tutorial for 3D printers and tips and tricks.: 3D print Tutorial Tips and Tricks for Creality Ender 3 and Creality Slicer

Rating: 9.3/10
Ready to dive into the exciting world of 3D printing with your Creality Ender 3? This comprehensive tutorial is your ultimate guide! We break down everything you need to know about using your Ender 3 printer and the Creality Slicer software. Whether you’re a complete beginner or looking to sharpen your skills, this resource will help you create amazing 3D prints.
What We Like:
- Clear, step-by-step instructions make learning easy.
- Covers both the printer setup and the slicer software.
- Offers helpful tips and tricks for better prints.
- Great for beginners getting started with 3D printing.
- Helps you understand how to prepare your models for printing.
What Could Be Improved:
- More advanced troubleshooting tips could be included.
- Visual aids like diagrams or short video clips would be beneficial.
- A section on common filament types and their settings would be useful.
This tutorial empowers you to confidently operate your Creality Ender 3 and master the Creality Slicer. Get ready to bring your ideas to life, one layer at a time!
3. Creality Official Ender 3 Extruder Upgrade Metal Drive Feeder 3D Printer Parts for Ender-3 Pro/3S/3 V2/3 Max CR-10/10S Gray Aluminum 1.75mm Filament Extruder

Rating: 8.7/10
Upgrade your 3D printer with the Creality Official Ender 3 Extruder Upgrade Metal Drive Feeder. This all-metal part replaces your original plastic extruder, giving your printer a much-needed boost in performance and reliability. It’s designed to work seamlessly with popular Creality models like the Ender-3 series and CR-10 series, feeding 1.75mm filament smoothly for a better printing experience.
What We Like:
- Made from high-quality aluminum alloy, this extruder is built to last.
- The adjustable bolt lets you fine-tune the pressure, ensuring better filament feeding.
- Its improved design prevents filament scraping for cleaner prints.
- Installation is straightforward, with all necessary parts and instructions included.
- Creality offers excellent after-sales support with 24/7 customer service.
What Could Be Improved:
- This is a DIY kit, meaning you need to assemble it yourself.
This metal extruder upgrade is a fantastic way to enhance your 3D printing. It offers a significant improvement over stock plastic parts and ensures more consistent, high-quality prints.
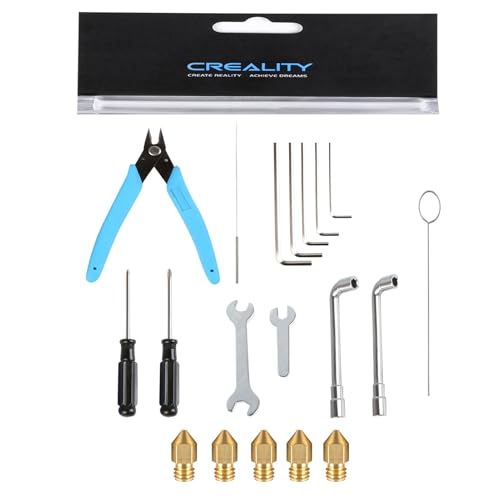
4. Creality Original Maintenance Common Tool Kit with 5pcs Brass Nozzles
Rating: 8.8/10
Keep your Creality Ender 3 series 3D printer running smoothly with the Creality Original Maintenance Common Tool Kit. This kit is designed to help you with all your printer’s maintenance needs. It comes with essential tools and even includes five brand-new brass nozzles. This means you’ll have everything you need to tackle common issues and keep your prints looking great.
What We Like:
- Includes a comprehensive set of maintenance tools like shear pliers, Allen wrenches, needle cleaners, socket wrenches, and a cross screwdriver.
- Comes with 5 high-quality brass nozzles, perfect for replacing worn-out ones or experimenting with different print settings.
- Designed specifically for a wide range of popular Creality Ender 3 models, ensuring a perfect fit and function.
- The new nozzle design uses advanced technology to make your 3D prints smoother and more detailed.
- All parts are genuine Creality products, so you know you’re getting reliable quality.
What Could Be Improved:
- The specific contents of the “Common Tool Kit” are only shown in the main diagram, which might not be immediately clear without looking at the picture.
- While it lists many Ender 3 models, it’s always good to double-check compatibility if you have a less common variant.
This tool kit is a must-have for any Ender 3 owner. It offers convenience and ensures your printer stays in top shape for amazing prints.
5. Creality Official Ender 3 V3 SE KE Hotend Upgrades Kit

Rating: 8.8/10
Ready to supercharge your Ender 3 V3 SE or KE 3D printer? This official Creality Hotend Upgrade Kit is designed for speed and reliability. It features a ceramic heating block that can reach 300°C, perfect for printing with a wide variety of materials. The quick-swap nozzle makes changes easy, and the all-metal design ensures durability. Get ready for faster prints and better results!
What We Like:
- Enables super-fast printing up to 600 mm/s.
- The ceramic heating block reaches 300°C for more material options.
- Quick-swap nozzles are easy to change.
- The all-metal design with a titanium alloy throat is very durable and prevents heat loss.
- It heats up quickly, reaching 200°C in just 40 seconds.
- The split design for heat dissipation helps keep things cool.
- Nickel-plated surface on the heating block is tough and looks good.
What Could Be Improved:
- You need to make sure the Teflon tube length is correct for your specific printer model (V3 KE or V3 SE).
- Proper first layer adhesion is crucial to avoid nozzle clogs, so you might need to adjust your settings.
This hotend upgrade is a fantastic way to boost your printer’s performance. You’ll experience faster speeds and greater versatility in the materials you can print.
Choosing the Best Slicer for Your Ender 3: A Beginner’s Guide
So, you’ve got an Ender 3 3D printer. That’s awesome! Now, to turn your digital designs into real-life objects, you need a special piece of software called a “slicer.” Think of it like a translator. It takes your 3D model (like a .STL file) and breaks it down into tiny layers that your Ender 3 can understand and print.
Choosing the right slicer can make a big difference in how your prints turn out. This guide will help you find the perfect one for your Ender 3.
Key Features to Look For
When you’re picking a slicer, keep these important features in mind:
- Ease of Use: For beginners, a simple and straightforward interface is key. You don’t want to get lost in complicated menus.
- Customization Options: As you get more comfortable, you’ll want to tweak settings. Look for slicers that let you adjust things like print speed, layer height, and infill.
- Support for Ender 3: Some slicers have pre-set profiles specifically for the Ender 3. This means you can start printing faster without a lot of trial and error.
- Preview Function: A good slicer lets you see a preview of your print layer by layer. This helps you spot potential problems before you start printing.
- Regular Updates: Software that is updated often usually means it’s being improved and bugs are being fixed.
Important Materials (Software Types)
Most slicers fall into two main categories:
- Free and Open-Source: These are great for beginners and those on a budget. They are often community-driven, meaning lots of people help make them better.
- Cura: This is probably the most popular slicer for Ender 3 users. It’s free, packed with features, and has tons of online support. Many Ender 3 owners start with Cura.
- PrusaSlicer: While originally made for Prusa printers, PrusaSlicer works very well with the Ender 3. It’s known for its advanced features and excellent print quality.
- Paid Slicers: These often offer more advanced tools and dedicated customer support. They can be a good choice for professionals or those who need very specific features. However, for most Ender 3 users, the free options are more than enough.
Factors That Improve or Reduce Quality
The slicer you choose and how you use it directly impact your print quality.
- Improving Quality:
- Layer Height: Smaller layer heights (like 0.1mm) create smoother prints but take longer.
- Infill: This is the internal structure of your print. More infill makes prints stronger but uses more filament and time.
- Print Speed: Printing too fast can lead to poor quality. Slower speeds usually result in better-looking prints.
- Cooling: Proper cooling helps prevent drooping and improves overhangs.
- Reducing Quality:
- Incorrect Settings: Using settings not suited for your filament or Ender 3 can cause issues like stringing or poor layer adhesion.
- Outdated Software: Older slicer versions might not have the latest optimizations for your printer.
- Ignoring Previews: Not checking the layer preview can lead to wasted filament on failed prints.
User Experience and Use Cases
Your experience with a slicer depends on your skill level and what you want to print.
- For Beginners: Cura is a fantastic starting point. Its user-friendly interface and vast community support make learning easy. You can quickly load a model, select basic Ender 3 settings, and start slicing.
- For Intermediate Users: Once you’re comfortable, you might explore PrusaSlicer. It offers more advanced settings that can help you achieve even better results, especially for complex models or specific material types.
- Use Cases:
- Small Figurines: You’ll want detailed settings and possibly supports.
- Functional Parts: Strength is important, so you’ll adjust infill and layer height for durability.
- Prototypes: Speed might be more important than perfect surface finish.
Choosing the right slicer is like picking the right tool for a job. Start with something simple, learn as you go, and don’t be afraid to experiment!
Frequently Asked Questions (FAQ) for Ender 3 Slicers
Q: What is the best free slicer for the Ender 3?
A: Cura is widely considered the best free slicer for the Ender 3. It’s easy to use and has many features.
Q: Do I need to pay for a slicer?
A: No, you don’t have to pay. Many excellent free slicers like Cura and PrusaSlicer work great with the Ender 3.
Q: How do I set up my Ender 3 in the slicer?
A: Most slicers have pre-made profiles for the Ender 3. You usually just select “Creality Ender 3” when setting up your printer.
Q: What is “layer height” and why does it matter?
A: Layer height is the thickness of each printed layer. Smaller layer heights make prints smoother but take longer. Bigger layer heights print faster but show more lines.
Q: What is “infill” in a slicer?
A: Infill is the internal support structure inside your 3D print. You can choose how much infill you want, from hollow (0%) to solid (100%).
Q: Can I use the same slicer for different filaments like PLA and ABS?
A: Yes, you can. Most slicers let you change settings for different filaments. You’ll need to adjust temperatures and cooling for each type.
Q: What is “support” in slicing?
A: Supports are temporary structures the slicer adds to print overhangs or bridges that would otherwise droop. You remove them after printing.
Q: How does print speed affect my Ender 3 prints?
A: Printing too fast can cause poor quality, like stringing or skipped steps. Printing slower usually gives better results but takes more time.
Q: Where can I find help if I have trouble with my slicer?
A: The Ender 3 community is huge! You can find help on forums, Reddit, and YouTube. Cura and PrusaSlicer also have their own support pages.
Q: Should I update my slicer software?
A: Yes, it’s a good idea to keep your slicer updated. Updates often fix bugs and add new features that can improve your printing.
In conclusion, every product has unique features and benefits. We hope this review helps you decide if it meets your needs. An informed choice ensures the best experience.
If you have any questions or feedback, please share them in the comments. Your input helps everyone. Thank you for reading.

Hi, I’m Larry Fish, the mind behind MyGrinderGuide.com.. With a passion for all things kitchen appliances, I created this blog to share my hands-on experience and expert knowledge. Whether it’s helping you choose the right tools for your culinary adventures or offering tips to make your kitchen more efficient, I’m here to guide you. My goal is to make your time in the kitchen not only easier but also enjoyable! Welcome to my world of kitchen mastery!