
Can you paint Ikea kitchen cabinets? Yes, you absolutely can! Painting your Ikea cabinets is a budget-friendly way to give your kitchen a fresh, new look without replacing the entire cabinetry. However, the secret to a long-lasting, professional-looking finish lies in meticulous preparation. This guide will walk you through every step, from selecting the right paint to mastering the prep work, ensuring a stunning ikea kitchen cabinet makeover.
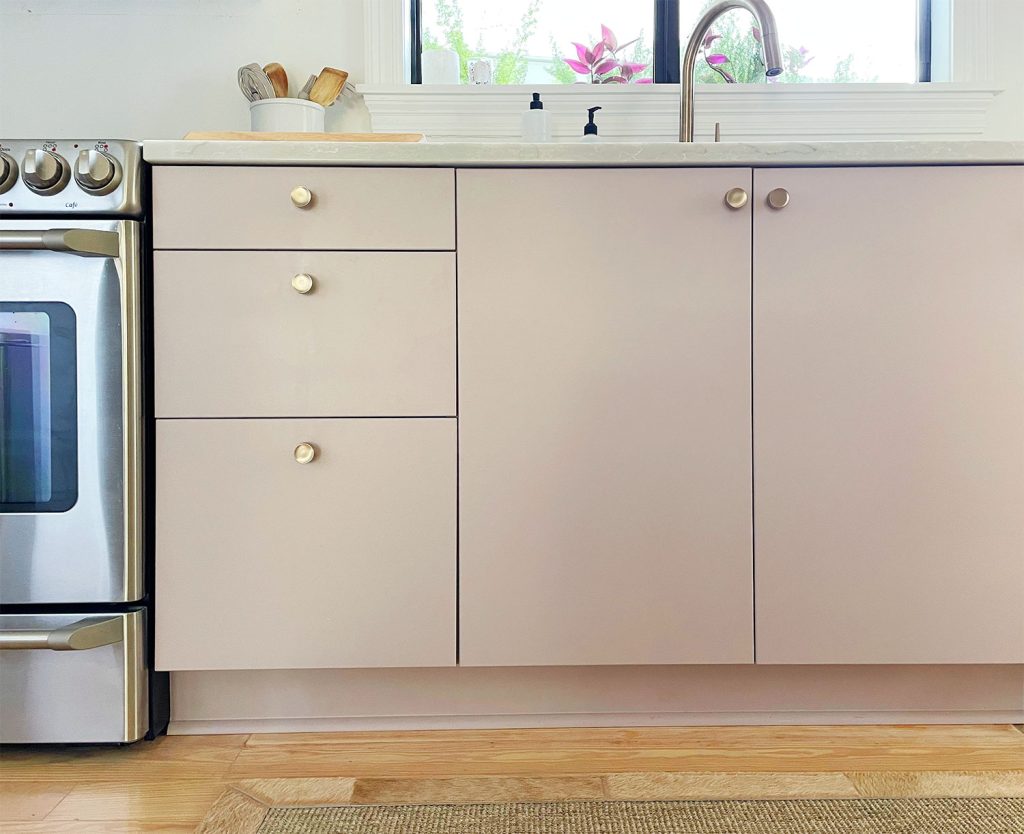
Image Source: www.younghouselove.com
Why Paint Ikea Kitchen Cabinets?
- Cost Savings: Replacing kitchen cabinets is expensive. Painting offers a significant cost reduction.
- Personalization: Choose any color you desire to match your style.
- Sustainability: Repurposing existing cabinets is environmentally friendly.
- Updated Look: Instantly refresh your kitchen’s aesthetic.
- Increased Home Value: A well-executed paint job can enhance your home’s appeal.
Deciphering Ikea Cabinet Materials
Before diving into the painting process, it’s vital to know what your Ikea cabinets are made of. Different materials require different preparation and painting techniques.
| Material | Characteristics | Paint Adhesion Challenges |
|---|---|---|
| Melamine | Smooth, durable, often found on older Ikea cabinets. | Very slick surface; paint doesn’t adhere easily. Requires a strong bonding primer. |
| Thermofoil | Vinyl layer heat-sealed to MDF; can peel or bubble with excessive heat/moisture. | Smooth, non-porous surface. Proper cleaning and sanding are crucial. Avoid harsh chemicals that could damage the thermofoil. |
| Laminate | Similar to melamine but potentially more textured. | Surface can be slick. Sanding helps create “tooth” for primer to grip. |
| Solid Wood/Veneer | Found on higher-end Ikea lines; easier to paint than synthetic materials. | May require wood filler to patch imperfections. Still needs sanding and priming for a smooth, even finish. |
| Foil | Thin layer of coating over particleboard. | Difficult to paint. Prone to peeling and bubbling if not properly prepped. May require extensive sanding or even replacement of doors. |
Assembling Your Arsenal: Materials & Tools
Gathering the right supplies is half the battle. Here’s what you’ll need for your diy ikea cabinet paint project:
- Cleaning Supplies:
- Degreaser (e.g., TSP, Krud Kutter)
- Clean cloths or rags
- Sanding Supplies:
- Sandpaper (120-grit, 220-grit)
- Sanding block or orbital sander
- Priming & Painting Supplies:
- Bonding primer (specifically for slick surfaces)
- Paint (see section on best paint for ikea cabinets)
- Paintbrushes (high-quality, angled for trim)
- Paint rollers (foam rollers for smooth finish)
- Paint tray
- Painter’s tape
- Safety Gear:
- Safety glasses
- Dust mask
- Gloves
- Optional but Recommended:
- Wood filler (for filling holes or imperfections)
- Caulk (for sealing gaps)
- Spray gun (for professional finish)
- Tack cloth (for removing dust)
- Shellac based primer (for stubborn surfaces)
The Cornerstone of Success: Prepping Ikea Cabinets for Paint
The prep work is the most critical stage in painting ikea cabinets. Don’t skip steps! Poor prep leads to peeling, chipping, and an overall unprofessional finish.
Step 1: Disassembly & Labeling
- Remove all doors, drawers, and hardware (knobs, pulls, hinges).
- Label each door and drawer with its corresponding cabinet location. Use painter’s tape and a permanent marker. This is crucial for reassembly!
- Consider taking photos before disassembly as a reference.
Step 2: Deep Cleaning
- Use a degreaser to thoroughly clean all surfaces. Pay extra attention to areas around handles and hinges where grease and grime accumulate.
- Rinse with clean water and allow to dry completely.
- This step removes contaminants that prevent paint adhesion.
Step 3: Sanding – Creating a “Tooth”
- Sanding roughens the surface, creating a “tooth” for the primer to grip.
- Use 120-grit sandpaper for the first pass, focusing on scuffing the surface rather than removing the existing finish entirely.
- Follow with 220-grit sandpaper for a smoother finish.
- For melamine and thermofoil, sanding is especially important. Be careful not to sand through the veneer!
- If you are painting ikea cabinet doors, take care to gently round off any sharp edges which helps prevent chipping.
Step 4: Dust Removal – A Pristine Surface
- After sanding, thoroughly remove all dust.
- Use a vacuum cleaner with a brush attachment, followed by a tack cloth.
- Dust particles trapped under the paint will create a bumpy, uneven finish.
Step 5: Filling Imperfections (Optional)
- If your cabinets have any holes, dents, or imperfections, fill them with wood filler.
- Allow the filler to dry completely, then sand it smooth and flush with the surrounding surface.
Step 6: Priming – The Bonding Agent
- Apply a high-quality bonding primer specifically designed for slick, non-porous surfaces. This is the most crucial step for painting ikea cabinets to ensure proper adhesion.
- Consider a shellac-based primer for the best adhesion, especially on melamine and thermofoil.
- Apply a thin, even coat of primer using a brush or roller.
- Allow the primer to dry completely according to the manufacturer’s instructions.
- Lightly sand the primed surface with 220-grit sandpaper for an ultra-smooth finish.
- Clean off any dust with a tack cloth.
The Art of Application: Painting Ikea Cabinet Doors
Now that the prep work is complete, it’s time to paint!
Step 1: Choosing the Best Paint for Ikea Cabinets
Selecting the right paint is critical for durability and aesthetics. Consider these factors:
Type of Paint:
- Acrylic Latex: Water-based, durable, easy to clean, low VOCs. Excellent for cabinets.
- Alkyd (Oil-Based): Durable, smooth finish, but higher VOCs, longer drying time, and requires mineral spirits for cleanup. Good for high-traffic areas but not as environmentally friendly.
- Acrylic Enamel: A hybrid that offers the durability of oil-based paints with the ease of use and lower VOCs of acrylic latex.
Sheen:
- Matte: Least reflective, hides imperfections well, but less durable and harder to clean.
- Eggshell/Satin: Slightly more reflective than matte, good balance of durability and cleanability. Popular choice for cabinets.
- Semi-Gloss: More reflective, very durable and easy to clean, but shows imperfections more readily.
- Gloss: Most reflective, extremely durable and easy to clean, but highlights imperfections.
Durability and Washability: Kitchen cabinets endure a lot of wear and tear. Choose a paint specifically designed for cabinets or furniture that can withstand frequent cleaning.
Here’s a table summarizing paint options:
| Paint Type | Pros | Cons | Recommended Sheen |
|---|---|---|---|
| Acrylic Latex | Durable, easy to clean, low VOCs, water-based | May require more coats than oil-based paints | Satin or Semi-Gloss |
| Alkyd (Oil-Based) | Very durable, smooth finish | High VOCs, long drying time, requires mineral spirits for cleanup | Satin or Semi-Gloss |
| Acrylic Enamel | Durable, good flow and leveling, easier cleanup than oil-based | Can be more expensive than standard acrylic latex | Satin or Semi-Gloss |
Step 2: Application Techniques
Brush vs. Roller vs. Sprayer:
- Brush: Best for detailed areas, corners, and touch-ups. Use a high-quality angled brush.
- Roller: Provides a smooth, even finish on flat surfaces. Use a foam roller for the best results.
- Sprayer: Delivers a professional, factory-like finish. Requires practice and proper ventilation.
Applying the Paint:
- Apply thin, even coats of paint. Avoid drips and runs.
- Allow each coat to dry completely according to the manufacturer’s instructions.
- Lightly sand between coats with 220-grit sandpaper for an ultra-smooth finish.
- Two to three coats of paint are usually necessary for full coverage and durability.
Step 3: Curing Time
- Allow the painted cabinets to cure completely before reassembling. Curing time can range from a few days to a week, depending on the paint.
- Curing allows the paint to fully harden and adhere to the surface, ensuring long-lasting durability.
Reassembly & Finishing Touches
- Carefully reattach the hardware (knobs, pulls, hinges).
- Rehang the doors and reinstall the drawers.
- Adjust hinges as needed to ensure proper alignment.
- Caulk any gaps between the cabinets and the walls for a seamless look.
- Clean up any spills or splatters.
Cost Considerations for Ikea Kitchen Cabinet Painting
The cost to paint Ikea kitchen cabinets depends on the size of your kitchen, the materials you use, and whether you hire a professional or do it yourself. Here’s a breakdown of potential costs:
| Item | DIY Cost Estimate | Professional Cost Estimate |
|---|---|---|
| Cleaning Supplies | \$20 – \$30 | Included in service |
| Sanding Supplies | \$15 – \$25 | Included in service |
| Primer | \$30 – \$50 | Included in service |
| Paint | \$50 – \$100 | Included in service |
| Brushes & Rollers | \$20 – \$40 | Included in service |
| Painter’s Tape | \$10 – \$20 | Included in service |
| Other (Wood filler) | \$10 – \$20 | Included in service |
| Total (DIY) | \$155 – \$285 | N/A |
| Professional Labor | N/A | \$1,000 – \$3,000+ |
Note: Professional costs vary greatly based on location and the complexity of the job. Get multiple quotes before hiring.
Troubleshooting Common Issues When Painting Ikea Cabinets
- Paint Peeling: Usually caused by inadequate surface preparation. Ensure thorough cleaning, sanding, and priming.
- Chipping: Can result from using the wrong type of paint or insufficient curing time. Use a durable paint formulated for cabinets and allow ample curing time.
- Uneven Finish: Often due to poor application techniques. Apply thin, even coats and sand between coats.
- Bubbling: Can occur if painting in direct sunlight or high humidity. Paint in a well-ventilated area with moderate temperature and humidity.
- Hardware Issues: Difficult to reinstall hardware after painting. Make sure to label and organize all hardware during disassembly.
Enhancing Your Ikea Kitchen Cabinet Makeover
Consider these additional enhancements to elevate your ikea kitchen cabinet makeover:
- New Hardware: Replacing outdated knobs and pulls can dramatically change the look of your cabinets.
- Under-Cabinet Lighting: Adds ambiance and improves task lighting.
- Backsplash: A new backsplash can complement your painted cabinets and tie the whole kitchen together.
- Countertops: While more expensive, new countertops can completely transform your kitchen.
- Cabinet Inserts: Add functionality and organization with pull-out shelves, drawer dividers, and spice racks.
Frequently Asked Questions (FAQ)
How long does it take to paint Ikea kitchen cabinets?
- How long this takes really depends on how big your kitchen is and how much work is involved. You should set aside at least 3 to 5 days to do it right. That gives you enough time for all the prep work, the actual painting, and letting the finish dry completely.
Can I spray paint Ikea kitchen cabinets?
- Yes, spray painting can provide a smooth, professional finish. Use a high-quality sprayer and follow the manufacturer’s instructions carefully. Proper ventilation and masking are essential.
Do I need to sand Ikea cabinets before painting?
- Yes, sanding is essential to create a “tooth” for the primer to grip. Even if the surface feels smooth, sanding is necessary.
What is the best primer for Ikea cabinets?
- A bonding primer specifically designed for slick, non-porous surfaces is recommended. Shellac-based primers are also excellent for adhesion.
How do I prevent paint from chipping on Ikea cabinets?
- Proper preparation is key. Thoroughly clean, sand, and prime the cabinets before painting. Use a durable paint formulated for cabinets and allow ample curing time.
Can I paint the inside of Ikea cabinets?
- Yes, you can paint the inside of the cabinets. Follow the same preparation and painting steps as for the exterior.
Is painting Ikea cabinets worth it?
- Yes! Ikea kitchen cabinet painting is a cost-effective way to update your kitchen and give it a fresh, new look.
Final Thoughts on Painting Ikea Kitchen Cabinets
Painting ikea cabinets is a rewarding project that can transform your kitchen on a budget. By following these steps and paying close attention to detail, you can achieve a professional-looking finish that you’ll enjoy for years to come. Remember, meticulous preparation is the key to success! Embrace the process, and prepare to be amazed at the transformation. You can create a truly unique and personalized kitchen through ikea cabinet refinishing.

Hi, I’m Larry Fish, the mind behind MyGrinderGuide.com.. With a passion for all things kitchen appliances, I created this blog to share my hands-on experience and expert knowledge. Whether it’s helping you choose the right tools for your culinary adventures or offering tips to make your kitchen more efficient, I’m here to guide you. My goal is to make your time in the kitchen not only easier but also enjoyable! Welcome to my world of kitchen mastery!