
Yes, you can absolutely paint the tile floors in your kitchen. However, you need to keep in mind that durability is a big deal. To get a finish that lasts, it takes careful preparation and the right products. Painting the floor yourself can be a cheap way to give your kitchen a fresh look, but it is important to understand exactly how it works and what to expect before you start.
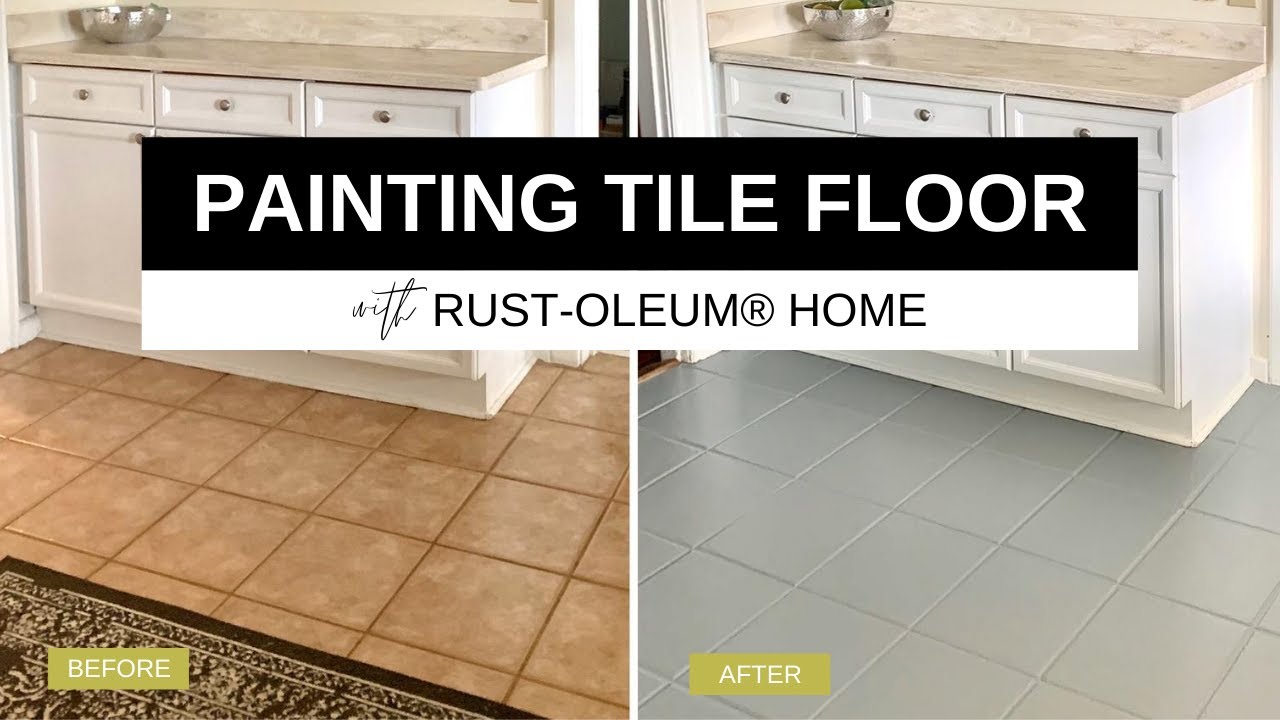
Image Source: i.ytimg.com
The Allure of Kitchen Tile Floor Painting
Tired of your outdated kitchen tile? Is replacing it too expensive or time-consuming? Kitchen tile floor painting offers a budget-friendly alternative. It’s a way to refresh your space without the mess and cost of a full renovation. Painting tile instead of replacing it can be a tempting option, but is it the right choice for you?
Advantages of Painting Tile Floors
- Cost-Effective: Painting is significantly cheaper than replacing tile.
- DIY Friendly: With proper preparation, most homeowners can tackle this project themselves.
- Quick Transformation: Painting offers a faster turnaround compared to a full renovation.
- Customizable: Choose any color and create unique patterns.
Disadvantages of Painting Tile Floors
- Durability Concerns: Painted tile is not as durable as new tile, especially in high-traffic areas.
- Maintenance: Painted floors require more careful cleaning and maintenance.
- Preparation is Key: Skimping on preparation can lead to peeling and chipping.
- Not a Permanent Solution: Painting is a temporary fix, not a long-term solution.
Deciding if Painting is Right for Your Kitchen
Before diving into kitchen tile floor painting, assess your situation. Consider the following:
- Traffic: Is your kitchen a high-traffic area? Painting may not be ideal for busy kitchens.
- Tile Condition: Are your tiles heavily damaged or cracked? Painting won’t fix structural issues.
- Budget: Compare the cost of painting to the cost of replacing the tile.
- Time Commitment: Painting requires time for preparation, painting, and curing.
- Expectations: Be realistic about the durability and lifespan of painted tile.
Getting Ready: How to Prepare Tile Floors for Painting
Proper preparation is crucial for a successful and durable kitchen tile floor painting project. Skipping steps will result in a poor finish that won’t last. Here’s a comprehensive guide:
1. Cleaning: The First Step
- Remove all items: Clear the entire area of furniture, appliances, and rugs.
- Sweep and Vacuum: Remove loose dirt, dust, and debris.
- Deep Clean: Use a strong degreaser to remove grease, grime, and stains. A TSP (trisodium phosphate) solution works well. Rinse thoroughly with clean water.
- Allow to Dry: Ensure the floor is completely dry before proceeding.
2. Repairing Damage
- Inspect the Tiles: Look for cracks, chips, or loose tiles.
- Repair Cracks: Use epoxy filler to repair any cracks or chips. Follow the manufacturer’s instructions for application and drying time.
- Re-Adhere Loose Tiles: If any tiles are loose, re-adhere them with tile adhesive.
- Allow Repairs to Cure: Give the repairs ample time to cure before moving on to the next step.
3. Etching or Priming
Painting ceramic tile floors, which are inherently smooth and non-porous, requires creating a surface that the paint can adhere to.
- Etching: Use an etching solution specifically designed for tile. This will create a slightly rough surface for better paint adhesion. Follow the manufacturer’s instructions carefully.
- Rinsing: Rinse the floor thoroughly with clean water after etching to remove any residue.
Priming: Alternatively, use a high-quality bonding primer designed for slick surfaces. This will create a base coat for the paint to adhere to.
Considerations When Deciding Whether to Etch or Prime:
Factor Etching Priming Adhesion Creates a physical bond by roughening the surface. Relies on chemical adhesion; effectiveness varies by primer quality. Surface Prep Requires careful rinsing to remove etching residue. Requires thorough cleaning but eliminates the need for harsh chemicals. Safety Involves handling potentially hazardous chemicals; requires proper ventilation. Generally safer, especially with water-based primers. Ease of Use Can be more complex and time-consuming. Simpler application with a brush or roller. Suitability Best for extremely glossy or smooth tiles. Suitable for most tile surfaces after proper cleaning.
4. Taping
- Protect Surfaces: Use painter’s tape to protect baseboards, cabinets, and other surfaces you don’t want to paint.
- Create Clean Lines: Ensure the tape is applied smoothly and securely to prevent paint from bleeding underneath.
Selecting the Best Paint for Kitchen Tile
Choosing the right paint is crucial for durability and longevity. Not all paints are created equal when it comes to kitchen tile floor painting. Here’s what to look for in the best paint for kitchen tile:
Types of Paint
- Epoxy Paint: Epoxy paint for tile floors is a two-part system that creates a hard, durable finish. It’s resistant to stains, chemicals, and abrasion, making it a good choice for kitchens.
- Acrylic Latex Paint with a Polyurethane Topcoat: Use a high-quality acrylic latex paint specifically designed for floors. Apply several coats of a clear polyurethane topcoat for added protection.
- Specialty Tile Paint: Some manufacturers offer paints specifically formulated for tile. These paints often have built-in primers and sealers.
Key Features to Look For
- Durability: Choose a paint that is resistant to scratches, scuffs, and stains.
- Adhesion: The paint should adhere well to tile surfaces, even with foot traffic.
- Water Resistance: Look for a paint that is water-resistant to prevent moisture damage.
- Ease of Application: Consider the ease of application when choosing a paint. Some paints are easier to apply than others.
- VOC Content: Opt for a low-VOC (volatile organic compounds) paint to minimize fumes and environmental impact.
Color Selection
- Consider Your Existing Decor: Choose a color that complements your existing cabinets, countertops, and appliances.
- Light vs. Dark: Lighter colors can make a small kitchen feel larger, while darker colors can add drama.
- Test Colors: Before committing to a color, test it in a small, inconspicuous area to see how it looks in your kitchen’s lighting.
Painting the Tile Floor: Step-by-Step
With the preparation complete and the right paint in hand, it’s time to start painting. Follow these steps for a professional-looking finish.
1. Apply the First Coat
- Use a Brush or Roller: Use a high-quality brush for edges and corners, and a roller for the main surface.
- Apply Thin, Even Coats: Avoid applying the paint too thickly, as this can lead to drips and uneven drying.
- Follow the Manufacturer’s Instructions: Pay attention to the paint’s recommended drying time between coats.
2. Apply Additional Coats
- Allow the First Coat to Dry Completely: Before applying the second coat, ensure the first coat is completely dry.
- Apply Additional Coats as Needed: Depending on the paint’s coverage, you may need to apply two or three coats for full opacity.
3. Painting Grout Lines on Tile Floor
- Option 1: Paint the Entire Floor: You can paint over the grout lines with the same color as the tiles for a uniform look.
- Option 2: Highlight the Grout Lines: Use a different color paint or a grout pen to highlight the grout lines for a more defined look. If using a grout pen, apply after the final coat of paint has dried and cured.
4. Apply a Protective Topcoat
- Choose a Polyurethane Topcoat: Apply several coats of a clear polyurethane topcoat to protect the painted surface from scratches, scuffs, and stains.
- Apply Thin, Even Coats: Apply the topcoat in thin, even coats, allowing each coat to dry completely before applying the next.
5. Curing Time
- Allow the Paint to Cure: Curing is the process where the paint hardens and reaches its full durability. Follow the manufacturer’s instructions for curing time, which can be several days.
- Avoid Heavy Traffic: During the curing period, avoid heavy traffic on the painted floor.
Maintaining Your Painted Tile Floor
Maintaining a DIY painted tile floor kitchen requires extra care compared to unpainted tile. Here are some tips to keep your painted floors looking their best:
- Regular Cleaning: Sweep or vacuum regularly to remove dirt and debris.
- Gentle Cleaning Products: Use mild, non-abrasive cleaning products to avoid damaging the paint.
- Avoid Harsh Chemicals: Avoid using harsh chemicals, bleach, or ammonia-based cleaners.
- Use Rugs and Mats: Place rugs and mats in high-traffic areas to protect the painted surface.
- Clean Spills Immediately: Wipe up spills immediately to prevent staining.
- Touch-Ups: Be prepared to touch up any chips or scratches as needed.
Tile Floor Paint Durability: What to Expect
While kitchen tile floor painting can be a cost-effective way to refresh your kitchen, it’s important to have realistic expectations about tile floor paint durability.
- Not as Durable as New Tile: Painted tile is not as durable as new tile and will likely require more maintenance.
- Lifespan: The lifespan of painted tile can vary depending on the quality of the paint, the preparation, and the amount of traffic.
- High-Traffic Areas: Expect more wear and tear in high-traffic areas.
- Potential for Chipping and Peeling: Chipping and peeling are common issues with painted tile, especially if the preparation was not done properly.
Alternatives to Painting Tile
If you’re concerned about the durability of painted tile, consider these alternative options:
- Tile Resurfacing: Tile resurfacing involves applying a new coating over the existing tile. This can be a more durable option than painting.
- Peel-and-Stick Tile: Peel-and-stick tile is a DIY-friendly option that is easy to install and remove.
- Laminate Flooring: Laminate flooring is a durable and affordable option that can mimic the look of tile.
- Vinyl Flooring: Vinyl flooring is a waterproof and stain-resistant option that is easy to clean.
- Replacing the Tile: While more expensive and time-consuming, replacing the tile is the most durable and long-lasting option.
FAQ: Kitchen Tile Floor Painting
Can I paint over existing grout?
Yes, you can paint over existing grout. However, you may need to apply multiple coats for full coverage.
How long does painted tile last?
The lifespan of painted tile can vary depending on the quality of the paint, the preparation, and the amount of traffic. It can last from 1-5 years, but proper maintenance can help prolong its lifespan.
What is the best type of paint to use on tile floors?
Epoxy paint or high-quality acrylic latex paint with a polyurethane topcoat are good options for tile floors.
Is it easy to paint tile floors?
With proper preparation and the right materials, painting tile floors can be a DIY-friendly project.
How do I clean painted tile floors?
Clean painted tile floors with mild, non-abrasive cleaning products and avoid harsh chemicals.
Can I use a stencil on painted tile floors?
Yes, you can use a stencil to create patterns on painted tile floors.
Does painting tile add value to my home?
While painting tile can improve the appearance of your kitchen, it may not significantly increase the value of your home. It is generally seen as a cosmetic upgrade rather than a permanent improvement.
How long does it take for the paint to dry on tile floors?
Drying time varies depending on the type of paint. Always follow the manufacturer’s instructions, but generally, allow 24 hours between coats and several days for the paint to fully cure.
Can I paint over glazed ceramic tile?
Yes, you can paint over glazed ceramic tile, but proper preparation, including cleaning, etching or priming, is crucial for adhesion.
What if the painted floor starts to peel?
If the painted floor starts to peel, sand down the affected area, clean it thoroughly, and apply a new coat of paint and topcoat.

Hi, I’m Larry Fish, the mind behind MyGrinderGuide.com.. With a passion for all things kitchen appliances, I created this blog to share my hands-on experience and expert knowledge. Whether it’s helping you choose the right tools for your culinary adventures or offering tips to make your kitchen more efficient, I’m here to guide you. My goal is to make your time in the kitchen not only easier but also enjoyable! Welcome to my world of kitchen mastery!