
Are you thinking about caulking your kitchen backsplash? The answer is yes, you can definitely do it yourself. This guide will show you the right way to get the job done so you don’t make any common mistakes. We’ll explain exactly which caulk to buy, how to put it on, and how to make sure water stays out.
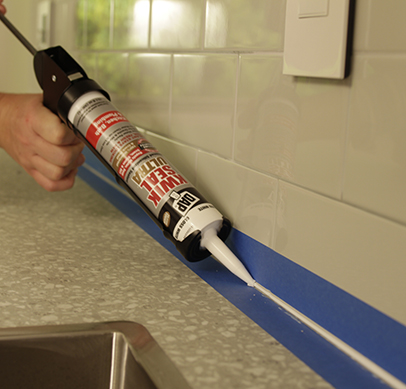
Image Source: www.dap.com
Why Caulking Your Kitchen Backsplash is Important
Caulking kitchen backsplash isn’t just for looks. It’s a vital step in protecting your walls and keeping your kitchen clean. The main reasons to caulk are:
- Preventing water damage: Kitchens see a lot of water. Splashes from the sink can seep behind the backsplash if there’s no caulk. This leads to mold, mildew, and damage to your walls.
- Sealing gaps: Caulk seals the gaps between the backsplash and the countertop, as well as where the backsplash meets the wall. This keeps out dirt, food, and grime.
- Improving appearance: A clean, smooth bead of caulk gives your backsplash a finished, professional look.
Choosing the Right Kitchen Backsplash Caulk
Picking the right kitchen backsplash caulk is important. There are different types, and each works best for different situations. Here are the main types:
- Silicone Caulk: This is a popular choice for kitchens. It’s waterproof, flexible, and resists mold and mildew. Silicone is great for areas that get wet often.
- Acrylic Latex Caulk with Silicone: This type is easier to apply and clean up than pure silicone. It’s also paintable, which can be useful if you want to match the caulk to your wall color. It’s not as waterproof as silicone, so it’s better for areas that don’t get a lot of water.
- Acrylic Caulk: This is the least expensive option, but it’s also the least durable. It’s not waterproof and can shrink and crack over time. Avoid using it in areas that get wet or see a lot of use.
Here’s a quick guide to help you choose:
| Caulk Type | Pros | Cons | Best For |
|---|---|---|---|
| Silicone | Waterproof, flexible, mold and mildew resistant, long-lasting | Can be difficult to apply smoothly, not paintable | Areas that get wet a lot, like around the sink |
| Acrylic Latex with Silicone | Easier to apply and clean up than silicone, paintable, good flexibility | Not as waterproof as silicone | Areas that don’t get a lot of water, where you want to paint the caulk |
| Acrylic | Inexpensive, paintable | Not waterproof, can shrink and crack, not very durable | Not recommended for kitchen backsplashes |
The best caulk for backsplash is usually 100% silicone caulk or a high-quality acrylic latex caulk with added silicone. Always read the label to make sure the caulk is suitable for kitchen use and is mold and mildew resistant.
Tools You’ll Need for Caulking Kitchen Backsplash
Before you start, gather all the tools you’ll need. This will make the job go much smoother. Here’s a list:
- Caulk gun: A good quality caulk gun makes application easier and more controlled.
- Caulk: Choose the right type of caulk for your project.
- Caulk remover tool or utility knife: For removing old caulk.
- Scraper: To help remove old caulk residue.
- Cleaning supplies: Cleaner, sponge, and cloths to clean the area before and after caulking.
- Painter’s tape: To create clean lines.
- Caulk smoothing tool or finger: To smooth the caulk bead.
- Paper towels: For wiping up excess caulk.
- Safety glasses: To protect your eyes.
- Gloves: To keep your hands clean.
Preparing the Area for Caulking
Proper preparation is key to a successful caulking job. If you skip this step, the caulk won’t adhere properly, and you’ll end up with leaks and a messy look.
Removing Old Backsplash Caulk
If you’re re-caulking, you’ll need to remove the old caulk first. Here’s how:
- Soften the old caulk: Use a heat gun (on a low setting) or a hairdryer to soften the old caulk. This makes it easier to remove. Be careful not to overheat the surrounding surfaces.
- Cut through the caulk: Use a caulk remover tool or a utility knife to carefully cut along the edges of the caulk bead. Be careful not to damage the backsplash or countertop.
- Peel away the caulk: Use pliers or your fingers to peel away the old caulk. If it’s stubborn, try using a scraper.
- Remove residue: Use a scraper or a stiff brush to remove any remaining caulk residue. You can also use a caulk remover solvent to soften the residue.
- Clean the surface: Use a cleaner and a sponge to clean the area thoroughly. Make sure to remove any dirt, grease, or mildew.
- Dry the surface: Let the area dry completely before applying new caulk.
Cleaning and Taping the Area
Even if you don’t have old caulk to remove, you still need to clean the area before caulking.
- Clean the surfaces: Use a cleaner and a sponge to clean the backsplash, countertop, and wall. Remove any dirt, grease, or grime.
- Dry the surfaces: Let the area dry completely.
- Apply painter’s tape: Apply painter’s tape along the edges of the backsplash and countertop, leaving a small gap for the caulk. This will create clean, straight lines and protect the surrounding surfaces.
How to Apply Caulk to Backsplash
Now it’s time to apply the caulk. This takes practice, but with these tips, you’ll get a professional-looking result.
Loading the Caulk Gun
- Prepare the caulk tube: Cut the tip of the caulk tube at a 45-degree angle. The size of the opening will determine the size of the caulk bead. Start with a small opening and make it larger if needed.
- Puncture the seal: Use a long nail or wire to puncture the seal inside the caulk tube.
- Load the caulk tube: Place the caulk tube into the caulk gun.
- Squeeze the trigger: Squeeze the trigger until the caulk starts to come out of the nozzle.
Applying the Caulk Bead
- Position the caulk gun: Hold the caulk gun at a 45-degree angle to the surface.
- Apply steady pressure: Squeeze the trigger and move the caulk gun slowly and steadily along the joint. Apply even pressure to create a consistent bead of caulk.
- Overlap slightly: Overlap each section of the caulk bead slightly to ensure a complete seal.
- Avoid air bubbles: Try to avoid trapping air bubbles in the caulk bead. If you see any, smooth them out with your finger or a caulk smoothing tool.
Smoothing the Caulk
Smoothing the caulk is essential for a professional look.
- Wet your finger or tool: Dip your finger or a caulk smoothing tool in water or mineral spirits. This will prevent the caulk from sticking to your finger or tool.
- Smooth the bead: Run your finger or the smoothing tool along the caulk bead, applying gentle pressure. This will smooth the caulk and press it into the joint.
- Wipe away excess caulk: Wipe away any excess caulk with a damp cloth or paper towel.
- Repeat as needed: Repeat the smoothing process until the caulk bead is smooth and even.
Backsplash Caulking Tips
Here are some extra backsplash caulking tips to help you get the best results:
- Work in small sections: Don’t try to caulk the entire backsplash at once. Work in small sections (about 2-3 feet long) to keep the caulk from drying out before you can smooth it.
- Use a consistent speed and pressure: Maintain a consistent speed and pressure when applying the caulk to create a uniform bead.
- Don’t apply too much caulk: It’s better to apply too little caulk than too much. You can always add more, but it’s harder to remove excess caulk.
- Clean up mistakes quickly: If you make a mistake, clean it up immediately with a damp cloth or paper towel.
- Let the caulk dry completely: Allow the caulk to dry completely before exposing it to water. Check the manufacturer’s instructions for drying time. Usually, it takes about 24 hours.
- Use mineral spirits for cleanup: Mineral spirits are effective for cleaning up silicone caulk. Use a clean cloth to wipe away any residue.
Common Caulking Mistakes to Avoid
- Using the wrong type of caulk: Choosing the wrong caulk can lead to leaks, cracks, and mold growth.
- Not preparing the surface properly: Failing to remove old caulk, clean the surface, or tape the area will result in poor adhesion and a messy look.
- Applying too much or too little caulk: Applying too much caulk can be difficult to smooth, while applying too little won’t create a proper seal.
- Not smoothing the caulk: Smoothing the caulk is essential for a professional look and a watertight seal.
- Exposing the caulk to water too soon: Allowing the caulk to dry completely is crucial for proper curing and adhesion.
Sealing Backsplash Edges to Prevent Leaks
Focus on sealing backsplash edges to prevent leaks. Pay extra attention to the areas where the backsplash meets the countertop and the wall. These are the most vulnerable areas for water damage. Make sure the caulk bead is continuous and even in these areas.
Different Types of Caulk Guns for Backsplash
Choosing the right caulk gun is important for a smooth and efficient caulking job. Here are the main types of caulk guns:
| Type of Caulk Gun | Pros | Cons | Best For |
|---|---|---|---|
| Drip-Free Caulk Gun | Prevents caulk from oozing out when you release the trigger, provides more control, reduces waste | More expensive than standard caulk guns | Precise applications, reducing mess and waste |
| Ratchet Caulk Gun | Inexpensive, easy to use, suitable for light-duty tasks | Less control over caulk flow, can be tiring to use for large projects | Small projects |
| Smooth Rod Caulk Gun | Provides smoother and more consistent caulk flow compared to ratchet guns, less tiring to use | More expensive than ratchet guns | Medium-sized projects |
| Battery-Powered Caulk Gun | Provides consistent caulk flow with minimal effort, ideal for large projects, adjustable speed settings for precise applications | Most expensive type of caulk gun, requires batteries, can be heavy | Large projects, professionals who need consistent and precise caulk flow |
Frequently Asked Questions (FAQ)
-
What is the best way to remove old caulk from my backsplash?
The best way to remove old caulk is to soften it with heat, cut along the edges with a utility knife or caulk remover tool, peel it away, and then scrape off any remaining residue.
* Can I paint over caulk on my backsplash?Yes, you can paint over acrylic latex caulk. Silicone caulk is not paintable.
* How long should I wait before exposing the caulked backsplash to water?Wait at least 24 hours, or according to the manufacturer’s instructions, before exposing the caulked backsplash to water.
* What causes caulk to crack or peel?Caulk can crack or peel due to using the wrong type of caulk, not preparing the surface properly, or movement in the building.
* How often should I re-caulk my kitchen backsplash?You should re-caulk your kitchen backsplash every 3-5 years, or as needed, if you notice cracks, gaps, or mold growth.
* What kind of caulk do professionals use?Professionals often use high-quality 100% silicone caulk for its durability and waterproof properties.
By following these steps and avoiding common mistakes, you can successfully caulk your kitchen backsplash and protect your walls from water damage. This simple project can make a big difference in the look and longevity of your kitchen.

Hi, I’m Larry Fish, the mind behind MyGrinderGuide.com.. With a passion for all things kitchen appliances, I created this blog to share my hands-on experience and expert knowledge. Whether it’s helping you choose the right tools for your culinary adventures or offering tips to make your kitchen more efficient, I’m here to guide you. My goal is to make your time in the kitchen not only easier but also enjoyable! Welcome to my world of kitchen mastery!