
Changing a blade on a grinder is a task that requires careful attention to safety procedures. This guide provides detailed instructions on how to perform an angle grinder blade replacement and other grinding wheel changes safely and effectively.
Grinders are powerful tools, and improperly changing their blades or discs can lead to serious injury. Whether you need to remove grinding wheel, install cutting disc grinder, or are just changing abrasive wheel grinder, following the correct steps is crucial. This comprehensive guide provides detailed grinder blade change instructions and emphasizes the importance of safety at every stage.
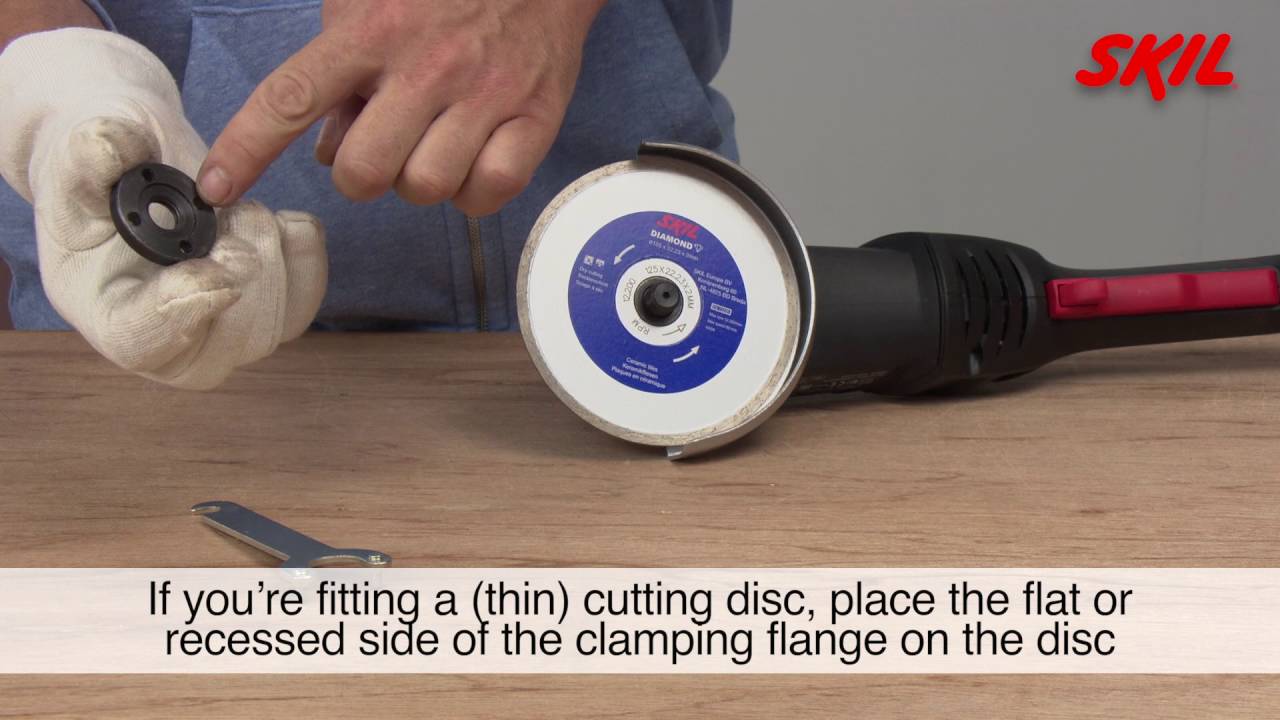
Image Source: i.ytimg.com
Prioritizing Your Protection: Gear and Preparation
Before you even pick up your grinder, you need to think about safety. Let’s go over the gear you’ll need to wear and how to get your workspace ready so you can work safely.
Essential Safety Gear
- Eye Protection: Safety glasses or a face shield are absolutely non-negotiable. Flying debris is a common hazard when working with grinders.
- Hearing Protection: Grinders are loud. Earplugs or earmuffs will protect your hearing from long-term damage.
- Gloves: Heavy-duty work gloves will protect your hands from sparks, heat, and sharp edges.
- Dust Mask or Respirator: Grinding creates a lot of dust. A dust mask is sufficient for some materials, but a respirator is better for hazardous materials like lead paint or certain types of metal.
- Apron or Overalls: Protect your clothing and skin from sparks and debris.
Preparing Your Work Area
- Cleanliness: Ensure your workspace is clean and free of clutter. This reduces the risk of tripping or knocking things over.
- Lighting: Good lighting is essential for seeing what you’re doing. Use a work light if necessary.
- Ventilation: If working indoors, ensure adequate ventilation to prevent the buildup of dust and fumes.
- Fire Safety: Keep a fire extinguisher nearby, especially when grinding metal. Sparks can easily ignite flammable materials.
Gather Your Tools: A Necessary Step
Before beginning the angle grinder blade replacement, having the necessary tools readily available will streamline the process and help prevent accidents.
Required Tools
- Grinder Wrench (Spanner Wrench): This specialized wrench is designed to loosen and tighten the lock nut that secures the blade or disc. Make sure you have the correct size wrench for your grinder.
- Grinder Blade Removal Tool (Optional): While the grinder wrench is usually sufficient, a specialized removal tool can be helpful for stubborn or stuck blades.
- Soft Mallet or Hammer (Optional): A soft mallet can be used to gently tap the lock nut loose if it’s particularly tight. Avoid using a metal hammer directly on the nut, as this can damage it.
- Clean Rags: These are useful for wiping down the grinder and cleaning the blade or disc before installation.
Inspect Your Grinder
Before you start, give your grinder a quick check:
- Power Cord: Ensure the power cord is in good condition and not frayed or damaged.
- Switch: Test the on/off switch to make sure it functions properly.
- Guards: Make sure the safety guard is securely attached and in good condition.
- Lock Nut and Spindle: Check for any signs of damage or wear on the lock nut and spindle.
Steps for Safe Grinder Blade Removal
Now we get to the core of it: how to remove grinding wheel safely and correctly.
Power Down and Unplug
- Disconnect: This is the most important step! Always disconnect the grinder from the power source before making any adjustments or changes. This prevents accidental activation of the tool, which can cause serious injury.
Locate the Spindle Lock
- Spindle Lock Button: Most angle grinders have a spindle lock button. This button locks the spindle in place, preventing it from rotating while you loosen the lock nut.
- Location: The spindle lock button is usually located near the gear housing of the grinder. Consult your grinder’s manual if you’re unsure of its location.
Engaging the Spindle Lock
- Depress the Button: Press and hold the spindle lock button.
- Rotate the Disc: While holding the button, gently rotate the blade or disc by hand until the spindle lock engages. You should feel or hear a click when the spindle is locked.
Loosening the Lock Nut
- Position the Wrench: Insert the grinder wrench into the slots on the lock nut.
- Direction: Turn the wrench in the correct direction to loosen the nut. The direction may vary depending on the grinder model, but it’s usually clockwise to loosen. Refer to your grinder’s manual for specific instructions.
- Apply Pressure: Apply steady pressure to the wrench. If the nut is stuck, try tapping the wrench gently with a soft mallet to help break it free.
Removing the Blade or Disc
- Unscrew the Nut: Once the lock nut is loosened, unscrew it completely by hand.
- Remove the Flange: Remove the outer flange that holds the blade or disc in place.
- Take Out the Old Blade: Carefully remove the old blade or disc from the spindle.
- Inspect Components: Examine the spindle and flanges for any signs of wear or damage. Clean them with a clean rag if necessary.
Installing Your New Blade: A Step-by-Step Guide
Now, let’s focus on how to install cutting disc grinder or other types of blades safely.
Choosing the Right Blade
- Diameter: Ensure the new blade or disc is the correct diameter for your grinder. Using a blade that is too large or too small can be dangerous.
- Arbor Size: Make sure the arbor size (the hole in the center of the blade) matches the spindle size on your grinder.
- Material: Select a blade that is appropriate for the material you will be grinding or cutting. Using the wrong type of blade can lead to poor performance and increased risk of injury.
Mounting the New Blade
- Inner Flange: Place the inner flange onto the spindle. Make sure it is properly seated.
- Position the Blade: Carefully position the new blade or disc onto the spindle, ensuring it sits flush against the inner flange.
- Outer Flange: Place the outer flange onto the spindle, aligning it with the blade.
- Lock Nut: Screw the lock nut onto the spindle by hand.
Tightening the Lock Nut
- Engage the Spindle Lock: Press and hold the spindle lock button.
- Tighten with Wrench: Use the grinder wrench to tighten the lock nut securely. The direction may vary depending on the grinder model, but it’s usually counter-clockwise to tighten. Refer to your grinder’s manual.
- Proper Torque: Tighten the nut firmly, but avoid over-tightening. Over-tightening can damage the nut or spindle.
Final Checks Before Use
- Rotation: Rotate the blade or disc by hand to ensure it spins freely and does not wobble.
- Guard: Make sure the safety guard is securely attached and adjusted to the correct position.
- Clearance: Check that the blade or disc has adequate clearance and does not rub against any part of the grinder.
- Test Run: Before starting your project, perform a brief test run in a safe area to ensure the grinder is functioning properly.
Troubleshooting Common Problems
Sometimes, things don’t go as planned. Here’s what to do if you encounter common issues during the grinder disc change process:
How to Remove a Stuck Grinder Disc
- Penetrating Oil: Apply penetrating oil to the threads of the lock nut and let it sit for a few minutes to help loosen any rust or corrosion.
- Soft Mallet: Gently tap the lock nut with a soft mallet to help break it free.
- Heat: If the nut is still stuck, you can try applying heat to the nut with a heat gun or torch. Be careful not to overheat the nut, as this can damage it.
- Specialized Tools: Consider using a specialized grinder blade removal tool designed for removing stuck blades or discs.
- Professional Help: If you’ve tried everything and the nut is still stuck, it may be best to take the grinder to a professional for assistance.
Stripped or Damaged Lock Nut
- Replacement: If the lock nut is stripped or damaged, it must be replaced. Do not attempt to use a damaged lock nut, as this can be dangerous.
- Proper Size: Ensure you purchase a replacement lock nut that is the correct size and thread for your grinder.
Spindle Lock Failure
- Inspection: Inspect the spindle lock mechanism for any signs of damage or wear.
- Cleaning: Clean the spindle lock mechanism with compressed air to remove any dirt or debris.
- Repair: If the spindle lock is not functioning properly, it may need to be repaired or replaced.
Grinder Blade Care and Maintenance
Proper care and maintenance will extend the life of your blades and ensure safe operation.
Storage Tips
- Dry Place: Store blades in a dry place to prevent rust and corrosion.
- Protective Case: Store blades in a protective case or container to prevent damage.
- Avoid Dropping: Avoid dropping blades, as this can cause them to crack or shatter.
Cleaning Your Blades
- Wire Brush: Use a wire brush to clean blades after each use to remove any debris or buildup.
- Solvent: Use a solvent to remove any grease or oil from the blades.
Inspecting Blades for Wear
- Cracks: Check blades for any cracks or chips before each use. Discard any blades that are damaged.
- Wear: Monitor the wear of the blade. Replace blades when they become worn down or lose their cutting ability.
Safety Reminders
- Always disconnect the grinder from the power source before making any adjustments or changes.
- Wear appropriate personal protective equipment, including eye protection, hearing protection, gloves, and a dust mask or respirator.
- Use the correct type of blade for the material you will be grinding or cutting.
- Inspect blades for damage before each use.
- Do not over-tighten the lock nut.
- Keep your work area clean and well-lit.
- Never use a grinder with a damaged power cord or switch.
- If you are unsure about any aspect of changing a blade or disc, consult your grinder’s manual or seek professional assistance.
- Be aware of your surroundings and keep bystanders at a safe distance.
Frequently Asked Questions (FAQ)
Q: What is the best way to store grinder blades?
A: Store grinder blades in a dry, protective case to prevent rust, corrosion, and physical damage.
Q: Can I use any blade on my angle grinder?
A: No, always use a blade that is specifically designed for your angle grinder’s size and arbor. Check your grinder’s manual for the correct specifications.
Q: What should I do if my grinder blade gets stuck?
A: Apply penetrating oil, gently tap the lock nut with a soft mallet, or use a specialized grinder blade removal tool. If it’s still stuck, seek professional assistance.
Q: Who is responsible if I injure myself while changing a grinder blade?
A: You are responsible for your own safety. Always follow safety guidelines and manufacturer’s instructions to prevent injury.
Q: Can I use a damaged blade?
A: Absolutely not. Discard any blades that are cracked, chipped, or show signs of wear.
By following these detailed instructions and prioritizing safety, you can confidently and effectively change blades on your grinder and ensure a safe working environment.

Hi, I’m Larry Fish, the mind behind MyGrinderGuide.com.. With a passion for all things kitchen appliances, I created this blog to share my hands-on experience and expert knowledge. Whether it’s helping you choose the right tools for your culinary adventures or offering tips to make your kitchen more efficient, I’m here to guide you. My goal is to make your time in the kitchen not only easier but also enjoyable! Welcome to my world of kitchen mastery!