
How do you change a blade on an angle grinder? The process involves unplugging the grinder, locking the spindle, removing the old blade using a wrench, and installing the new blade, ensuring it’s properly secured before use. This comprehensive guide covers angle grinder blade replacement in detail, ensuring your angle grinder maintenance is safe and efficient.
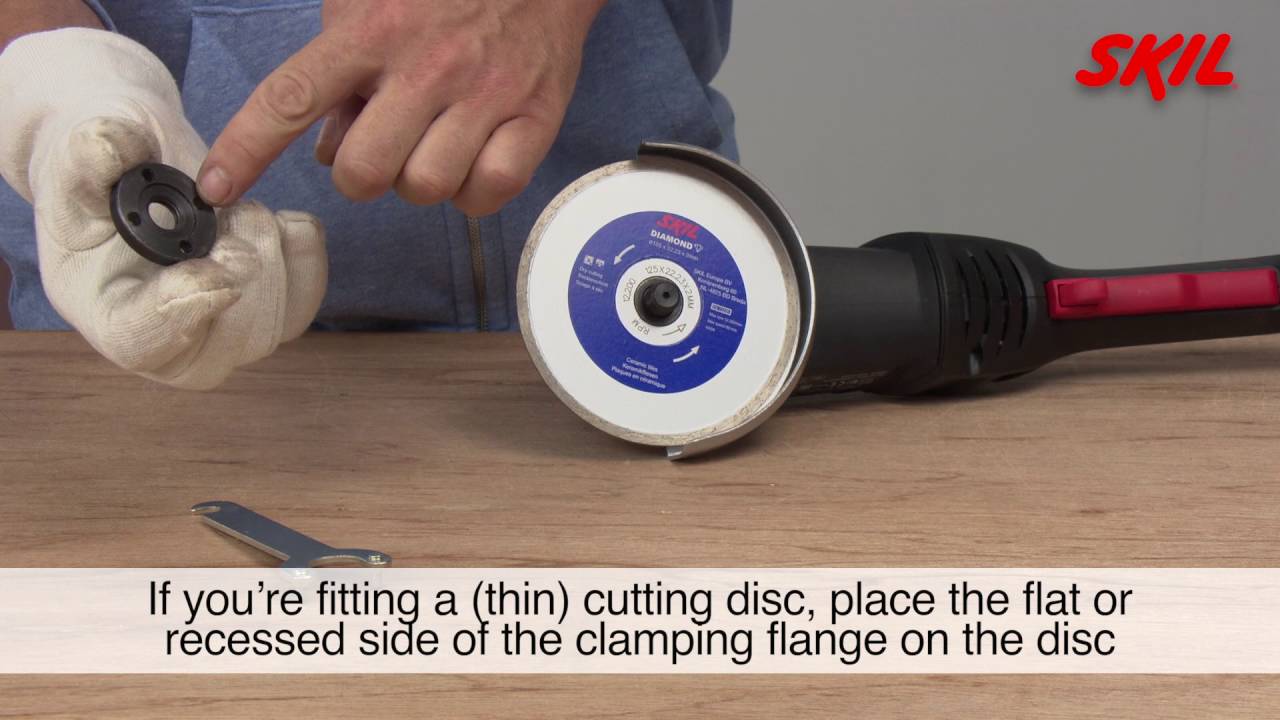
Image Source: i.ytimg.com
Angle Grinder Blade Replacement: A Step-by-Step Approach
Changing the blade on an angle grinder might seem daunting, but it’s a simple task when broken down into clear, manageable steps. It’s a crucial part of angle grinder maintenance that ensures the tool’s optimal performance and your safety. Replacing grinding disc or changing cutting wheel should be done with utmost care.
Prioritizing Angle Grinder Safety
Before you even think about touching your angle grinder, safety must be your top priority. Angle grinders are powerful tools, and improper handling can lead to serious injuries.
Unplug the Grinder: The very first step is to disconnect the angle grinder from the power source. This eliminates the risk of accidental start-up while you’re working on it.
Wear Safety Gear: Always wear safety glasses or a face shield to protect your eyes from sparks and debris. Gloves will protect your hands, and hearing protection is also recommended.
Inspect the Blade: Before installing any blade, examine it carefully for cracks, chips, or any other damage. A damaged blade can shatter during use, posing a significant hazard.
Tools Needed for Angle Grinder Disc Change
Having the right tools on hand will make the blade changing process much smoother and safer. Here’s what you’ll typically need:
Angle Grinder Wrench (Spanner Wrench): This is a specialized wrench designed to fit the locknut on your angle grinder. It usually comes with the grinder itself.
New Grinding Disc or Cutting Wheel: Make sure you have the correct type and size of blade for the material you’ll be working with.
Gloves: To protect your hands from sharp edges and debris.
Safety Glasses or Face Shield: Absolutely essential for eye protection.
Clean Rags: For wiping down the grinder and the new blade.
Angle Grinder Blade Removal Tool (Optional): Some users prefer a specialized tool for removing stubborn blades.
Step-by-Step: Removing Angle Grinder Blade
-
Locate the Spindle Lock: The spindle lock is a button or lever located on the body of the angle grinder. Its purpose is to prevent the spindle (the rotating shaft) from turning while you loosen the locknut.
-
Engage the Spindle Lock: Press and hold the spindle lock button. You might need to rotate the blade slightly by hand until the lock engages properly.
-
Loosen the Locknut: Using the angle grinder wrench, turn the locknut counterclockwise to loosen it. It might be tight, so apply steady pressure.
- Note: Some angle grinders have a self-tightening nut. These need to be loosened in the direction the blade spins.
-
Remove the Locknut and Outer Flange: Once the locknut is loose, fully unscrew it and remove it. Also, remove the outer flange (the metal disc that sits between the locknut and the blade).
-
Remove the Old Blade: Carefully slide the old blade off the spindle. If it’s stuck, gently wiggle it back and forth.
Step-by-Step: Installing New Grinding Disc
-
Inspect the Inner Flange: Before installing the new blade, check the inner flange (the metal disc that sits directly against the grinder). Make sure it’s clean and properly seated.
-
Mount the New Blade: Place the new blade onto the spindle, ensuring it sits flush against the inner flange. Pay attention to the direction of the blade. Some blades have a specific direction of rotation indicated by an arrow.
-
Reinstall the Outer Flange: Place the outer flange back onto the spindle, ensuring it’s properly aligned.
-
Reinstall and Tighten the Locknut: Screw the locknut back onto the spindle by hand. Then, engage the spindle lock again and use the angle grinder wrench to tighten the locknut securely.
- Do not overtighten: Overtightening the locknut can damage the blade or the grinder. Tighten it firmly, but avoid excessive force.
-
Release the Spindle Lock: Release the spindle lock button.
-
Test the Blade: Before using the grinder, spin the blade by hand to ensure it rotates freely and is properly seated.
Changing Cutting Wheel: Additional Considerations
When changing a cutting wheel, there are a few extra points to keep in mind:
Cutting Wheel Thickness: Cutting wheels are typically thinner than grinding discs and are more fragile. Handle them with extra care.
Appropriate Cutting Wheel: Always use a cutting wheel that is designed for the material you are cutting. Using the wrong type of wheel can be dangerous.
Angle Grinder Blade Removal Tool: Is It Necessary?
You don’t absolutely have to have a special tool to take the blade off your angle grinder, but it’s really nice to have one. It’s especially helpful if you find yourself switching blades a lot or if the nut holding the blade on gets stuck. These tools give you a better grip and more pulling power, which can make the whole job a lot faster and easier.
Troubleshooting Common Issues During Angle Grinder Blade Replacement
Sometimes, the blade changing process doesn’t go as smoothly as planned. Here are some common issues and how to address them:
Locknut is Stuck: If the locknut is extremely tight, try using a penetrating oil to loosen it. Let the oil soak in for a few minutes before attempting to remove the nut again. You can also try using a longer wrench for more leverage.
Spindle Lock Not Engaging: If the spindle lock isn’t engaging properly, try rotating the blade slightly by hand until it clicks into place.
Blade Wobbles After Installation: If the blade wobbles after installation, it’s likely that it’s not seated properly or that the locknut isn’t tight enough. Recheck the installation and tighten the locknut securely.
The Importance of Angle Grinder Maintenance
Regular angle grinder maintenance is crucial for ensuring the tool’s longevity and safety.
Clean the Grinder Regularly: Keep the grinder clean by wiping it down with a clean rag after each use. This will prevent dust and debris from building up and affecting its performance.
Inspect the Power Cord: Regularly check the power cord for any signs of damage. A damaged power cord can be a fire hazard.
Check the Carbon Brushes: Angle grinders use carbon brushes to conduct electricity to the motor. These brushes wear down over time and need to be replaced periodically.
Lubricate Moving Parts: Periodically lubricate the moving parts of the grinder to keep them running smoothly.
Angle Grinder Blade Selection: Choosing the Right Blade for the Job
Choosing the right blade is just as important as knowing how to change it. Different blades are designed for different materials and applications.
Types of Angle Grinder Blades
| Blade Type | Material Compatibility | Application |
|---|---|---|
| Grinding Disc | Metal, Stone | Grinding, Deburring, Smoothing |
| Cutting Wheel | Metal, Concrete, Tile | Cutting |
| Flap Disc | Metal, Wood | Grinding, Blending, Finishing |
| Diamond Blade | Concrete, Stone, Tile, Masonry | Cutting hard materials |
| Wire Wheel Brush | Metal | Removing rust, paint, and scale |
| Polishing Pad | Metal | Polishing and buffing |
Factors to Consider When Selecting a Blade
Material: Choose a blade that is specifically designed for the material you’ll be working with.
Application: Consider the type of work you’ll be doing. Grinding, cutting, or polishing each require different types of blades.
Size: Make sure the blade is the correct size for your angle grinder.
Quality: Invest in high-quality blades from reputable manufacturers. They will last longer and perform better.
Safety Tips for Using Angle Grinder Blades
Never Use a Damaged Blade: A damaged blade can shatter during use, posing a serious hazard.
Use the Correct Blade Speed: Make sure the blade’s maximum RPM (revolutions per minute) rating is equal to or greater than the angle grinder’s RPM.
Don’t Apply Excessive Pressure: Let the blade do the work. Applying too much pressure can cause the blade to overheat and break.
Maintain a Proper Angle: When cutting, maintain a consistent angle to prevent the blade from binding.
Use a Guard: Always use the guard that came with your angle grinder. It will help protect you from sparks and debris.
Blade Changing Guide: Quick Reference Checklist
Here’s a quick checklist to guide you through the blade changing process:
- [ ] Unplug the grinder.
- [ ] Wear safety gear.
- [ ] Locate the spindle lock.
- [ ] Engage the spindle lock.
- [ ] Loosen the locknut.
- [ ] Remove the locknut and outer flange.
- [ ] Remove the old blade.
- [ ] Inspect the inner flange.
- [ ] Mount the new blade.
- [ ] Reinstall the outer flange.
- [ ] Reinstall and tighten the locknut.
- [ ] Release the spindle lock.
- [ ] Test the blade.
Angle Grinder Disc Change: Best Practices
Keep it Clean: A clean workspace and clean components make for a safer and more efficient blade change.
Take Your Time: Don’t rush the process. Double-check each step to ensure everything is properly installed.
Store Blades Properly: Store your blades in a dry place to prevent rust and corrosion.
FAQ: Answering Common Questions About Angle Grinder Blade Replacement
What is the best way to remove a stuck angle grinder blade? Use penetrating oil and a longer wrench for more leverage.
Can I use any blade on my angle grinder? No, use only blades that are the correct size and designed for your grinder.
Who should I contact if I’m having trouble changing the blade? Consult a qualified mechanic or contact the angle grinder manufacturer.
Is it safe to use an angle grinder without a guard? No, never use an angle grinder without a guard.
Why does my angle grinder blade keep coming loose? Ensure the locknut is tightened properly and that the blade is seated correctly.
How often should I replace my angle grinder blade? Replace the blade when it is worn down, damaged, or no longer performing efficiently.
Changing the blade on your angle grinder is a simple but essential task. By following these steps and prioritizing safety, you can ensure that your angle grinder remains a reliable and effective tool for years to come. Remember, proper angle grinder maintenance, including regular blade checks and replacements, contributes significantly to safer and more productive work.

Hi, I’m Larry Fish, the mind behind MyGrinderGuide.com.. With a passion for all things kitchen appliances, I created this blog to share my hands-on experience and expert knowledge. Whether it’s helping you choose the right tools for your culinary adventures or offering tips to make your kitchen more efficient, I’m here to guide you. My goal is to make your time in the kitchen not only easier but also enjoyable! Welcome to my world of kitchen mastery!