
Finishing your kitchen cabinets takes a little work, starting with a good clean and ending with that final coat of paint or stain. This guide walks you through the whole process, step by step. Whether you want to do it yourself or just want that professional look, we’ll cover the best techniques for painting and staining, plus help you pick out exactly the right paint for the job.
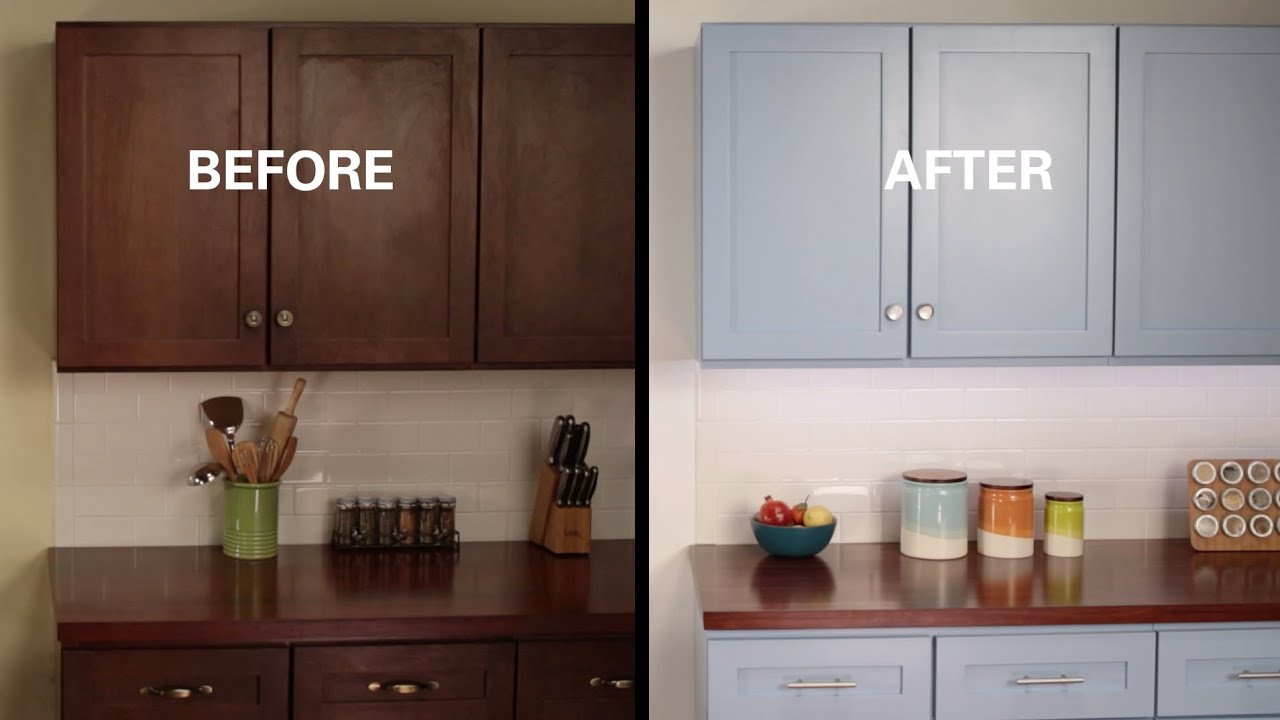
Image Source: i.ytimg.com
Why Refinish Your Kitchen Cabinets?
Instead of replacing your entire kitchen cabinetry, refinishing is a cost-effective way to update the look of your kitchen. Refinishing can breathe new life into dated cabinets and significantly alter your kitchen’s aesthetic without the expense of a full renovation.
It allows you to customize the color and finish, creating a space that reflects your personal style.
Benefits of Refinishing
- Cost Savings: Refinishing is significantly cheaper than replacing cabinets.
- Customization: Choose your perfect color and finish.
- Eco-Friendly: Reduces waste by reusing existing materials.
- Increased Home Value: A fresh, modern kitchen increases appeal.
Gathering Your Cabinet Painting Supplies
Before you begin, make sure you have all the necessary tools and materials. This will ensure a smoother and more efficient cabinet finishing process.
Essential Cabinet Painting Supplies
- Cleaning Supplies: Degreaser, soap, water, and rags.
- Sandpaper: Various grits (120, 220, 320) for different stages.
- Primer: High-quality primer suitable for your chosen paint.
- Paint: Best paint for kitchen cabinets (see section below).
- Brushes: High-quality angled brush for trim and details.
- Rollers: Foam rollers for smooth surfaces.
- Paint Trays: For easy paint application.
- Drop Cloths: To protect your floors and countertops.
- Painter’s Tape: To mask off areas you don’t want to paint.
- Screwdriver or Drill: For removing cabinet doors and hardware.
- Wood Filler: To repair any imperfections.
- Safety Gear: Safety glasses, gloves, and a respirator.
Choosing the Right Paint: The Best Paint for Kitchen Cabinets
Selecting the right paint is crucial for durability and appearance. Here’s a comparison of popular options:
| Paint Type | Pros | Cons | Best For |
|---|---|---|---|
| Acrylic Latex | Durable, easy to clean, low VOC, water-based | Can be less durable than oil-based on high-use areas | DIYers, environmentally conscious homeowners |
| Alkyd (Oil-Based) | Extremely durable, smooth finish, resists stains and scratches | High VOCs, requires mineral spirits for cleanup, yellows over time | Professional cabinet finishing, high-traffic kitchens |
| Acrylic Enamel | Combines the best of both; durable, low VOC, easy to clean | Can be more expensive than other options | A balance of durability and ease of use |
| Chalk Paint | Matte finish, easy to distress, requires a topcoat | Not as durable without a topcoat, can chip easily | Distressed or vintage look |
Important Note: Always follow the manufacturer’s instructions for application and drying times.
How to Prep Cabinets for Painting: The Essential First Step
Proper preparation is key to a professional and lasting finish. Skipping steps in the prep process can lead to peeling, chipping, or an uneven finish.
Step-by-Step Preparation
- Remove Hardware: Take off all knobs, pulls, hinges, and doors. Label everything to make reassembly easier.
- Clean Thoroughly: Use a degreaser to remove grease, grime, and any buildup. Then, wash with soap and water and let dry completely.
- Sand the Surface: Sanding creates a slightly rough surface for the primer to adhere to. Use 120-grit sandpaper for the first pass, then smooth with 220-grit.
- Fill Imperfections: Use wood filler to fill any holes, dents, or scratches. Let it dry completely and sand smooth.
- Apply Primer: Primer is essential for adhesion and helps block stains. Apply one or two coats of high-quality primer, allowing each coat to dry completely. Lightly sand with 320-grit sandpaper between coats for an ultra-smooth surface.
- Taping: Use painter’s tape to mask off any areas you don’t want to paint, like the inside edges of the cabinet frames.
Painting Kitchen Cabinets DIY: Step-by-Step Guide
Now that your cabinets are prepped, it’s time to paint. Follow these steps for a professional-looking finish.
The Cabinet Painting Process
- Apply the First Coat: Use a high-quality brush for edges and details, and a foam roller for flat surfaces. Apply a thin, even coat of paint.
- Let Dry Completely: Follow the paint manufacturer’s recommended drying time.
- Lightly Sand: Use 320-grit sandpaper to lightly sand the surface, removing any imperfections and creating a smooth base for the next coat.
- Apply the Second Coat: Apply another thin, even coat of paint. This coat provides the final color and finish.
- Let Dry Completely: Allow the paint to dry completely before handling the cabinets.
- Reassemble: Carefully reattach the hardware and rehang the doors.
Staining Kitchen Cabinets Guide: Revealing Natural Beauty
If you prefer the look of natural wood, staining is a great option. This cabinet finishing process highlights the wood grain and adds warmth to your kitchen.
Preparing for Staining
- Sand the Wood: Start with 120-grit sandpaper to remove any existing finish, then move to 220-grit for a smooth surface.
- Apply Wood Conditioner: This helps the stain absorb evenly, preventing blotchiness.
- Choose Your Stain: Select a stain color that complements your kitchen. Consider the type of wood and the desired final look.
- Test the Stain: Before staining all the cabinets, test the stain on a small, inconspicuous area to ensure you like the color.
The Staining Process
- Apply the Stain: Use a brush or rag to apply the stain in the direction of the wood grain.
- Wipe Off Excess: After a few minutes, wipe off the excess stain with a clean rag. The longer you leave the stain on, the darker the color will be.
- Let Dry Completely: Follow the stain manufacturer’s recommended drying time.
- Apply a Clear Coat: A clear coat protects the stain and provides a durable finish. Use a polyurethane or varnish designed for cabinets.
- Sand Lightly: After the clear coat dries, lightly sand with 320-grit sandpaper to remove any imperfections.
- Apply Additional Coats: Apply one or two more coats of clear coat, sanding lightly between each coat.
- Reassemble: Reattach the hardware and rehang the doors.
Cabinet Finishing Techniques: Achieving a Professional Look
Achieving a professional finish requires attention to detail and the right techniques. Here are some tips for both painting and staining.
Painting Techniques
- Spray Painting: Using a paint sprayer can create an incredibly smooth, factory-like finish. However, it requires practice and proper ventilation.
- Brushing: If using a brush, use a high-quality brush and apply thin, even coats. Avoid applying too much pressure, which can leave brushstrokes.
- Rolling: Use a foam roller for large, flat surfaces to minimize texture.
Staining Techniques
- Even Application: Apply the stain evenly to avoid dark or light spots.
- Wiping: Wipe off the excess stain in the direction of the wood grain.
- Multiple Coats: Apply multiple thin coats of stain for a richer, deeper color.
DIY Cabinet Restoration: Saving Old Cabinets
If you have older cabinets with significant damage, cabinet finishing techniques can restore them.
Repairing Damaged Cabinets
- Assess the Damage: Determine the extent of the damage and what repairs are needed.
- Repair Structural Issues: Fix any broken or loose joints.
- Replace Damaged Parts: Replace any parts that are beyond repair.
- Sand and Refinish: Follow the steps for painting or staining to restore the cabinets to their former glory.
Professional Cabinet Finishing: When to Call the Pros
While DIY cabinet finishing is achievable, sometimes it’s best to hire a professional.
When to Hire a Professional
- Extensive Damage: If your cabinets have significant damage that requires extensive repairs.
- Complex Finishes: If you’re looking for a specialized finish, like glazing or antiquing.
- Time Constraints: If you don’t have the time to dedicate to the project.
Finding a Qualified Professional
- Get Referrals: Ask friends, family, or neighbors for recommendations.
- Check Online Reviews: Read online reviews to get an idea of the professional’s reputation.
- Get Multiple Quotes: Get quotes from several professionals to compare pricing and services.
Preserving Your Finished Cabinets
Taking care of your newly finished cabinets will keep them looking great for years.
Care and Maintenance Tips
- Clean Regularly: Wipe down cabinets with a damp cloth to remove spills and splatters.
- Avoid Harsh Cleaners: Use mild soap and water instead of harsh chemicals.
- Touch Up As Needed: Touch up any chips or scratches as soon as possible to prevent further damage.
Frequently Asked Questions (FAQ)
What is the best type of paint to use on kitchen cabinets?
- The best paint for kitchen cabinets is typically either acrylic latex or acrylic enamel. Acrylic latex is water-based, easy to clean, and low in VOCs, making it a good choice for DIYers. Acrylic enamel offers a harder, more durable finish, similar to oil-based paints but with lower VOCs and easier cleanup.
Can I paint over laminate cabinets?
- Yes, you can paint over laminate cabinets, but it requires thorough preparation. Sand the surface well, use a bonding primer specifically designed for laminate, and then apply your topcoat.
Who is best suited for a DIY cabinet refinishing project?
- DIY cabinet refinishing is best suited for homeowners who are comfortable with hands-on projects, have some experience with painting or staining, and are willing to invest the time and effort required for proper preparation and execution.
How long does it take to refinish kitchen cabinets?
- The time it takes to refinish kitchen cabinets varies depending on the size of your kitchen and the complexity of the project. It can take anywhere from a weekend to a week or more.
What are the best kitchen cabinet refinishing tips for beginners?
- Focus on thorough preparation, use high-quality materials, apply thin coats of paint or stain, and be patient. Don’t rush the process, and take your time to ensure a smooth and even finish.
By following these steps and techniques, you can achieve a professional-looking finish for your kitchen cabinets, whether you choose to paint or stain them. Good luck with your project!

Hi, I’m Larry Fish, the mind behind MyGrinderGuide.com.. With a passion for all things kitchen appliances, I created this blog to share my hands-on experience and expert knowledge. Whether it’s helping you choose the right tools for your culinary adventures or offering tips to make your kitchen more efficient, I’m here to guide you. My goal is to make your time in the kitchen not only easier but also enjoyable! Welcome to my world of kitchen mastery!