
Can I remove a KitchenAid dishwasher myself? Yes, you can remove a KitchenAid dishwasher yourself, but it requires careful planning, the right tools, and a thorough understanding of the disconnection process. This guide provides step-by-step instructions and safety precautions to ensure a smooth and safe KitchenAid dishwasher removal.
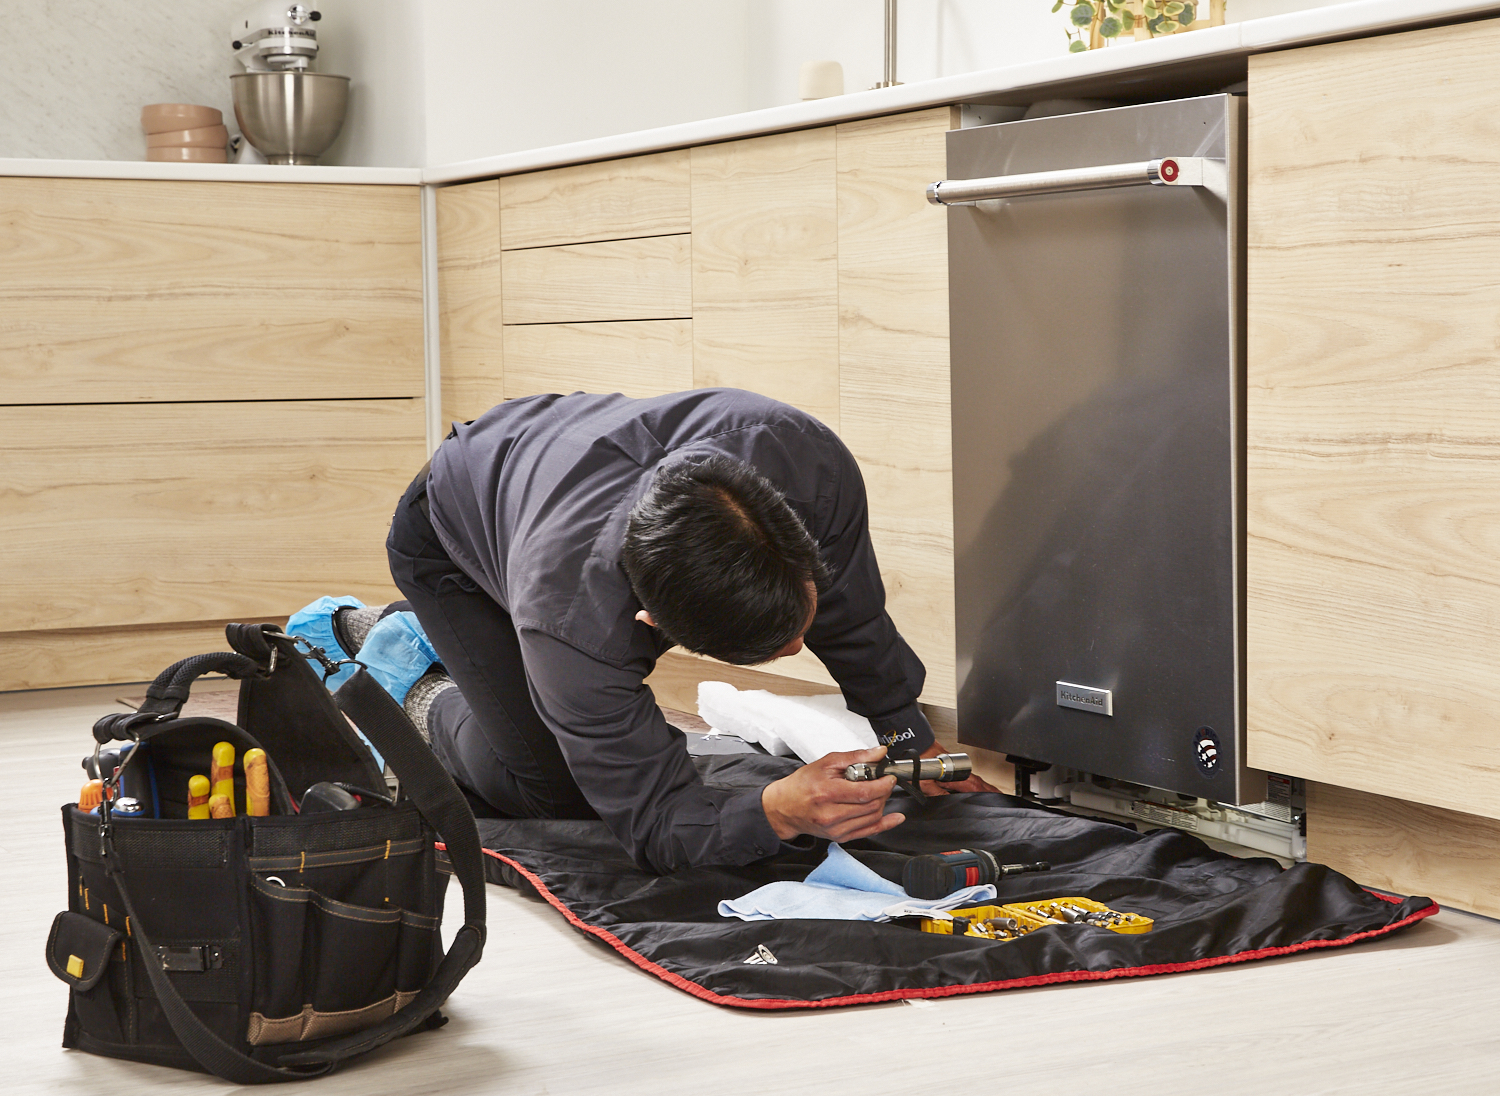
Image Source: theappliancepros.ca
Preparing for KitchenAid Dishwasher Removal
Before you even think about touching a wrench, proper preparation is key. This includes gathering the right tools, turning off utilities, and preparing your workspace. Failing to prepare adequately can lead to injury, damage to your home, or problems with the dishwasher itself. This section covers KitchenAid dishwasher installation prep.
Gathering Your Tools
Having the right tools on hand will make the KitchenAid dishwasher removal steps much easier and faster. Here’s a list of what you’ll need:
- Screwdrivers: Both Phillips head and flathead screwdrivers of varying sizes.
- Pliers: For gripping and bending wires or hoses.
- Adjustable Wrench: To disconnect water lines.
- Basin/Bucket: To catch any water when disconnecting the water supply.
- Towels/Rags: For cleaning up spills.
- Gloves: To protect your hands.
- Safety Glasses: To protect your eyes.
- Flashlight/Work Light: To see clearly in dark areas.
- Voltage Tester: To ensure power is off before working with electrical connections.
- Moving Blanket or Cardboard: To protect your floors when moving the dishwasher.
Turning Off Utilities: Water and Electricity
Safety is paramount. Before you begin any dishwasher disconnection guide, you must turn off the water supply and electrical power to the dishwasher.
Disconnecting the Water Supply
- Locate the Water Shut-Off Valve: This is usually located under the sink or in the basement near the water pipes.
- Turn Off the Water: Turn the valve clockwise to shut off the water supply to the dishwasher.
- Test the Shut-Off: Turn on the kitchen faucet to ensure the water is completely off. If water continues to flow, the valve may not be working correctly, and you’ll need to address this before proceeding.
- Relieve Water Pressure: Turn on the dishwasher briefly to relieve any remaining water pressure in the line.
Disconnecting the Electricity
- Locate the Circuit Breaker: Find the circuit breaker that controls the dishwasher. It should be labeled in your breaker box.
- Turn Off the Breaker: Flip the breaker to the “off” position.
- Verify the Power is Off: Use a voltage tester to confirm that the power to the dishwasher is completely off. Test the wires where they connect to the dishwasher. Never skip this step!
Preparing the Workspace
Clear the area around the dishwasher to give yourself plenty of room to work.
- Remove Items from Under the Sink: Clear out anything stored under the sink to give yourself easy access to the plumbing connections.
- Protect the Floor: Place a moving blanket or cardboard on the floor in front of the dishwasher to protect it from scratches.
- Clear the Dishwasher: Make sure the dishwasher is empty of all dishes and utensils.
KitchenAid Dishwasher Removal Steps
Now that you’ve prepared, it’s time to begin the actual KitchenAid dishwasher removal steps. Take your time and follow these steps carefully.
Disconnecting Plumbing
The first step is to disconnect the water and drain lines from the dishwasher. This requires a little patience and a basin to catch any residual water.
- Accessing the Plumbing Connections: The plumbing connections are usually located at the bottom front of the dishwasher. You may need to remove the lower access panel to reach them.
- Disconnecting the Water Supply Line:
- Place a basin or bucket under the water supply connection to catch any water.
- Use an adjustable wrench to loosen the connection between the water supply line and the dishwasher’s water inlet valve.
- Carefully disconnect the water supply line.
- Have towels handy to wipe up any spills.
- Disconnecting the Drain Hose:
- Locate the drain hose, which is typically connected to the garbage disposal or a dedicated drainpipe under the sink.
- Loosen the clamp that secures the drain hose to the disposal or drainpipe.
- Carefully disconnect the drain hose.
- Lift the end of the hose to prevent any remaining water from draining onto the floor. Empty the hose into a bucket.
Disconnecting Electrical Wiring
This is perhaps the most critical step for dishwasher removal safety. Always double-check that the power is off before proceeding.
- Accessing the Electrical Connections: The electrical connections are usually located in a junction box behind the access panel at the bottom front of the dishwasher.
- Removing the Junction Box Cover: Use a screwdriver to remove the cover of the junction box.
- Disconnecting the Wires:
- Carefully disconnect the wires from the dishwasher’s terminals. Typically, there will be three wires: a black (hot) wire, a white (neutral) wire, and a green (ground) wire.
- Use pliers if necessary to loosen the wire connectors.
- Cap the wires with wire connectors or electrical tape to prevent accidental shocks during the removal process.
- Tucking the Wires: Gently tuck the wires back into the junction box.
- Replacing the Junction Box Cover: Replace the cover of the junction box.
Releasing the Dishwasher from Its Mounts
Most KitchenAid dishwashers are secured to the countertop or cabinets with mounting brackets. You’ll need to release these brackets before you can slide the dishwasher out.
- Locating the Mounting Brackets: The mounting brackets are usually located at the top of the dishwasher, near the front.
- Removing the Screws: Use a screwdriver to remove the screws that secure the mounting brackets to the countertop or cabinets.
- Lowering the Feet (If Applicable): Some dishwashers have adjustable feet. Lower them to provide extra clearance for sliding the dishwasher out.
Sliding the Dishwasher Out
With the plumbing, electrical, and mounting brackets disconnected, you should now be able to carefully slide the dishwasher out of its opening.
- Gently Pull the Dishwasher Out: Grasp the dishwasher firmly and gently pull it straight out of its opening.
- Check for Obstructions: If the dishwasher gets stuck, check for any remaining connections or obstructions.
- Use a Dolly (If Necessary): If the dishwasher is heavy, use a dolly to help move it.
- Protect the Floor: Be careful not to scratch the floor as you slide the dishwasher out.
- Place on Moving Blanket: Once free, carefully place the dishwasher on the moving blanket or cardboard.
After Removal: KitchenAid Dishwasher Disposal & Installation Prep
Once you’ve successfully removed the dishwasher, you’ll need to deal with its KitchenAid dishwasher disposal and prepare the space for a new appliance.
Preparing the Space for a New Dishwasher
- Clean the Area: Clean the area where the dishwasher was located. Remove any debris or dirt.
- Inspect Plumbing and Electrical Connections: Inspect the plumbing and electrical connections to ensure they are in good condition. Make any necessary repairs.
- Measure the Opening: Measure the opening to ensure that the new dishwasher will fit properly.
Disposing of the Old Dishwasher
KitchenAid dishwasher disposal should be done responsibly. Here are a few options:
- Recycling: Contact your local recycling center to see if they accept old appliances.
- Donation: Consider donating the dishwasher to a charity or organization that can use it.
- Appliance Retailer: Some appliance retailers will haul away your old dishwasher when you purchase a new one.
- Junk Removal Service: Hire a junk removal service to haul away the dishwasher.
- Municipal Waste Disposal: As a last resort, you can dispose of the dishwasher through your municipal waste disposal service, but be aware of local regulations regarding appliance disposal.
Common Problems & Troubleshooting
Even with careful planning, you might encounter some common problems during the KitchenAid dishwasher removal. Here are a few tips for troubleshooting:
- Water Still Flowing: If water is still flowing after you’ve turned off the water supply, the shut-off valve may be faulty. You’ll need to either repair or replace the valve before proceeding.
- Dishwasher Won’t Slide Out: If the dishwasher won’t slide out, double-check that you’ve disconnected all plumbing and electrical connections, released the mounting brackets, and lowered the feet.
- Stripped Screws: If you strip the screws on the mounting brackets, try using a screw extractor or a rubber band between the screwdriver and the screw head to get a better grip.
- Electrical Shock: If you feel an electrical shock, immediately turn off the circuit breaker and double-check that the power is completely off before proceeding.
Safety Precautions: A Recap
- Turn Off Utilities: Always turn off the water and electricity before beginning any work.
- Wear Safety Gear: Wear gloves and safety glasses to protect yourself.
- Use the Right Tools: Using the right tools will make the job easier and safer.
- Take Your Time: Don’t rush the process.
- Get Help if Needed: If you’re not comfortable with any of these steps, hire a professional.
Frequently Asked Questions (FAQ)
Q: How long does it take to remove a KitchenAid dishwasher?
A: Removing a KitchenAid dishwasher typically takes 1-2 hours, depending on your experience and the complexity of the installation.
Q: Do I need to hire a professional to remove my dishwasher?
A: If you’re comfortable working with plumbing and electrical connections, you can remove the dishwasher yourself. However, if you’re not confident, it’s best to hire a professional.
Q: What should I do with the old dishwasher after removing it?
A: You can recycle it, donate it, sell it, or dispose of it through your local waste disposal service.
Q: What tools do I need to remove a KitchenAid dishwasher?
A: You’ll need screwdrivers, pliers, an adjustable wrench, a basin, towels, gloves, safety glasses, a flashlight, and a voltage tester.
Q: How do I disconnect the water supply to my dishwasher?
A: Locate the water shut-off valve, turn it off, test the shut-off, and then disconnect the water supply line from the dishwasher.
Q: How do I disconnect the electricity to my dishwasher?
A: Locate the circuit breaker, turn it off, verify the power is off with a voltage tester, and then disconnect the wires from the dishwasher’s terminals.
If you stick to these steps and safety tips, you can successfully take out your KitchenAid dishwasher without any issues. Just remember not to rush, make sure you are using the right tools, and keep safety your top priority. Good luck with the project!

Hi, I’m Larry Fish, the mind behind MyGrinderGuide.com.. With a passion for all things kitchen appliances, I created this blog to share my hands-on experience and expert knowledge. Whether it’s helping you choose the right tools for your culinary adventures or offering tips to make your kitchen more efficient, I’m here to guide you. My goal is to make your time in the kitchen not only easier but also enjoyable! Welcome to my world of kitchen mastery!