
Can I sharpen a drill bit on a bench grinder? Yes, you can sharpen a drill bit on a bench grinder. It’s a common and effective method, but it requires practice and attention to detail to achieve the correct angles and cutting edges. This guide will walk you through the process, ensuring your drill bits are sharp and ready for use.
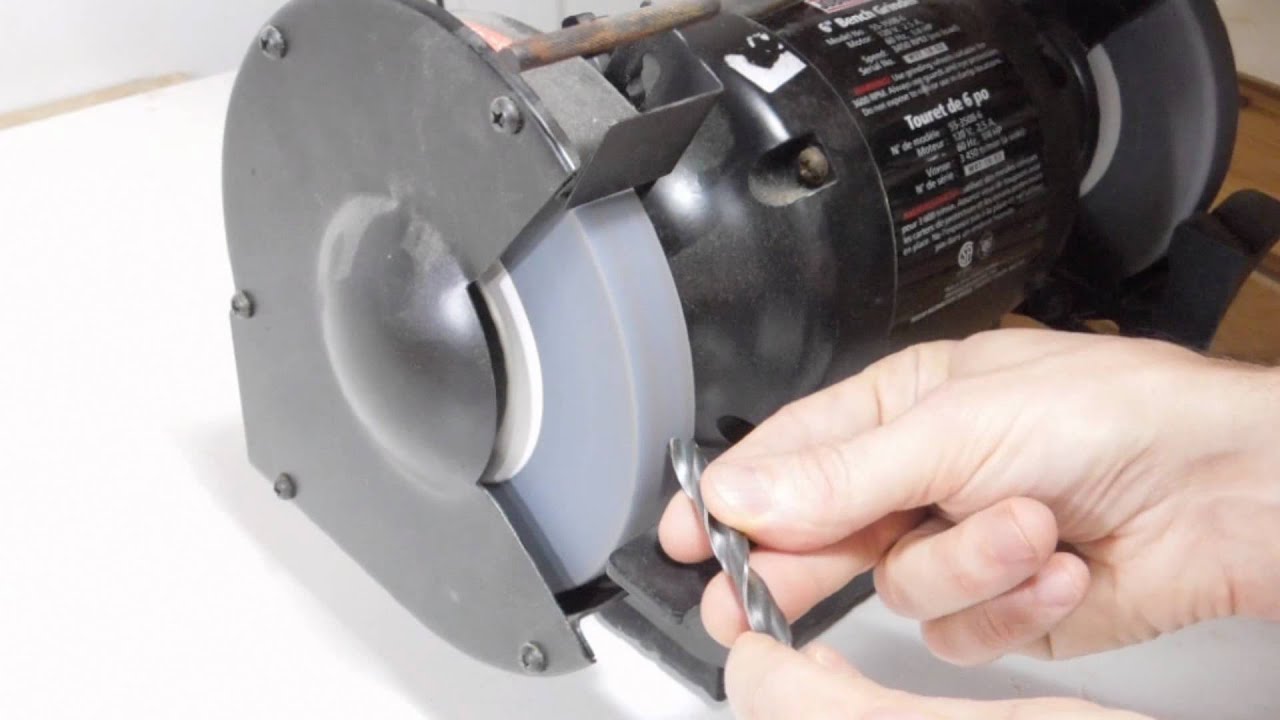
Image Source: i.ytimg.com
Why Drill Bit Sharpening Matters
Using dull drill bits is a total headache. They leave you with messy, rough holes, make the job take way longer than it should, and can even ruin the project you’re working on or wear out your drill. Keeping your bits sharp is a big deal if you want to work safely and get things done fast. It saves you money, saves you time, and keeps you from getting frustrated. Instead of running to the store for new ones all the time, you can easily fix up the ones you already own. Sharpening them makes your tools last much longer and ensures every hole you drill is clean and perfect.
Benefits of Sharpening Drill Bits
- Cost Savings: Sharpening extends the life of your drill bits, reducing the need to buy new ones.
- Improved Performance: Sharp bits drill faster and cleaner, producing better results.
- Reduced Strain: Sharp bits require less pressure, reducing strain on your drill and your body.
- Enhanced Safety: Dull bits can slip and cause injuries. Sharp bits provide better control and reduce the risk of accidents.
- Precision: Sharp bits create accurate holes with clean edges.
Getting Ready: Tools and Safety Gear
Before you begin, gather the necessary tools and safety gear. This will ensure a smooth and safe drill bit sharpening experience.
Essential Tools and Materials
- Bench Grinder: A bench grinder with a medium-grit grinding wheel is essential.
- Safety Glasses: Protect your eyes from flying sparks and debris.
- Work Gloves: Protect your hands from heat and sharp edges.
- Water Container: For cooling the drill bit during grinding.
- Magnifying Glass (Optional): To inspect the cutting edges closely.
- Drill Bit Gauge or Angle Finder (Optional): Helps ensure accurate angles.
Safety First: Protective Measures
- Wear Safety Glasses: Always protect your eyes from flying debris.
- Use Work Gloves: Protect your hands from heat and sharp edges.
- Keep Water Nearby: Cool the drill bit frequently to prevent overheating.
- Secure the Bench Grinder: Make sure your bench grinder is firmly mounted to prevent movement during use.
- Avoid Loose Clothing: Loose clothing can get caught in the grinder.
- Focus: Pay attention to what you are doing to avoid mistakes and injuries.
Fathoming Drill Bit Anatomy: The Key to Sharpening
To properly sharpen a drill bit, you must first understand its anatomy. Knowing the different parts of a drill bit will help you grind it correctly.
Key Parts of a Twist Drill Bit
- Point: The tip of the drill bit that makes initial contact with the material.
- Cutting Edges (Lips): The sharp edges that do the actual cutting.
- Heel: The back portion of the cutting edge that provides clearance.
- Flutes: The spiral grooves that remove chips from the hole.
- Body: The main cylindrical part of the drill bit.
- Shank: The part that is held by the drill chuck.
Deciphering the Drill Bit Sharpening Angle
The drill bit sharpening angle is crucial for effective cutting. The most common point angle is 118 degrees, but this can vary depending on the material you are drilling.
- Standard Angle (118 degrees): Suitable for general-purpose drilling in wood, metal, and plastic.
- Softer Materials (90 degrees): Better for drilling soft materials like aluminum and plastic.
- Harder Materials (135 degrees): Ideal for drilling hard materials like steel and stainless steel.
Step-by-Step Guide: Sharpening Drill Bits with a Grinder
Now, let’s dive into the actual process of drill bit sharpening. Follow these steps carefully to achieve optimal results.
Step 1: Inspection and Preparation
- Examine the Drill Bit: Look for any damage, such as chips or cracks. Severely damaged bits may not be salvageable.
- Clean the Drill Bit: Remove any debris or rust with a wire brush.
- Set Up Your Workspace: Make sure your bench grinder is clean and well-lit. Have your safety gear and water container within easy reach.
Step 2: Positioning and Grinding the First Cutting Edge
- Grip the Drill Bit: Hold the drill bit firmly with your gloved hand, near the shank.
- Angle the Drill Bit: Present the cutting edge to the grinding wheel at the correct drill bit sharpening angle (usually 59 degrees relative to the wheel, to achieve the 118-degree point angle).
- Grind Lightly: Gently touch the cutting edge to the grinding wheel. Use light pressure and a smooth, consistent motion.
- Cool Frequently: Dip the drill bit in water after each pass to prevent overheating. Overheating can ruin the temper of the steel.
- Focus on the Lip: Grind only the cutting edge (lip), maintaining the original shape and angle.
Step 3: Grinding the Second Cutting Edge
- Rotate the Drill Bit: Turn the drill bit 180 degrees to present the second cutting edge to the grinding wheel.
- Match the Angle: Grind the second cutting edge to match the angle and shape of the first. It’s crucial that both cutting edges are symmetrical.
- Check for Symmetry: Regularly check the symmetry of the cutting edges. They should be the same length and angle.
Step 4: Grinding the Clearance Angle (Heel)
- Lower the Heel: After grinding the cutting edges, you need to grind the heel to create clearance. This allows the cutting edges to engage the material without the heel rubbing.
- Slightly Angle Down: Slightly lower the heel of the drill bit and gently touch it to the grinding wheel.
- Create Clearance: Grind just enough material to create a slight clearance angle behind the cutting edges.
Step 5: Final Inspection and Adjustments
- Inspect Carefully: Use a magnifying glass to inspect the cutting edges and angles.
- Check for Symmetry: Ensure both cutting edges are symmetrical and have the same length and angle.
- Make Adjustments: If necessary, make small adjustments to correct any imbalances.
- Test the Drill Bit: Drill a test hole in a piece of scrap material to check the sharpness and accuracy of the drill bit.
Drill Bit Sharpening Techniques: Tips for Success
Mastering drill bit sharpening techniques takes time and practice. Here are some tips to help you improve your skills.
Mastering the Art of Drill Bit Sharpening
- Practice Makes Perfect: Don’t be discouraged if your first attempts aren’t perfect. Keep practicing, and you’ll improve over time.
- Use a Drill Bit Sharpening Jig: A drill bit sharpening jig can help you maintain consistent angles and achieve more accurate results.
- Grind Slowly: Avoid grinding too quickly, which can overheat the drill bit and ruin the temper of the steel.
- Cool Frequently: Always cool the drill bit in water after each pass to prevent overheating.
- Maintain the Original Shape: Try to maintain the original shape and angles of the drill bit as much as possible.
- Watch Videos: Watch instructional videos to learn different drill bit sharpening techniques and see the process in action.
Drill Bit Sharpening Angle Guide
| Material | Point Angle |
|---|---|
| Soft Wood | 90 degrees |
| Hard Wood | 118 degrees |
| Steel | 118 degrees |
| Stainless Steel | 135 degrees |
| Aluminum | 90 degrees |
| Plastic | 90 degrees |
Drill Bit Sharpening Jig: A Helpful Aid
A drill bit sharpening jig is a tool designed to hold the drill bit at the correct angle while you grind it. This can greatly improve the accuracy and consistency of your sharpening.
Benefits of Using a Jig
- Consistent Angles: Ensures the correct drill bit sharpening angle every time.
- Improved Accuracy: Helps you grind symmetrical cutting edges.
- Easier to Use: Makes the sharpening process easier and more efficient.
- Beginner-Friendly: Ideal for beginners who are just learning how to sharpen drill bits.
Types of Jigs
- Simple Angle Guides: Basic jigs that provide a reference angle.
- Adjustable Jigs: More advanced jigs that allow you to adjust the angle and position of the drill bit.
- Powered Jigs: Electric jigs that automate the sharpening process.
DIY Drill Bit Sharpening Alternatives
While a bench grinder is a common tool for DIY drill bit sharpening, there are alternative methods you can use.
Alternative Sharpening Methods
- Drill Doctor: A specialized tool specifically designed for sharpening drill bits.
- Handheld Grinder: A handheld grinder with a small grinding wheel can be used for smaller drill bits.
- Sharpening Stone: A sharpening stone can be used for manual sharpening, but it requires more skill and patience.
Grinding Drill Bits for Beginners: Essential Tips
If you’re a beginner, grinding drill bits for beginners might seem intimidating, but with the right approach, it can be manageable.
Tips for Beginners
- Start with Scrap Bits: Practice on old or damaged drill bits before attempting to sharpen your good ones.
- Take Your Time: Don’t rush the process. Focus on maintaining the correct angles and shapes.
- Use a Jig: A drill bit sharpening jig can make the process much easier for beginners.
- Watch Videos: Watch instructional videos to see the process in action.
- Seek Guidance: Ask an experienced woodworker or metalworker for guidance and tips.
Sharpening Twist Drill Bits: A Common Task
Sharpening twist drill bits is a fundamental skill for any DIY enthusiast or professional. By following the steps outlined in this guide, you can keep your twist drill bits sharp and ready for any project.
Troubleshooting Common Issues
Even with the best techniques, you might encounter some common issues when sharpening drill bits. Here’s how to troubleshoot them:
Common Problems and Solutions
- Uneven Cutting Edges: Ensure both cutting edges are ground to the same angle and length.
- Overheating: Cool the drill bit frequently to prevent overheating, which can ruin the temper of the steel.
- Rounded Cutting Edges: Maintain a sharp, crisp edge by using light pressure and a consistent motion.
- Incorrect Angle: Use a drill bit gauge or angle finder to ensure you are grinding at the correct angle.
FAQ: Frequently Asked Questions
Here are some frequently asked questions about drill bit sharpening.
Q: How often should I sharpen my drill bits?
A: Sharpen your drill bits whenever you notice they are dull, taking longer to drill, or producing rough holes.
Q: Can I sharpen carbide drill bits on a bench grinder?
A: Yes, but you need a diamond grinding wheel specifically designed for carbide.
Q: What grit grinding wheel should I use?
A: A medium-grit grinding wheel (around 60-80 grit) is suitable for most drill bit sharpening tasks.
Q: Is it worth buying a drill bit sharpener?
A: If you frequently sharpen drill bits, a dedicated drill bit sharpener can be a worthwhile investment.
Q: How do I know if my drill bit is sharp enough?
A: A sharp drill bit should easily bite into the material and produce clean, consistent chips.
Q: How do I prevent overheating when grinding drill bits?
A: Cool the drill bit frequently in water and use light pressure when grinding.
By following this comprehensive guide, you’ll be well-equipped to sharpen your drill bits on a bench grinder, achieving perfect angles and extending the life of your tools. Remember to prioritize safety and practice regularly to improve your skills. Happy drilling!

Hi, I’m Larry Fish, the mind behind MyGrinderGuide.com.. With a passion for all things kitchen appliances, I created this blog to share my hands-on experience and expert knowledge. Whether it’s helping you choose the right tools for your culinary adventures or offering tips to make your kitchen more efficient, I’m here to guide you. My goal is to make your time in the kitchen not only easier but also enjoyable! Welcome to my world of kitchen mastery!