
What is the best way to vent a sink in a kitchen island? The best way to vent a kitchen island sink, while staying compliant with plumbing codes, often involves using an air admittance valve (AAV) or a loop vent. Both methods prevent siphonage by allowing air into the drain line. However, local codes vary, so always check with your building department.
Planning a kitchen remodel that includes a sink in your kitchen island can greatly enhance the functionality and aesthetics of your space. However, island sinks require special consideration when it comes to plumbing, particularly venting. Proper kitchen island sink venting is critical for efficient drainage and preventing sewer gases from entering your home. Ignoring these essential details can result in slow draining, gurgling noises, and unpleasant odors. This guide provides a comprehensive look at how to vent a kitchen island sink, ensuring compliance with plumbing codes and a smoothly functioning kitchen.
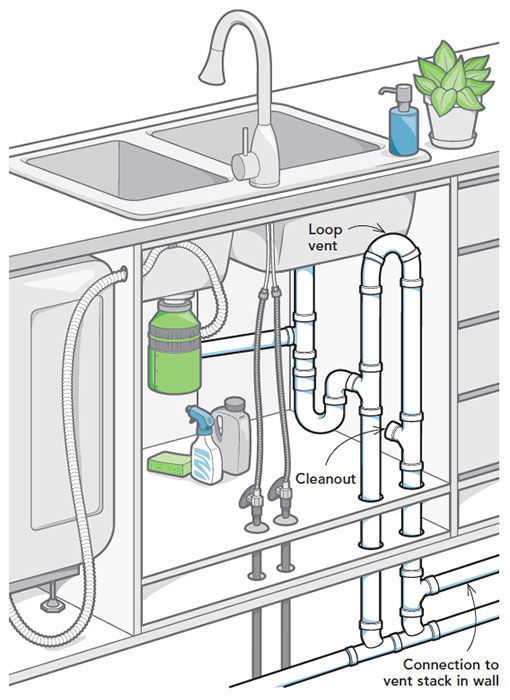
Image Source: images.finehomebuilding.com
Why Proper Venting Matters
Before diving into the “how,” it’s crucial to appreciate the “why.” All plumbing fixtures need vents to function correctly. Drains don’t just rely on gravity; they also need air pressure to balance the system. Without proper venting, a vacuum can form in the drainpipe as water flows, causing the water in the P-trap to be siphoned out. The P-trap is the curved pipe under your sink designed to hold water, creating a seal that prevents sewer gases from entering your home. When this seal is broken due to siphonage, those gases, which include methane, can leak into your kitchen.
The Consequences of Poor Venting
- Slow Draining: A vacuum in the drainpipe restricts water flow.
- Gurgling Noises: These sounds indicate air being sucked through the drain.
- Sewer Gas Odors: Unpleasant and potentially harmful gases enter your home.
- Plumbing Code Violations: Non-compliance can lead to fines and required corrections.
Traditional Venting vs. Island Sink Venting
Traditional venting systems typically connect each fixture’s drainpipe to a vertical vent stack that extends through the roof. This allows air to enter the drain system freely, preventing vacuums and ensuring proper drainage. However, this approach becomes challenging with a kitchen island sink because it’s not directly adjacent to a wall where a vent stack can be easily run. This is where alternative sink venting methods come into play.
Acceptable Venting Methods for Kitchen Island Sinks
Several approved methods exist to vent a kitchen island sink, offering flexibility depending on your home’s layout and local plumbing codes.
1. The Loop Vent (or Island Vent)
The loop vent is a common and often preferred method for kitchen island sink venting. It involves creating a loop of pipe that rises as high as possible under the countertop, ideally above the flood rim of the sink, before connecting to a horizontal vent line.
How a Loop Vent Works:
- The drain line extends from the sink P-trap downward.
- It then rises vertically in a loop.
- The loop connects to a horizontal vent line that ties into the main plumbing vent system.
Advantages:
- Effective at preventing siphonage.
- Widely accepted by plumbing codes.
- Allows for longer drain runs.
Disadvantages:
- Can be more complex to install than other methods.
- Requires sufficient space under the island to accommodate the loop.
Installation Steps:
- Connect the P-trap to the sink drain.
- Extend the drainpipe downward, then upward to form a loop as high as possible under the counter.
- Connect the top of the loop to a horizontal vent pipe.
- Ensure the horizontal vent ties into an existing vent stack or runs to a new one.
- Test the drain to ensure proper flow and no gurgling.
2. Air Admittance Valve (AAV)
An island sink air admittance valve (AAV), also known as a Studor vent, is a one-way valve that allows air to enter the drainpipe when negative pressure develops, preventing siphonage. It closes when there’s positive pressure, preventing sewer gases from escaping. An AAV for kitchen island applications is a popular choice due to its ease of installation and space-saving design.
How an AAV Works:
- The AAV is installed on the drain line, typically above the P-trap and under the sink.
- When a vacuum forms, the valve opens, allowing air to enter.
- Once the pressure is equalized, the valve closes.
Advantages:
- Simple to install.
- Requires minimal space.
- Cost-effective.
Disadvantages:
- May not be permitted in all jurisdictions.
- Can fail over time and require replacement.
- Doesn’t vent sewer gases outside.
Installation Steps:
- Connect the P-trap to the sink drain.
- Install a vertical pipe extending upward from the drain line, above the flood rim of the sink.
- Attach the AAV to the top of this vertical pipe, using thread sealant.
- Ensure the AAV is accessible for inspection and replacement.
- Test the drain to confirm proper flow and valve operation.
Important Note: Some jurisdictions require AAVs to be accessible for maintenance and replacement. This often means placing them within a cabinet space and not behind drywall.
3. Combination Waste and Vent System (CWV)
A “combination waste and vent” setup is an old-school way of plumbing that uses one single, extra-wide pipe to handle both the drain water and the air (venting). Because it’s doing two jobs at once, the pipe has to be a very specific size, have the perfect tilt, and can’t be too long. While you’re still allowed to use this method in some places, it’s not as popular as it used to be because the rules for setting it up are so tricky. If you’re thinking about using this, definitely check your local building rules first to see if it’s even allowed.
How a CWV Works:
- A larger diameter drainpipe is used.
- The slope of the pipe is carefully controlled.
- Horizontal distances are limited to prevent siphonage.
Advantages:
- Eliminates the need for separate vent lines.
Disadvantages:
- Complex design and installation.
- Strict code requirements.
- May not be suitable for all kitchen island configurations.
4. Wet Venting
Wet venting involves using a drain line from another fixture (e.g., a bathroom sink) as a vent for the island sink. This method is typically allowed when the other fixture is located on the same floor and is close to the island sink. This requires careful consideration of the drainage layout and proper sizing of the pipes to avoid overloading the system and ensure adequate venting.
How Wet Venting Works:
- The island sink drain connects to the drain line of another fixture.
- The shared drain line serves as both a drain and a vent.
Advantages:
- Can reduce the amount of piping needed.
Disadvantages:
- Complex design and code requirements.
- Not always permitted.
- Risk of overloading the drain system.
Factors to Consider When Choosing a Venting Method
Selecting the appropriate venting method for your kitchen island sink depends on several factors:
- Local Plumbing Codes: This is the most important factor. Always check with your local building department to determine which methods are permitted in your area. Island sink plumbing code compliance is non-negotiable.
- Island Configuration: The size and shape of your kitchen island, as well as the available space underneath, will influence your choice.
- Accessibility: Ensure the vent is accessible for inspection and maintenance, especially if using an AAV.
- Cost: The cost of materials and labor can vary depending on the chosen method.
- DIY vs. Professional Installation: Some methods are easier to install than others. If you’re not comfortable with plumbing, it’s best to hire a qualified plumber.
Common Mistakes to Avoid
- Ignoring Local Codes: Failing to check local plumbing codes is a recipe for disaster. Always obtain the necessary permits and follow code requirements.
- Improper Slope: Maintaining the correct slope of the drain lines is crucial for proper drainage. Typically, a slope of ¼ inch per foot is required.
- Using the Wrong Size Pipe: Using undersized drainpipes can lead to clogs and slow draining. Use the size pipe specified by the plumbing code.
- Over-Tightening AAVs: Over-tightening can damage the valve and prevent it from functioning correctly.
- Covering AAVs: Enclosing an AAV in a sealed space can prevent it from working properly. AAVs require air circulation to function.
Troubleshooting Common Venting Problems
Even with proper installation, venting problems can sometimes occur. Here are some common issues and how to address them:
- Slow Draining: Check for clogs in the drainpipe or P-trap. Ensure the vent is not blocked.
- Gurgling Noises: This indicates a venting problem. Check the AAV (if applicable) to ensure it’s functioning correctly. Inspect the vent line for obstructions.
- Sewer Gas Odors: This indicates a broken P-trap seal. Check for leaks in the drain lines. Ensure the vent is functioning properly to prevent siphonage.
- Leaks: Inspect all connections for leaks. Tighten fittings as needed. Replace damaged pipes or fittings.
Maintaining Your Island Sink Venting System
Regular maintenance can help prevent venting problems and extend the lifespan of your plumbing system.
- Flush Drains Regularly: Use hot water and a drain cleaner to flush the drains regularly and prevent clogs.
- Inspect AAVs Periodically: Check AAVs for signs of wear or damage. Replace them as needed.
- Clean Vent Lines: Periodically clean the vent lines to remove any obstructions.
- Listen for Unusual Noises: Pay attention to any unusual noises, such as gurgling or whistling, which could indicate a venting problem.
Island Sink Drain Solutions: Choosing the Right Drain Components
Beyond the venting itself, selecting the right drain components contributes significantly to the overall efficiency and functionality of your island sink drain solutions. This includes the P-trap, tailpiece, and any connecting pipes. Opt for durable materials like PVC or ABS, ensuring they are appropriately sized according to local plumbing codes. A well-chosen and properly installed drain system will minimize the risk of clogs and leaks, providing long-lasting performance.
Kitchen Island Ventless Plumbing: Is It Really Possible?
While the term kitchen island ventless plumbing might seem appealing, it’s crucial to clarify what it entails. True ventless plumbing, without any form of venting, is rarely permitted by modern plumbing codes due to the risk of siphonage and sewer gas intrusion. The use of AAVs is often considered a form of “ventless” plumbing in common parlance because it avoids the need for a traditional vent stack extending to the roof, but it is in fact a type of venting. Therefore, aiming for genuinely ventless plumbing is generally not a viable or code-compliant option.
Table of Venting Methods Comparison
| Venting Method | Advantages | Disadvantages | Code Compliance | Difficulty |
|---|---|---|---|---|
| Loop Vent | Effective, widely accepted | More complex, requires space | Generally | Moderate |
| Air Admittance Valve | Simple, space-saving, cost-effective | May not be permitted, can fail, doesn’t vent sewer gases outside | Varies | Easy |
| Combination Waste/Vent | Eliminates separate vent lines | Complex, strict requirements, may not be suitable | Varies | Difficult |
| Wet Venting | Can reduce piping | Complex, not always permitted, risk of overloading | Varies | Moderate |
The Importance of Professional Consultation
While this guide provides a comprehensive overview of how to vent a sink in a kitchen island, it’s not a substitute for professional advice. Consulting with a qualified plumber is essential to ensure your venting system meets local code requirements and functions correctly. A plumber can assess your specific situation, recommend the best venting method, and perform the installation to ensure a safe and efficient plumbing system. Getting professional advice is particularly important if you’re dealing with complex plumbing configurations or have any doubts about your ability to perform the work safely.
Fathoming Siphonage Prevention for Island Sinks
The ultimate goal of any venting system for an island sink is siphonage prevention. Siphonage, the unwanted draining of water from the P-trap, can lead to unpleasant odors and potential health hazards. Understanding the principles of siphonage and how different venting methods counteract it is key to ensuring a properly functioning and safe kitchen island sink. By allowing air into the drain line, vents equalize pressure and prevent the vacuum that causes siphonage.
Conclusion
Venting a kitchen island sink properly is essential for a functional and code-compliant kitchen. Understanding the different venting methods, their advantages and disadvantages, and local plumbing codes is critical. Whether you choose a loop vent, an air admittance valve, or another approved method, ensure the installation is done correctly to prevent siphonage, sewer gas odors, and other plumbing problems. When in doubt, consult with a qualified plumber to ensure a safe and efficient venting system. With careful planning and proper installation, your kitchen island sink will function flawlessly for years to come.
Frequently Asked Questions (FAQ)
Q: Can I use an AAV for my kitchen island sink?
A: Whether you can use an AAV for your kitchen island depends on your local plumbing codes. Some jurisdictions allow them, while others do not. Always check with your local building department before installing an AAV.
Q: What is the best way to vent a kitchen island sink?
A: The best way to vent island sink depends on your specific situation and local codes. Loop vents are often preferred, but AAVs can be a good option if permitted.
Q: How high should a loop vent be?
A: A loop vent should rise as high as possible under the countertop, ideally above the flood rim of the sink.
Q: Are air admittance valves reliable?
A: AAVs can be reliable, but they can also fail over time. Regular inspection and replacement may be necessary.
Q: What happens if my kitchen island sink is not vented properly?
A: If your kitchen island sink isn’t vented properly, you may experience slow draining, gurgling noises, and sewer gas odors.
Q: Who is responsible for ensuring my kitchen island sink is vented according to code?
A: The homeowner is ultimately responsible, but a licensed plumber will ensure the work complies with all applicable island sink plumbing code regulations.
Q: Can I vent my island sink through an outside wall instead of the roof?
A: Generally no, as this would not be considered proper venting to the atmosphere, which is a fundamental requirement of most plumbing codes. A loop vent or AAV (if allowed) are the common solutions.

Hi, I’m Larry Fish, the mind behind MyGrinderGuide.com.. With a passion for all things kitchen appliances, I created this blog to share my hands-on experience and expert knowledge. Whether it’s helping you choose the right tools for your culinary adventures or offering tips to make your kitchen more efficient, I’m here to guide you. My goal is to make your time in the kitchen not only easier but also enjoyable! Welcome to my world of kitchen mastery!