
Can I sharpen a drill bit on a grinder? Yes, you can sharpen a drill bit on a grinder. It’s a cost-effective way to maintain your drill bits and extend their lifespan. This guide will show you how to sharpen drill bits using a bench grinder safely and effectively.
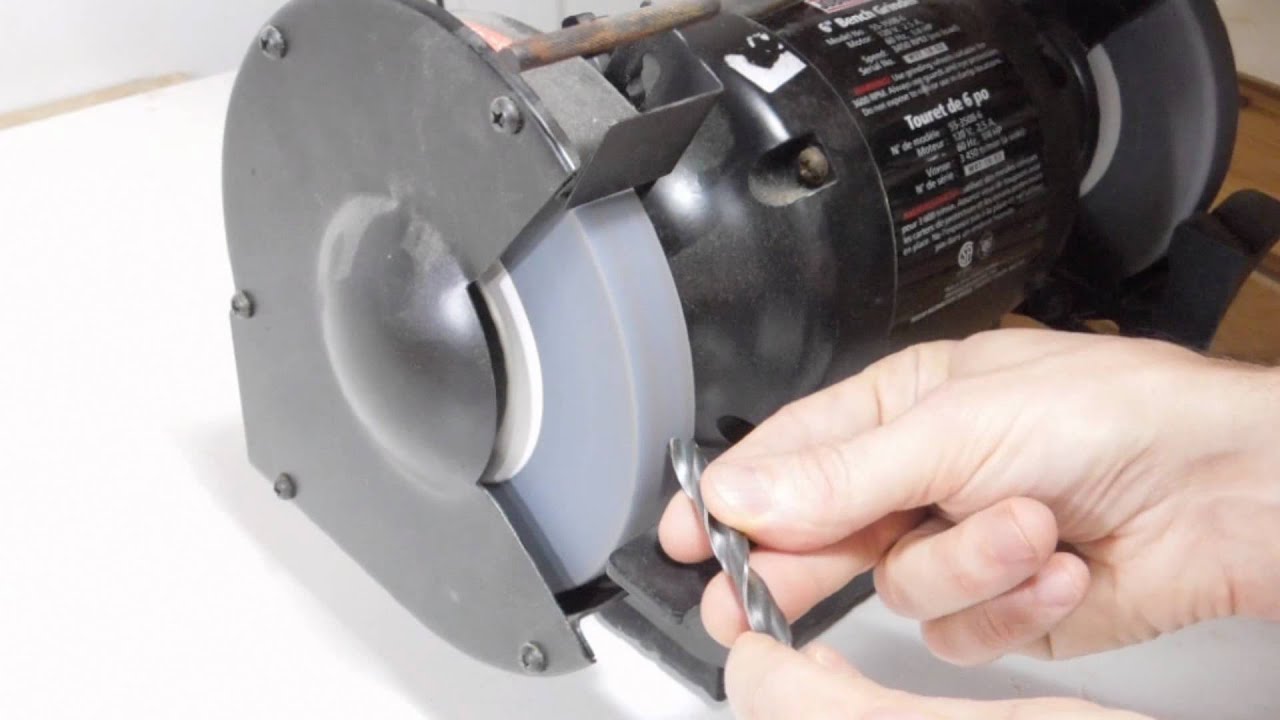
Image Source: i.ytimg.com
Why Sharpen Your Drill Bits?
Dull drill bits are a pain. They can:
- Make drilling harder and slower.
- Create rough, uneven holes.
- Cause the drill bit to wander.
- Overheat and damage the bit or the material you are drilling.
- Require more force, increasing the risk of injury.
Sharpening your drill bits yourself saves money and ensures you always have sharp bits ready to go.
Choosing the Right Grinder and Wheel
To sharpen drill bits with a bench grinder, you need the right tools.
Selecting a Bench Grinder
A 6-inch or 8-inch bench grinder works well for most drill bit sharpening tasks. Look for a grinder with:
- Adjustable tool rests.
- Eye shields.
- A sturdy base.
- A variable-speed motor (optional, but helpful).
Choosing the Right Grinding Wheel Grit for Drill Bits
The grinding wheel grit for drill bits is very important. A medium grit wheel is a good choice for general-purpose sharpening.
- Coarse Grit (40-60): Removes material quickly. Use this for very dull or damaged bits, but be careful not to overheat the bit.
- Medium Grit (60-80): A good all-around choice for most sharpening needs.
- Fine Grit (100+): Creates a very smooth finish. Use this for honing the cutting edge after sharpening with a medium grit wheel.
Aluminum oxide wheels are a popular choice for sharpening steel drill bits. CBN (Cubic Boron Nitride) wheels are also very effective, cut cooler and last longer, but are more expensive. A drill bit sharpening wheel made of CBN is a great option if you sharpen frequently.
Dressing the Grinding Wheel
Before you begin, “dress” the grinding wheel. Dressing removes any build-up of material on the wheel and makes it flat. Use a wheel dresser to do this.
Getting Ready to Sharpen
Proper preparation is key to safe and effective drill bit sharpening.
Safety First!
- Wear Safety Glasses: Always protect your eyes from flying sparks and debris.
- Wear a Dust Mask: Grinding creates dust particles that can be harmful to breathe.
- Use Proper Lighting: Make sure you have enough light to see what you are doing.
- Keep a Container of Water Nearby: Dip the drill bit in water frequently to keep it cool and prevent overheating.
Inspecting the Drill Bit
Before you start sharpening, check the drill bit for any damage.
- Cracks: If the bit has cracks, it should be replaced, not sharpened.
- Chips: Small chips can be ground out.
- Wear: Look at the cutting edges and the chisel edge to see where the bit needs sharpening.
Drill Bit Sharpening Techniques
The goal of drill bit sharpening techniques is to restore the original drill bit sharpening angle and cutting edges.
Fathoming the Drill Bit Geometry
The most common type of drill bit is the twist drill bit. Key angles:
- Point Angle: The angle at the tip of the bit. Typically 118 degrees for general-purpose drilling.
- Lip Angle (Clearance Angle): The angle behind the cutting edge. This angle lets the cutting edge cut into the material.
- Chisel Edge Angle: The angle of the chisel edge in the center of the bit.
The Hand Sharpening Method
This is the most common method, but it requires practice.
- Positioning: Hold the drill bit with both hands. Rest one hand on the tool rest for stability.
- Angle: Start with the cutting edge parallel to the grinding wheel. Raise the shank of the bit slightly to create the correct lip angle (about 8-12 degrees).
- Grinding: Gently bring the cutting edge into contact with the wheel. Use a smooth, sweeping motion to grind the cutting edge.
- Cooling: Dip the drill bit in water frequently to prevent overheating.
- Repeat: Repeat the process for the other cutting edge. It is very important to remove the same amount of material from each side, which will ensure the bit is centered.
- Check: Check the point angle and lip angle. Adjust your technique as needed.
Using a Sharpening Jig for Drill Bits
A sharpening jig for drill bits can help you achieve consistent angles and make the process easier, especially if you are grinding drill bits for beginners.
- Choose a Jig: There are many different types of drill bit sharpening jigs available. Some are simple and clamp onto the drill bit, while others are more complex and have adjustable angles.
- Set the Angle: Adjust the jig to the desired point angle. For general-purpose drilling, 118 degrees is a good starting point.
- Secure the Bit: Clamp the drill bit into the jig.
- Grind: Follow the jig’s instructions to grind the cutting edges.
- Cool: Dip the drill bit in water frequently.
- Repeat: Repeat for the other cutting edge.
Sharpening Drill Bits Safely
Sharpening drill bits safely is very important.
- Keep your hands away from the grinding wheel.
- Use light pressure when grinding.
- Do not overheat the drill bit.
- Take breaks to avoid fatigue.
Step-by-Step Guide: How to Sharpen Twist Drill Bits
Here’s a detailed guide on how to sharpen twist drill bits using the hand sharpening method:
- Inspect: Examine the drill bit for damage.
- Prepare: Put on your safety glasses and dust mask. Make sure you have a container of water nearby.
- Position: Hold the drill bit with the cutting edge parallel to the grinding wheel.
- Angle: Raise the shank of the bit slightly to create the lip angle. The correct best angle for sharpening drill bits is around 8-12 degrees for the lip angle and 118 degrees for the point angle.
- Grind: Gently bring the cutting edge into contact with the wheel. Use a smooth, sweeping motion.
- Cool: Dip the drill bit in water.
- Repeat: Repeat the process for the other cutting edge, matching the amount of material removed.
- Check: Check the point angle, lip angle, and chisel edge. Adjust your technique as needed.
- Hone (Optional): Use a fine grit wheel or a honing stone to smooth the cutting edges.
Addressing Common Problems
- Uneven Cutting Edges: If the cutting edges are uneven, one side will cut more than the other. This can cause the drill bit to wander. To fix this, grind the longer cutting edge until it matches the shorter one.
- Overheating: Overheating can ruin the temper of the steel and make the drill bit brittle. Dip the bit in water frequently to prevent this.
- Rounded Cutting Edges: Rounded cutting edges are a sign of a dull drill bit. Use a coarse grit wheel to restore the sharp edges.
- Incorrect Angles: Use a drill gauge or protractor to check the angles. Adjust your grinding technique to achieve the correct angles.
Tips for Better Results
- Practice: Sharpening drill bits takes practice. Don’t be discouraged if you don’t get it right away.
- Use a Guide: A drill bit sharpening guide or jig can help you maintain consistent angles.
- Take Your Time: Don’t rush the process. Take your time and focus on getting the angles right.
- Keep the Wheel Clean: A dirty grinding wheel will not sharpen as effectively. Dress the wheel regularly.
- Cool the Bit: Always cool the drill bit to prevent overheating.
- Use Light Pressure: Light pressure prevents overheating and gives you more control.
Drill Bit Types and Sharpening Considerations
While the general principles apply, different drill bit types may need slight adjustments in sharpening technique.
- High-Speed Steel (HSS) Bits: These are the most common and suitable for general-purpose drilling. The techniques described above work well.
- Cobalt Bits: These are more heat-resistant than HSS bits and are used for drilling harder materials like stainless steel. Sharpen them like HSS bits, but be extra careful not to overheat them.
- Titanium-Coated Bits: The coating can wear off with repeated sharpening, so sharpen these sparingly.
- Masonry Bits: These bits have a carbide tip for drilling concrete, brick, and stone. Sharpening masonry bits requires a specialized grinding wheel.
- Wood Boring Bits (Spade Bits, Forstner Bits): These have different geometries than twist drill bits. Specialized sharpening tools or careful hand filing are required.
Frequently Asked Questions (FAQ)
- What is the best angle for sharpening drill bits?
The best angle for sharpening drill bits is generally 118 degrees for the point angle and 8-12 degrees for the lip angle. This is suitable for general-purpose drilling. - Can I use a file to sharpen a drill bit?
Yes, you can use a file to sharpen a drill bit, but it is more difficult and time-consuming than using a grinder. A file is better suited for touching up a slightly dull bit rather than a completely dull one. - What happens if I overheat the drill bit while sharpening?
Overheating can ruin the temper of the steel and make the drill bit brittle. It may also change the color of the steel to blue or purple, which is a sign of overheating. If this happens, the bit may be more prone to breakage. - How do I know when a drill bit is sharp enough?
A sharp drill bit will cut smoothly and easily into the material you are drilling. The shavings produced should be long and continuous, not small and crumbly. - What’s the difference between sharpening and honing?
Sharpening restores the cutting edge by removing material, while honing smooths and refines the cutting edge after sharpening.
If you follow this guide and practice a little bit, you’ll be sharpening your own drill bits on a grinder like a pro in no time. It’s a great skill to have because it saves you from having to spend money on new bits every time they get dull.

Hi, I’m Larry Fish, the mind behind MyGrinderGuide.com.. With a passion for all things kitchen appliances, I created this blog to share my hands-on experience and expert knowledge. Whether it’s helping you choose the right tools for your culinary adventures or offering tips to make your kitchen more efficient, I’m here to guide you. My goal is to make your time in the kitchen not only easier but also enjoyable! Welcome to my world of kitchen mastery!