
Curious about how to use your KitchenAid meat grinder? This guide has you covered. I’ll walk you through everything from putting it together to getting it clean afterward, so you can start making fresh, tasty meals right at home without any hassle.
Image Source: www.kitchenaid.com
Why Grind Your Own Meat?
Grinding your own meat at home offers several advantages over buying pre-ground meat from the store. Freshness is key – you control the quality and know exactly what goes into your ground meat. You can choose the best meats for grinding, experiment with different cuts, and even create custom blends. Grinding meat at home also lets you avoid additives and preservatives often found in store-bought ground meat.
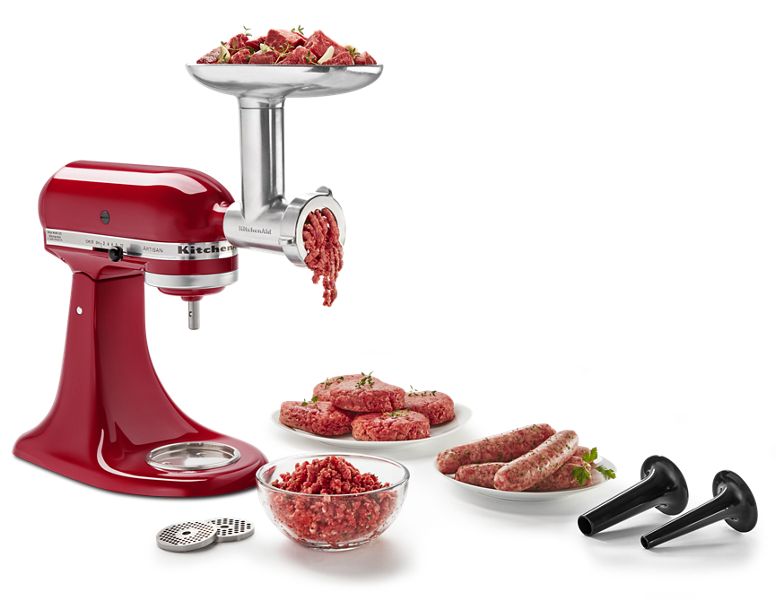
Parts of Your KitchenAid Meat Grinder
Before you begin, familiarize yourself with the parts of your KitchenAid meat grinder. Knowing the names and functions of each component will make the assembly and operation process much smoother. These components are also the main focus of Kitchenaid Grinder Troubleshooting, should you experience any issues.
- Grinder Body: This is the main housing for the grinding mechanism. It attaches to the KitchenAid stand mixer.
- Grinding Worm (Auger): This spiral-shaped piece pushes the meat through the grinder.
- Grinding Plates: These metal discs with different sized holes determine the coarseness of the grind. Typically, a coarse, medium, and fine grinding plate are included.
- Cutting Blade: This four-bladed blade sits against the grinding plate and cuts the meat as it’s pushed through.
- Retaining Ring: This ring screws onto the grinder body to hold all the components in place.
- Food Pusher: This tool helps push the meat down the feed tube safely.
- Sausage Stuffer Attachments (optional): These cones attach to the grinder body for making homemade sausage with KitchenAid.
Assembling Your KitchenAid Meat Grinder
Proper assembly is essential for safe and efficient operation. Here’s how to assemble your KitchenAid meat grinder.
- Attach the Grinder Body: Secure the grinder body to the KitchenAid stand mixer’s power hub. Tighten the attachment knob until secure.
- Insert the Grinding Worm: Slide the grinding worm into the grinder body, with the narrow end going in first.
- Place the Cutting Blade: Put the cutting blade onto the end of the grinding worm shaft. Make sure the blade is facing outwards, with the flat side against the grinding plate.
- Choose and Install the Grinding Plate: Select your desired grinding plate (coarse, medium, or fine) and place it against the cutting blade. The small notch on the plate should align with the notch in the grinder body.
- Secure with the Retaining Ring: Screw the retaining ring onto the grinder body until it is snug, but do not overtighten.
Kitchenaid Food Grinder Instructions: Assembly Summary
| Step | Description |
|---|---|
| 1 | Attach the grinder body to the stand mixer. |
| 2 | Insert the grinding worm. |
| 3 | Place the cutting blade (facing outwards). |
| 4 | Select and install the grinding plate. |
| 5 | Secure with the retaining ring (do not overtighten). |
Preparing Your Meat for Grinding
Proper preparation is crucial for successful grinding.
- Chill the Meat: Partially freezing the meat for about 30-60 minutes before grinding helps it maintain its shape and prevents smearing. The ideal temperature is around 28-30°F (-2 to -1°C).
- Cut the Meat into Strips or Cubes: Cut the meat into 1-inch (2.5 cm) strips or cubes that will easily fit into the grinder’s feed tube.
- Remove Bones and Tendons: Ensure all bones, tendons, and tough connective tissues are removed from the meat. These can damage the grinder and affect the quality of the ground meat.
Grinding Meat: A Step-by-Step Guide
Here’s how to grind meat using your KitchenAid meat grinder:
- Set Up Your Work Station: Place a clean bowl under the grinder to collect the ground meat.
- Turn on the Stand Mixer: Turn the KitchenAid stand mixer to speed 4 or medium speed.
- Feed the Meat: Gently feed the chilled meat pieces into the grinder’s feed tube. Use the food pusher to safely push the meat down towards the grinding worm. Avoid forcing the meat.
- Collect the Ground Meat: The ground meat will come out through the grinding plate into the bowl.
- Repeat if Necessary: If you want a finer grind, you can grind the meat a second time using a finer grinding plate.
Best Meats for Grinding
The best meats for grinding include:
- Beef: Chuck roast, sirloin, round steak, brisket
- Pork: Pork shoulder (Boston butt), pork loin
- Poultry: Chicken thighs, turkey thighs
- Lamb: Lamb shoulder, leg of lamb
- Venison: Venison shoulder, leg of venison
For best results, use a combination of lean meat and fat. A ratio of 80% lean meat to 20% fat is a good starting point for ground beef. You can adjust the ratio to your preference.
Making Homemade Sausage with KitchenAid
Your KitchenAid meat grinder can also be used to make delicious homemade sausage. You’ll need the sausage stuffer attachments for this.
- Prepare the Sausage Mixture: Grind your chosen meat using the desired grinding plate. Mix in seasonings, herbs, and spices according to your recipe.
- Attach the Sausage Stuffer: Remove the grinding plate and cutting blade. Attach the sausage stuffer attachment to the grinder body.
- Stuff the Casings: Slide a sausage casing onto the sausage stuffer nozzle. Slowly feed the sausage mixture into the grinder, guiding the casing as it fills. Be careful not to overstuff the casings.
- Twist and Link the Sausages: Once the casing is filled, twist it to create individual sausages.
Meat Grinder Recipes
There are endless possibilities when it comes to meat grinder recipes. Here are a few ideas to get you started:
- Ground Beef: Burgers, meatloaf, chili, tacos, spaghetti sauce
- Ground Pork: Sausage, dumplings, stir-fries, meat pies
- Ground Chicken: Chicken burgers, meatballs, lettuce wraps
- Sausage: Italian sausage, breakfast sausage, chorizo, bratwurst
KitchenAid Meat Grinder Cleaning
Proper cleaning is essential for hygiene and to prolong the life of your meat grinder. It’s very easy to clean Kitchenaid meat grinder, if it’s done directly after use.
- Disassemble the Grinder: Remove the retaining ring, grinding plate, cutting blade, grinding worm, and grinder body from the stand mixer.
- Wash the Parts: Wash all the parts in hot, soapy water. Use a brush to remove any stubborn meat residue.
- Dry the Parts: Thoroughly dry all the parts with a clean towel or allow them to air dry completely.
- Lubricate the Grinding Worm: Lightly coat the grinding worm with food-grade mineral oil to prevent rusting.
- Reassemble and Store: Reassemble the grinder and store it in a dry place.
Kitchenaid Meat Grinder Cleaning: A Quick Guide
| Step | Action |
|---|---|
| 1 | Disassemble the grinder. |
| 2 | Wash parts in hot, soapy water. |
| 3 | Dry all parts thoroughly. |
| 4 | Lubricate the grinding worm. |
| 5 | Reassemble and store. |
Kitchenaid Grinder Troubleshooting
Here are some common problems you might encounter with your KitchenAid meat grinder and how to fix them:
- Meat Smearing: This is often caused by the meat not being cold enough or the blade being dull. Make sure the meat is properly chilled and the blade is sharp.
- Grinder Not Grinding: Ensure the grinder is assembled correctly and that the retaining ring is tight enough. Also, check that there are no obstructions in the feed tube.
- Grinder Overheating: If the grinder overheats, turn off the stand mixer and allow it to cool down before continuing. Avoid forcing too much meat into the grinder at once.
- Rusting: To prevent rusting, always dry the parts thoroughly after washing and lubricate the grinding worm.
Meat Grinder Safety Tips
- Keep Fingers Away from the Feed Tube: Always use the food pusher to feed the meat into the grinder.
- Do Not Force the Meat: Let the grinder do the work. Forcing the meat can damage the grinder and cause injury.
- Use Caution When Handling Sharp Blades: The cutting blade is very sharp. Handle it with care during assembly, disassembly, and cleaning.
- Unplug the Stand Mixer Before Disassembling: Always unplug the stand mixer from the power outlet before disassembling or cleaning the grinder.
- Read the Manual: Always refer to the KitchenAid meat grinder manual for detailed instructions and safety information.
Fathoming Grinding Plates
The grinding plates play a pivotal role in determining the texture of your ground meat. Each plate features holes of varying sizes, dictating the coarseness of the final product.
Coarse Grinding Plate
Ideal for:
- Creating a hearty, rustic texture in sausages.
- Preparing meat for dishes where a chunkier consistency is desired, such as chili or certain types of meat sauces.
- First grind for double grinding process.
Medium Grinding Plate
Versatile choice for:
- Everyday ground meat needs, like hamburgers and meatloaf.
- Achieving a balanced texture that is neither too coarse nor too fine.
- Many meat grinder recipes.
Fine Grinding Plate
Best suited for:
- Creating a smooth, even texture in pâtés and terrines.
- Making finely ground sausages, such as frankfurters.
- Situations where a very fine consistency is desired.
Kitchenaid Meat Grinder Attachments
Beyond the standard grinding plates, several Kitchenaid meat grinder attachments can expand the functionality of your grinder.
- Sausage Stuffer Kit: As described earlier, this attachment allows you to easily make homemade sausages.
- Food Tray: A larger food tray can be helpful when grinding large quantities of meat.
- Grinding Plates: Additional plates can be purchased if you need finer or coarser grinds than those included in the standard set.
FAQs About Using a KitchenAid Meat Grinder
Q: Can I grind bones in my KitchenAid meat grinder?
A: No, you should not grind bones in your KitchenAid meat grinder. Bones can damage the grinder and dull the blade.
Q: What is the best way to clean my KitchenAid meat grinder?
A: Disassemble the grinder, wash all parts in hot, soapy water, dry thoroughly, and lubricate the grinding worm with food-grade mineral oil.
Q: Can I use my KitchenAid meat grinder to grind vegetables?
A: Yes, you can use your KitchenAid meat grinder to grind vegetables, but it is primarily designed for grinding meat. It’s important to clean the grinder thoroughly after grinding vegetables to prevent cross-contamination if you plan to grind meat later.
Q: Who is the best to contact regarding KitchenAid meat grinder replacement parts?
A: You can purchase KitchenAid meat grinder replacement parts from the KitchenAid website, authorized KitchenAid retailers, or online marketplaces like Amazon.

Hi, I’m Larry Fish, the mind behind MyGrinderGuide.com.. With a passion for all things kitchen appliances, I created this blog to share my hands-on experience and expert knowledge. Whether it’s helping you choose the right tools for your culinary adventures or offering tips to make your kitchen more efficient, I’m here to guide you. My goal is to make your time in the kitchen not only easier but also enjoyable! Welcome to my world of kitchen mastery!