
What is involved in changing a grinder blade? Changing a grinder blade, also known as replacing a grinder disc, involves safely removing the old, worn-out blade and installing a new one. This process requires specific tools and precautions to prevent injuries and ensure the grinder operates correctly. This comprehensive guide will walk you through angle grinder blade replacement, covering everything from removing grinder wheel safely to angle grinder disc removal, and how to install grinder blade.
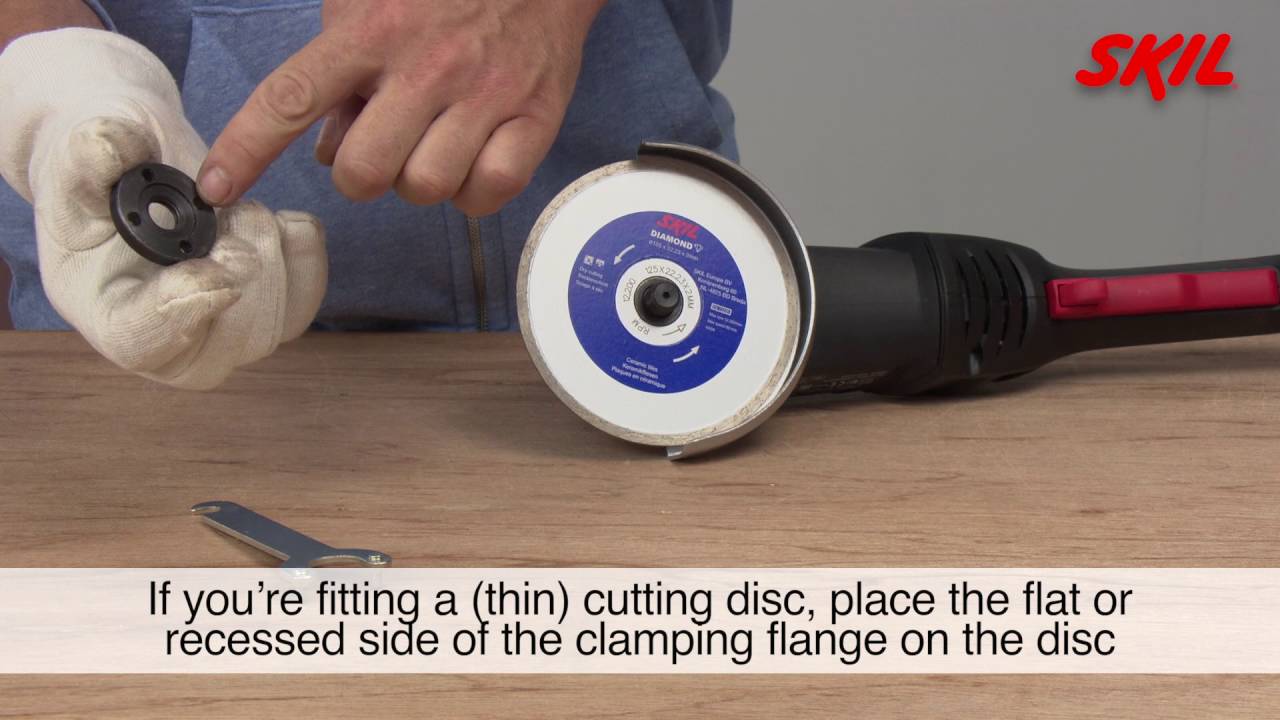
Image Source: i.ytimg.com
The Importance of Changing Your Grinder Blade
Changing the disc on your angle grinder regularly is really important for both safety and getting the job done right. A worn-out or damaged blade can actually break apart while you’re using it, which could cause serious injury. Plus, a dull blade forces you to push harder, making the tool difficult to control and giving you a messy result. Swapping out the disc is just a normal part of taking care of your tools.
Safety First: Preparing to Change Your Grinder Blade
Before you even think about how to install grinder blade, safety is paramount. Always follow these steps:
- Unplug the Grinder: This is the most crucial step. Ensure the grinder is completely disconnected from the power source.
- Wear Safety Gear: At a minimum, wear safety glasses, gloves, and a dust mask. Hearing protection is also recommended.
- Inspect the New Blade: Check the new blade for any cracks or damage before installation.
- Read the Manual: Familiarize yourself with your grinder’s specific instructions for blade changes.
- Clear the Work Area: Remove any flammable materials or obstructions from your workspace.
Tools You’ll Need for Replacing Grinder Disc
Gather these tools before you begin the process of replacing grinder disc or changing cutting disc:
- Angle Grinder Wrench (Spanner Wrench): This specialized wrench is designed to loosen and tighten the locking nut that secures the blade.
- New Grinder Blade: Ensure it’s the correct size and type for your grinder and the material you’ll be working with.
- Gloves: To protect your hands from sharp edges and debris.
- Safety Glasses: Essential for protecting your eyes from flying particles.
- Dust Mask: To avoid inhaling harmful dust.
- Grinder Blade Removal Tool (Optional): Some aftermarket tools can make removing a stuck blade easier.
- Clean Cloth: For wiping down the grinder and new blade.
Step-by-Step Guide: Grinder Blade Removal
This section will guide you through removing grinder wheel safely.
1. Securing the Grinder
- Place the grinder on a stable surface. Some grinders have a spindle lock button that helps secure the spindle while you loosen the nut. If yours has one, engage it.
2. Locating the Locking Nut
- The locking nut is the circular nut in the center of the grinder blade. It holds the blade firmly in place.
3. Using the Angle Grinder Wrench
- Insert the prongs of the angle grinder wrench into the corresponding slots on the locking nut.
4. Loosening the Nut (Removing Grinder Wheel)
- Important: The direction to loosen the nut can vary depending on your grinder model. Typically, you’ll need to turn it counterclockwise. However, some grinders have reverse-threaded nuts. Consult your grinder’s manual to confirm the correct direction.
- Apply steady pressure to the wrench until the nut loosens. It may require some force, especially if the nut is tightly secured or corroded.
- If the nut is exceptionally stubborn, try applying a penetrating oil (like WD-40) and let it sit for a few minutes before attempting to loosen it again.
5. Removing the Old Blade
- Once the nut is loose, you should be able to unscrew it by hand.
- Carefully remove the locking nut and the outer flange (the metal disc that sits between the nut and the blade).
- Gently slide the old grinder blade off the spindle.
- Inspect the inner flange (the metal disc that sits against the grinder) for any damage or wear. Clean it if necessary.
Step-by-Step Guide: Grinder Blade Installation
Now, let’s move on to how to install grinder blade or grinder blade installation properly.
1. Preparing the New Blade
- Inspect the new blade for any damage or defects.
- Ensure the blade is the correct size and type for your grinder and the intended application.
- Clean the blade with a clean cloth to remove any dust or debris.
2. Mounting the New Blade
- Place the new blade onto the grinder spindle, ensuring it sits flush against the inner flange. The blade should fit snugly but not be forced.
- Make sure the blade is oriented correctly, with the arrow on the blade pointing in the direction of rotation (indicated on the grinder).
3. Reinstalling the Flange and Locking Nut
- Place the outer flange back onto the spindle, ensuring it aligns properly with the blade.
- Thread the locking nut back onto the spindle by hand, turning it clockwise until it’s snug.
4. Tightening the Nut Securely
- Use the angle grinder wrench to tighten the locking nut securely. Again, the direction to tighten the nut may vary depending on your grinder model. Refer to your manual for the correct direction.
- Avoid overtightening the nut, as this can damage the blade or the grinder. A firm, snug fit is sufficient.
5. Final Checks Before Use
- Double-check that the blade is securely mounted and that the locking nut is properly tightened.
- Ensure the blade spins freely without any wobbling or obstructions.
- Plug the grinder back in (if it was unplugged).
- Run the grinder briefly to ensure the blade is running smoothly and safely.
Tips for Dealing with a Stuck Grinder Blade
Sometimes, removing a grinder wheel can be difficult due to rust, debris, or overtightening. Here are some tips for dealing with a stuck grinder blade:
- Penetrating Oil: Apply penetrating oil (like WD-40) to the locking nut and let it sit for several minutes to loosen any corrosion.
- Heat: Use a heat gun (carefully!) to heat the locking nut. This can help expand the metal and loosen the nut. Be extremely cautious when using heat, and avoid overheating the blade or grinder.
- Grinder Blade Removal Tool: Consider using a specialized grinder blade removal tool, which provides extra leverage and grip.
- Vice Grips: If the angle grinder wrench slips, carefully use vice grips to get a better grip on the locking nut. Be careful not to damage the nut.
- Professional Help: If you’ve tried everything and the blade is still stuck, consider taking the grinder to a qualified repair technician.
Choosing the Right Grinder Blade
The type of grinder blade you need depends on the material you’ll be working with. Here’s a quick overview:
| Blade Type | Material | Application |
|---|---|---|
| Abrasive Cutting Discs | Metal (steel, iron, aluminum) | Cutting, slicing through metal |
| Grinding Wheels | Metal, concrete, stone | Grinding, shaping, removing material |
| Diamond Blades | Concrete, tile, stone, masonry | Cutting hard, abrasive materials |
| Flap Discs | Metal, wood | Sanding, blending, finishing |
| Wire Wheels | Metal | Removing rust, paint, and scale |
Always choose a blade that is specifically designed for the material you’ll be working with. Using the wrong blade can be dangerous and ineffective.
Safety Precautions During Grinding
Even with a new blade installed, it’s crucial to follow safety precautions when using an angle grinder:
- Keep a Firm Grip: Hold the grinder firmly with both hands.
- Maintain a Stable Stance: Keep your feet firmly planted and maintain a balanced stance.
- Avoid Overreaching: Don’t reach too far or work in awkward positions.
- Use the Guard: Always use the grinder’s guard to protect yourself from flying debris.
- Work in a Well-Ventilated Area: Grinding can produce harmful dust and fumes.
- Take Breaks: Avoid fatigue by taking regular breaks.
Common Mistakes to Avoid During Angle Grinder Blade Replacement
- Forgetting to Unplug the Grinder: This is the most common and potentially dangerous mistake.
- Using the Wrong Tools: Using improper tools can damage the grinder or the blade.
- Overtightening the Locking Nut: Overtightening can damage the blade or the grinder’s spindle.
- Using a Damaged Blade: Never use a blade that is cracked, chipped, or otherwise damaged.
- Ignoring Safety Gear: Always wear safety glasses, gloves, and a dust mask.
- Installing the Blade Backwards: Ensure the blade is oriented correctly, with the arrow pointing in the direction of rotation.
How to Store Grinder Blades
Proper storage can extend the life of your grinder blades and keep them safe.
- Keep Blades Dry: Store blades in a dry place to prevent rust and corrosion.
- Protect from Impact: Store blades in a way that prevents them from being dropped or damaged.
- Use Original Packaging: If possible, store blades in their original packaging.
- Label Blades: Label blades with their material type and grit size for easy identification.
- Store Away from Children: Keep grinder blades out of reach of children.
Fathoming the Grinder’s Anatomy: Key Components
Fathoming the key components of your angle grinder is essential for proper maintenance and blade replacement:
- Motor: Powers the grinder.
- Spindle: The rotating shaft that holds the blade.
- Locking Nut: Secures the blade to the spindle.
- Flanges: Metal discs that sandwich the blade and provide support.
- Guard: Protects the user from flying debris.
- Handle: Provides a grip for the user.
- Power Cord: Connects the grinder to the power source.
Conclusion
Replacing grinder disc might seem daunting, but with the right tools, knowledge, and safety precautions, it’s a task that most DIYers can handle. By following these steps and tips, you can safely and efficiently change your grinder blade and keep your angle grinder operating at its best. Always prioritize safety and refer to your grinder’s manual for specific instructions. Replacing abrasive disc is key for maintaining a functional tool. Remember, proper maintenance ensures not only the longevity of your tools but also your safety.
Frequently Asked Questions (FAQ)
Q: How often should I change my grinder blade?
A: You should change your grinder blade when it becomes worn, damaged, or no longer cuts effectively. The frequency depends on the material you’re working with and how often you use the grinder. Always inspect your blades before each use.
Q: Can I use any type of blade on my angle grinder?
A: No, you should only use blades that are specifically designed for your angle grinder and the material you’re working with. Using the wrong blade can be dangerous and ineffective.
Q: What is the purpose of the locking nut?
A: The locking nut secures the grinder blade to the spindle. It’s essential to tighten it properly to prevent the blade from coming loose during use.
Q: Is it safe to use a grinder without a guard?
A: No, it is not safe. The guard protects you from flying debris and reduces the risk of injury. Always use the guard when operating an angle grinder.
Q: What should I do if the locking nut is stuck?
A: Try applying penetrating oil, using a heat gun, or using a specialized grinder blade removal tool. If you’re still unable to remove the nut, consider taking the grinder to a qualified repair technician.
Q: Can I sharpen my grinder blade?
A: While some specialized sharpening services exist for certain types of blades (like diamond blades), it’s generally not recommended to sharpen abrasive cutting discs or grinding wheels. These are designed to wear down and be replaced. Sharpening them can compromise their structural integrity and make them unsafe to use. It is generally advisable to focus on replacing grinder disc instead.

Hi, I’m Larry Fish, the mind behind MyGrinderGuide.com.. With a passion for all things kitchen appliances, I created this blog to share my hands-on experience and expert knowledge. Whether it’s helping you choose the right tools for your culinary adventures or offering tips to make your kitchen more efficient, I’m here to guide you. My goal is to make your time in the kitchen not only easier but also enjoyable! Welcome to my world of kitchen mastery!