
How do you change an angle grinder blade? Changing an angle grinder blade involves unplugging the grinder, using the spindle lock to secure the blade, loosening the lock nut with a wrench, removing the old blade, installing the new blade correctly, tightening the lock nut, and then testing the grinder. This article will walk you through each step with detailed instructions and vital safety information.
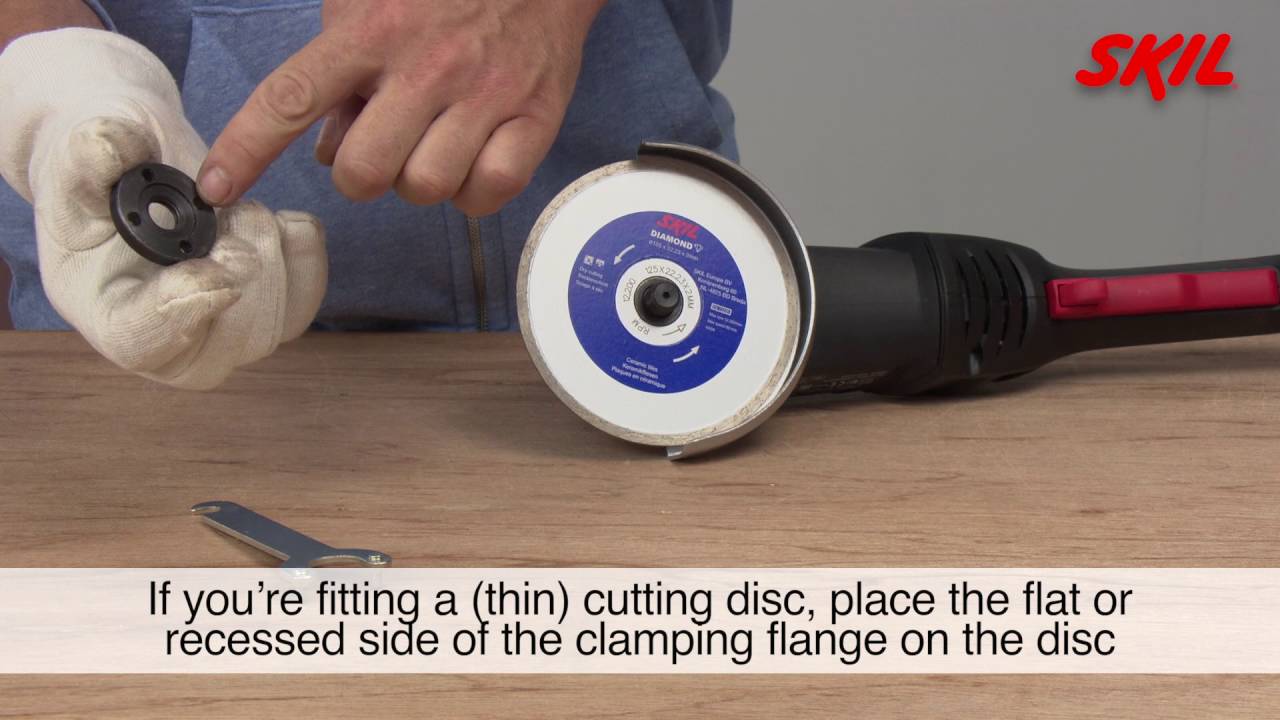
Image Source: i.ytimg.com
Why Replacing Your Angle Grinder Blade Is Important
A dull or damaged angle grinder blade can be dangerous and inefficient. Regular angle grinder blade replacement ensures:
- Optimal Cutting Performance: Sharp blades cut faster and cleaner.
- Reduced Risk of Kickback: Dull blades require more force, increasing the risk of the grinder kicking back.
- Safer Operation: Damaged blades can shatter, causing serious injury.
- Prolonged Tool Life: Using the correct blade for the job and replacing it when needed protects your angle grinder.
Tools You’ll Need
Before you start changing cutting wheel on your angle grinder, gather these essential tools:
- Angle Grinder Wrench (Spanner Wrench): Specifically designed to loosen and tighten the lock nut.
- New Angle Grinder Blade/Disc: Make sure it’s the right size and type for your grinder and the material you’re working with.
- Work Gloves: Protect your hands from sharp edges and debris.
- Safety Glasses or Face Shield: Essential for eye protection.
- Ear Protection: Angle grinders are loud; protect your hearing.
- Clean Rags: For wiping down the grinder and blades.
- Bench Vice (Optional): To help secure the grinder during blade changes, though not essential.
Safety First: Preparing for Blade Removal
Safety is paramount when dealing with power tools. Follow these precautions before starting the angle grinder blade removal process:
- Disconnect the Power: Unplug the angle grinder from the power outlet. Never attempt to change the blade while the grinder is connected to power.
- Wear Proper PPE: Put on your safety glasses, work gloves, and ear protection. A face shield offers even more protection.
- Inspect the Grinder: Check the grinder for any damage, such as frayed cords or loose parts. If you find any issues, have the grinder repaired before use.
- Clear the Work Area: Remove any obstacles or flammable materials from your work area.
- Read the Manual: Refer to your angle grinder’s user manual for specific safety guidelines and instructions.
- Ventilation: Ensure adequate ventilation, especially when working with materials that create dust or fumes.
Step-by-Step Guide: Removing the Old Blade
Here’s how to remove the old blade, ensuring a smooth angle grinder disc change:
Step 1: Locate the Spindle Lock
Most angle grinders have a spindle lock button. This button, when pressed, locks the spindle in place, preventing the blade from rotating. Find the spindle lock button on your grinder. It’s usually near the grinder head.
Step 2: Engage the Spindle Lock
Press and hold the spindle lock button. You may need to rotate the blade slightly by hand until the lock engages fully. You’ll feel or hear a click when the spindle is locked.
Step 3: Loosen the Lock Nut
Take the wrench that fits your grinder and place the little pins into the holes on the locking nut. Turn the wrench to the left to loosen it up. It might be really tight, so you’ll need to use steady pressure. If it won’t budge, try putting a little oil on it or giving the wrench a gentle tap with a rubber hammer to help get it moving.
Step 4: Remove the Lock Nut and Outer Flange
Once the lock nut is loose, unscrew it completely by hand. Remove the lock nut and the outer flange (the metal disc that sits between the nut and the blade). Keep these parts in a safe place, as you’ll need them to install the new blade.
Step 5: Remove the Old Blade
Carefully remove the old grinder disc from the spindle. Be mindful of any sharp edges or debris. Dispose of the old blade properly, following local regulations for hazardous waste disposal.
Installing the New Blade: A Detailed Walkthrough
Now that the old blade is removed, let’s focus on angle grinder blade installation.
Step 1: Inspect the New Blade
Before installation, inspect the new blade for any cracks, chips, or other damage. Do not use a damaged blade. Ensure the blade is compatible with your angle grinder in terms of size, arbor hole diameter, and maximum RPM rating.
Step 2: Clean the Inner Flange
Wipe down the inner flange (the metal disc that sits directly on the spindle) with a clean rag to remove any dirt or debris. This ensures a flush and secure fit for the new blade.
Step 3: Position the New Blade
Place the new angle grinder wheel onto the spindle, ensuring it sits flush against the inner flange. The label on the blade should face outwards. Make sure the arbor hole of the blade aligns perfectly with the spindle.
Step 4: Reinstall the Outer Flange and Lock Nut
Place the outer flange back onto the spindle, followed by the lock nut. Make sure the lock nut is oriented correctly (some lock nuts have a specific side that should face the blade).
Step 5: Tighten the Lock Nut
Engage the spindle lock button again. Using the angle grinder wrench, tighten the lock nut clockwise until it is snug. Do not overtighten, as this could damage the blade or the grinder. A firm, secure fit is sufficient.
Step 6: Release the Spindle Lock
Release the spindle lock button. The blade should now be securely attached to the grinder.
Verifying Correct Installation
Before using the angle grinder with the new blade, perform these checks to ensure proper installation:
- Rotation: Spin the blade by hand to ensure it rotates freely without any wobbling or binding.
- Secure Fit: Check that the lock nut is tight and the blade is securely held in place.
- Clearance: Verify that the blade guard is properly positioned and does not interfere with the blade’s rotation.
- Sound Test: Briefly turn on the grinder (without applying it to any material) to listen for any unusual noises or vibrations. If you hear anything abnormal, stop immediately and recheck the blade installation.
Choosing the Right Blade
Selecting the appropriate blade is crucial for safety and effectiveness. Consider these factors:
- Material: Different blades are designed for different materials, such as metal, concrete, tile, or wood. Using the wrong blade can be dangerous and inefficient.
- Blade Type: Cutting wheels are thin and designed for cutting, while grinding wheels are thicker and designed for grinding and smoothing surfaces.
- Size: Ensure the blade diameter matches the specifications of your angle grinder.
- Arbor Hole: The arbor hole diameter must match the spindle size of your grinder.
- Maximum RPM: The blade’s maximum RPM rating should be equal to or greater than the grinder’s RPM rating.
Here’s a table summarizing common blade types and their applications:
| Blade Type | Material | Application |
|---|---|---|
| Cutting Wheel | Metal, Concrete, Tile | Cutting through materials |
| Grinding Wheel | Metal, Concrete | Grinding, smoothing, deburring |
| Flap Disc | Metal, Wood | Sanding, blending, finishing |
| Diamond Blade | Concrete, Tile, Stone | Cutting hard, abrasive materials |
| Wire Wheel Brush | Metal | Removing rust, paint, scale |
Common Mistakes to Avoid
- Forgetting to Unplug the Grinder: This is a major safety hazard.
- Using the Wrong Blade: Always use the correct blade for the material you’re working with.
- Overtightening the Lock Nut: This can damage the blade or the grinder.
- Using a Damaged Blade: Never use a blade that is cracked, chipped, or otherwise damaged.
- Ignoring Safety Precautions: Always wear proper PPE and follow safety guidelines.
- Neglecting Blade Inspection: Failing to inspect the new blade can lead to using a flawed product.
Maintaining Your Angle Grinder
Regular maintenance extends the life of your angle grinder:
- Clean the Grinder: After each use, wipe down the grinder with a clean rag to remove dust and debris.
- Inspect the Cord: Check the power cord for any damage, such as fraying or cuts.
- Lubricate Moving Parts: Periodically lubricate the spindle and other moving parts with a light machine oil.
- Check the Brushes: If your grinder has carbon brushes, check them regularly for wear and replace them as needed.
- Store Properly: Store the grinder in a clean, dry place.
Troubleshooting Common Issues
- Lock Nut Stuck: Apply penetrating oil and let it sit for a few minutes. Try tapping the wrench lightly with a rubber mallet.
- Blade Wobbles: Ensure the blade is properly seated on the inner flange and the lock nut is tightened securely. Check for any damage to the blade or flanges.
- Grinder Overheats: This could be due to using the wrong blade, applying too much pressure, or a worn-out motor. Let the grinder cool down and try again with a different blade or less pressure.
Fathoming Lock Nut Variations
Not all angle grinders use the same type of lock nut. Some common variations include:
- Standard Lock Nut: The most common type, with two holes for the angle grinder wrench.
- Quick-Release Nut: Allows for tool-free blade changes. These nuts have a lever or button that releases the blade.
- Adjustable Lock Nut: Can be adjusted to accommodate different blade thicknesses.
Always refer to your grinder’s manual to identify the specific type of lock nut and how to operate it correctly. Using the wrong tool or technique can damage the nut or the grinder.
Conclusion
Replacing grinder disc or any angle grinder wheel replacement is a straightforward process when done carefully and with the right tools. By following these steps and prioritizing safety, you can confidently change your angle grinder blade and keep your tool in top working condition. Remember to always disconnect the power, wear proper PPE, and choose the correct blade for your application. Regular maintenance and inspection will ensure the longevity and safe operation of your angle grinder. With these guidelines, you can safely and efficiently manage fitting angle grinder disc tasks.
Frequently Asked Questions (FAQ)
Q: Can I use any blade on my angle grinder?
A: No, you should only use blades that are specifically designed for angle grinders and are compatible with the grinder’s size and RPM rating. Using the wrong blade can be dangerous.
Q: How often should I change my angle grinder blade?
A: Change the blade when it becomes dull, damaged, or when you switch to a different material or application. Regular angle grinder blade replacement is crucial for safety and efficiency.
Q: What if I can’t get the lock nut loose?
A: Try applying penetrating oil to the nut and letting it sit for a few minutes. You can also try tapping the wrench lightly with a rubber mallet. If it’s still stuck, consider taking the grinder to a professional repair shop.
Q: What should I do with my old angle grinder blades?
A: Dispose of old blades properly, following local regulations for hazardous waste disposal. Some scrap metal recyclers may also accept old blades.
Q: What is the best way to store angle grinder blades?
A: Store blades in a dry, safe place where they won’t be damaged or exposed to moisture. Keep them in their original packaging or in a dedicated blade storage container.

Hi, I’m Larry Fish, the mind behind MyGrinderGuide.com.. With a passion for all things kitchen appliances, I created this blog to share my hands-on experience and expert knowledge. Whether it’s helping you choose the right tools for your culinary adventures or offering tips to make your kitchen more efficient, I’m here to guide you. My goal is to make your time in the kitchen not only easier but also enjoyable! Welcome to my world of kitchen mastery!