
Can I grind meat without a meat grinder? Yes, you absolutely can! While a meat grinder is the ideal tool, there are several alternative meat grinding methods you can use at home. This guide will explore various techniques for DIY ground meat, turning tougher cuts into delicious, easily usable ground meat for your favorite recipes. We’ll cover everything from food processor meat grind techniques to manual meat grinding techniques, providing ground meat hacks that even a beginner can master.
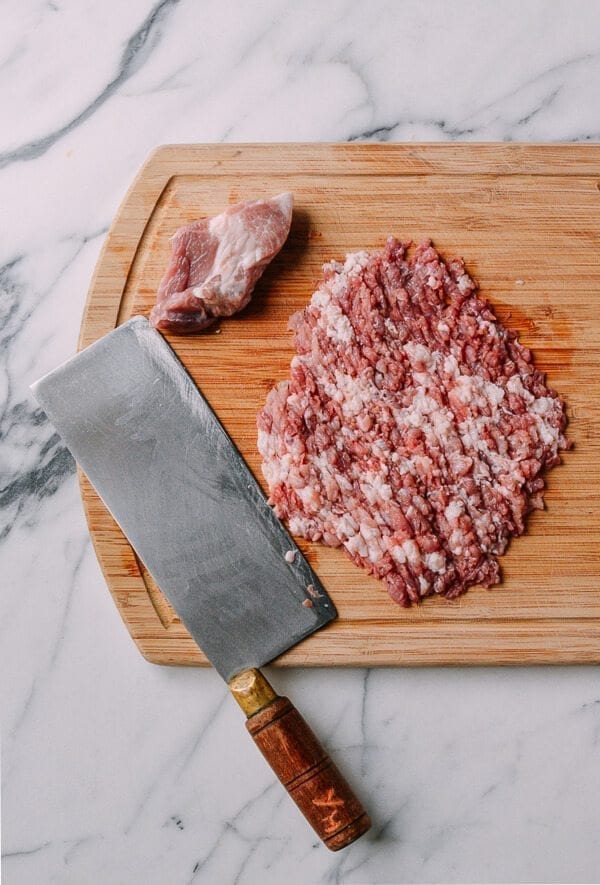
Image Source: thewoksoflife.com
Why Grind Your Own Meat?
Before we dive into how to grind meat without a grinder, let’s explore why you might want to.
- Freshness: Grinding your own meat ensures maximum freshness. You control exactly when the meat is ground, minimizing the time it sits exposed to potential bacteria.
- Quality Control: You get to choose the cut of meat you’re using. This means you can opt for higher-quality cuts, leaner options, or even create custom blends.
- Cost Savings: Often, whole cuts of meat are less expensive per pound than pre-ground meat.
- Flavor Enhancement: Freshly ground meat has a superior flavor and texture.
- Dietary Needs: If you have specific dietary requirements (e.g., low-fat, gluten-free), grinding your own meat allows complete control over ingredients.
- Avoidance of Additives: You can avoid any unwanted additives, preservatives, or fillers that might be present in commercially ground meat.
- Creative Blends: Experimenting with different cuts of meat allows you to create unique and flavorful blends tailored to specific recipes.
Essential Tips Before You Start
Regardless of the alternative meat grinding methods you choose, keeping these tips in mind is crucial for food safety and optimal results.
- Keep Everything Cold: This is the most important rule. Cold meat grinds more easily and prevents bacterial growth. Place your meat in the freezer for 15-30 minutes before grinding. Chill your tools (food processor blade, knives, cutting board) in the freezer as well.
- Cut Meat into Small Pieces: Smaller pieces are easier to process. Cut the meat into 1-inch cubes.
- Work in Batches: Avoid overloading your food processor or grinder substitute. Work in small batches to ensure even grinding.
- Cleanliness is Key: Thoroughly clean and sanitize all your equipment before and after grinding.
- Use Sharp Tools: Sharp knives and food processor blades are safer and more efficient.
- Don’t Over-Process: Over-processing can result in a mushy texture. Aim for a coarse or fine grind depending on your preference.
Alternative Meat Grinding Methods
Here are several effective ways to achieve DIY ground meat when you don’t have a meat grinder:
1. The Food Processor Method: Quick and Efficient
The food processor is a popular and relatively easy ground beef recipe tool for creating ground meat without a grinder.
How to Use a Food Processor for Meat Grinding:
- Chill the Meat: Place your cut meat cubes in the freezer for about 20-30 minutes until they are firm but not frozen solid.
- Chill the Food Processor: Place the food processor bowl and blade in the freezer for about 15 minutes. This helps keep the meat cold during processing.
- Load the Food Processor: Add a small batch of chilled meat cubes to the food processor. Don’t overload it; work in batches.
- Pulse, Don’t Puree: Pulse the food processor in short bursts (1-2 seconds each). Avoid running it continuously, as this will result in a puree rather than ground meat.
- Check the Texture: After a few pulses, check the texture of the meat. If it’s too coarse, pulse a few more times. If it’s fine enough, remove it.
- Repeat: Repeat the process with the remaining batches of meat.
- Use Immediately or Store: Use the ground meat immediately or store it in the refrigerator or freezer.
Pros:
- Fast and efficient
- Easily accessible (most kitchens have a food processor)
- Relatively easy to clean
Cons:
- Can easily over-process the meat if not careful
- May require multiple batches
- Texture may not be as consistent as with a meat grinder
2. The Knife Method: Time-Honored and Precise
Using a knife for meat grinding is a manual meat grinding techniques that requires more time and effort but allows for greater control over the texture.
How to Chop Meat Finely with a Knife:
- Chill the Meat: As always, ensure the meat is very cold, almost frozen.
- Slice into Thin Strips: Use a sharp knife to slice the meat into thin strips against the grain.
- Cut into Small Cubes: Stack the strips and cut them into small cubes.
- Mince: Using a rocking motion with a chef’s knife, repeatedly chop the cubes until you achieve your desired ground meat texture.
- Repeat: Repeat the process until all the meat is ground.
Pros:
- Maximum control over texture
- Requires no special equipment
- Allows for a more rustic, hand-cut texture
Cons:
- Time-consuming and labor-intensive
- Requires good knife skills
- Can be tiring for large quantities of meat
3. Using a Blender (with Caution)
While not ideal, a blender can be used as a meat grinder substitute in a pinch. However, it’s crucial to proceed with caution to avoid a pureed mess.
How to Grind Meat with a Blender:
- Chill the Meat: Ensure the meat is very cold.
- Cut into Small Pieces: Cut the meat into small, manageable pieces (smaller than for the food processor).
- Add a Small Amount of Liquid (Optional): Add a tablespoon or two of ice water or broth to the blender to help the meat move more easily. This is optional and should only be used if needed.
- Pulse Carefully: Pulse the blender in very short bursts (1 second each).
- Monitor Texture: Check the texture frequently to avoid over-processing.
- Remove and Repeat: Remove the ground meat and repeat with the remaining batches.
Pros:
- Can be used if no other options are available
- Relatively fast
Cons:
- Very easy to over-process the meat
- Texture is often inconsistent
- Not recommended unless absolutely necessary
4. The Stand Mixer Attachment Method
If you have a stand mixer, check if it has a meat grinder attachment. This is a convenient option that bridges the gap between a dedicated meat grinder and other alternative methods.
How to Use a Stand Mixer Meat Grinder Attachment:
- Chill Everything: Chill the meat, the grinder attachment, and any bowls you’ll be using.
- Assemble the Attachment: Attach the meat grinder attachment to your stand mixer according to the manufacturer’s instructions.
- Feed the Meat: Feed the chilled meat pieces into the grinder attachment.
- Collect the Ground Meat: Collect the ground meat in a chilled bowl.
Pros:
- More efficient than manual methods
- Provides a more consistent grind than a food processor
- Requires less effort than hand-chopping
Cons:
- Requires a stand mixer and the meat grinder attachment
- May not be as powerful as a dedicated meat grinder
5. Improvised Manual Grinder (Less Common)
While not as effective, some people have used creative solutions to mimic a meat grinder. These usually involve pressing meat through a grate or screen.
Examples:
- Potato Ricer: Pressing small amounts of meat through a potato ricer can create a coarse, shredded texture.
- Vegetable Mill: Some vegetable mills with fine grating plates can be used to grind meat, but this can be messy and require significant effort.
Pros:
- Can be used in emergency situations with limited equipment
Cons:
- Inefficient and time-consuming
- Difficult to achieve a consistent grind
- May not be suitable for large quantities of meat
Best Practices for Making Ground Meat Without a Grinder
Here’s a summary of best practices to ensure success with your alternative meat grinding methods:
| Practice | Description |
|---|---|
| Keep it Cold | Ensure the meat and all tools are well-chilled to prevent bacterial growth and facilitate easier grinding. |
| Cut into Cubes | Cut the meat into 1-inch cubes for even processing. |
| Small Batches | Work in small batches to avoid overloading equipment and ensure uniform texture. |
| Sharp Tools | Use sharp knives and food processor blades for efficient and safe grinding. |
| Pulse (Don’t Puree) | When using a food processor or blender, pulse in short bursts to avoid over-processing. |
| Cleanliness | Thoroughly clean and sanitize all equipment before and after use. |
| Texture Check | Regularly check the texture and adjust processing time accordingly to achieve the desired grind. |
| Immediate Use/Storage | Use the ground meat immediately or store properly in the refrigerator or freezer to maintain freshness. |
Storing Your Homemade Ground Meat
Proper storage is essential to maintain the quality and safety of your ground meat.
- Refrigerator: Store ground meat in the refrigerator for up to two days. Place it in an airtight container or tightly wrap it in plastic wrap.
- Freezer: For longer storage, freeze the ground meat. Divide it into portions and wrap each portion tightly in plastic wrap. Then, place the wrapped portions in a freezer bag or container. Frozen ground meat can last for up to three months.
- Thawing: Thaw frozen ground meat in the refrigerator. Do not thaw it at room temperature.
Easy Ground Beef Recipe Ideas
Now that you know how to grind your own meat, here are some delicious and easy ground beef recipe ideas:
- Classic Burgers: Season your ground beef with salt, pepper, and your favorite spices. Form into patties and grill or pan-fry.
- Meatloaf: Combine ground beef with breadcrumbs, eggs, onions, and seasonings. Bake in a loaf pan until cooked through.
- Spaghetti Sauce: Brown ground beef with onions and garlic. Add tomato sauce, herbs, and spices. Simmer for at least 30 minutes.
- Tacos: Brown ground beef with taco seasoning. Serve in tortillas with your favorite toppings.
- Chili: Combine ground beef with beans, tomatoes, onions, chili powder, and other spices. Simmer for at least an hour.
- Shepherd’s Pie: Brown ground beef with vegetables and gravy. Top with mashed potatoes and bake until golden brown.
Fathoming the Grind: Cut Selection & Fat Content
The cut of meat you choose greatly affects the final product. Different cuts have varying fat contents and flavor profiles. Here’s a brief guide:
- Chuck: A good all-purpose choice with a balance of flavor and fat.
- Sirloin: A leaner option, but can be drier if not mixed with a fattier cut.
- Round: Very lean and best used in combination with a higher-fat cut.
- Brisket: Adds rich flavor and is often used in blends.
- Short Rib: Offers a very rich and flavorful ground meat due to its high fat content.
The ideal fat content for ground meat is typically between 15% and 20%. If using a leaner cut, consider adding some beef fat trimmings to achieve the desired ratio.
FAQ: Frequently Asked Questions
Q: What is the best way to mince meat without a grinder?
A: The best way to mince meat without a grinder is by using a food processor, pulsing carefully to avoid pureeing. Alternatively, you can finely chop the meat by hand using a sharp knife.
Q: Can I use frozen meat in a food processor?
A: No, you should not use completely frozen meat in a food processor. It’s best to partially freeze it so that it’s firm but not solid. This allows it to be processed more easily and evenly.
Q: How do I prevent my food processor from overheating when grinding meat?
A: Work in small batches and avoid running the food processor continuously. Pulse the meat in short bursts and allow the food processor to rest if it starts to overheat.
Q: What are some alternative uses for ground meat besides burgers and tacos?
A: Ground meat can be used in a variety of dishes, including meatloaf, spaghetti sauce, chili, shepherd’s pie, stuffed peppers, and lasagna.
Q: What if my ground meat is too mushy?
A: If your ground meat turns out mushy, it’s usually because it was mixed or ground for too long. To fix this, make sure your meat is really cold before you start. It also helps to do just a little bit at a time and use short bursts of power instead of letting the machine run constantly. You can also try mixing in some breadcrumbs to soak up any extra moisture.
Q: How can I make my own custom ground meat blends?
A: Experiment with different cuts of meat and fat ratios. For example, you could combine chuck and brisket for a rich, flavorful blend, or sirloin and round for a leaner option. Always ensure that the meat is properly chilled and that you are using safe food handling practices.
By following these tips and techniques, you can confidently grind your own meat without a meat grinder, unlocking a world of culinary possibilities and enjoying the superior taste and quality of freshly ground meat.

Hi, I’m Larry Fish, the mind behind MyGrinderGuide.com.. With a passion for all things kitchen appliances, I created this blog to share my hands-on experience and expert knowledge. Whether it’s helping you choose the right tools for your culinary adventures or offering tips to make your kitchen more efficient, I’m here to guide you. My goal is to make your time in the kitchen not only easier but also enjoyable! Welcome to my world of kitchen mastery!