
Do you need to know how to remove angle grinder blade? Yes, changing the blade on an angle grinder is a crucial skill for anyone working with metal, concrete, or other materials. This guide provides a comprehensive, step-by-step approach to angle grinder blade replacement, focusing on safety and efficiency.
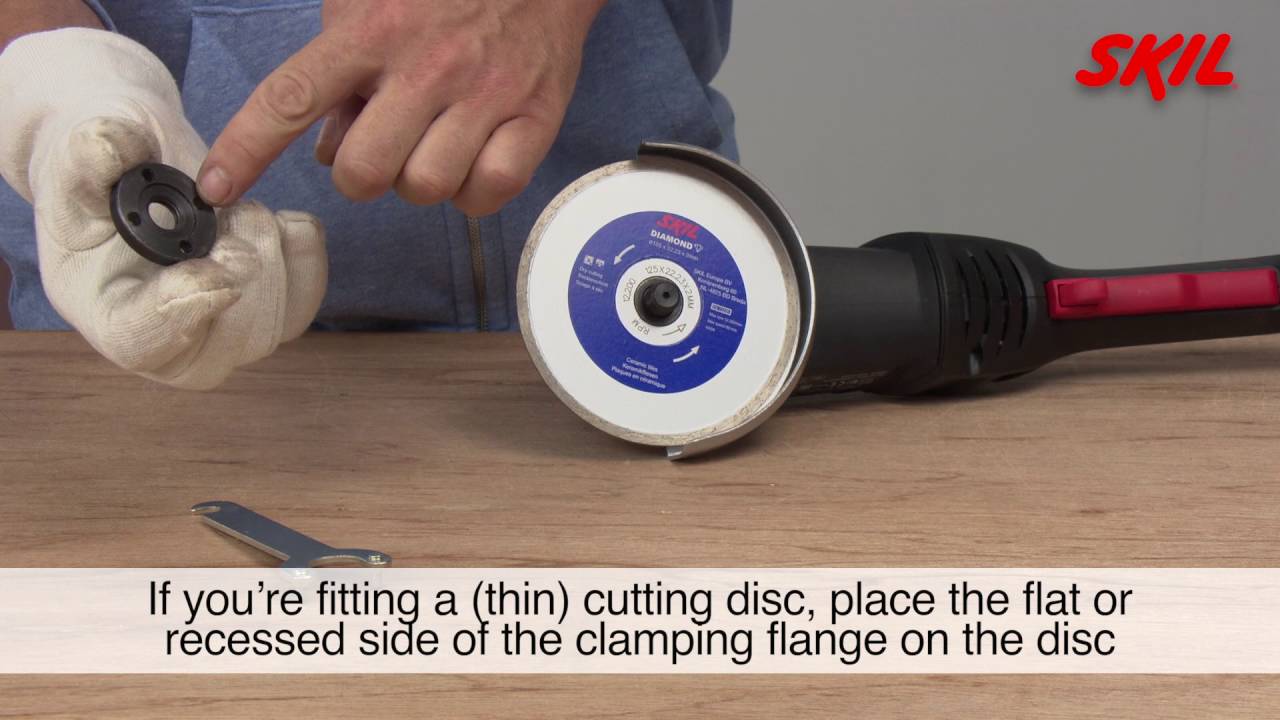
Image Source: i.ytimg.com
Safety First: Gear Up!
Before even thinking about replacing grinder disc or changing cutting disc grinder, personal protective equipment (PPE) is absolutely non-negotiable. Think of it as your first line of defense against injury.
- Safety Glasses or Face Shield: Flying debris is a constant hazard. Protect your eyes and face.
- Gloves: Protect your hands from sharp edges and sparks. Leather gloves are a good choice.
- Ear Protection: Angle grinders are loud. Prolonged exposure can damage your hearing. Use earplugs or earmuffs.
- Dust Mask or Respirator: Grinding can produce a lot of dust, some of which can be harmful to breathe.
- Apron or Work Clothes: Protect your clothing from sparks and debris.
Why Safety Matters
Neglecting PPE can lead to serious injuries. Eye injuries, cuts, burns, and hearing loss are all potential risks. Taking the time to gear up is a small price to pay for your safety.
Gathering Your Tools
Having the right tools on hand will make the angle grinder disc change process much smoother. Here’s what you’ll need:
- Angle Grinder Spanner Wrench (or Pin Wrench): This specialized wrench is designed to loosen and tighten the lock nut that secures the blade. It usually comes with the grinder.
- Locking Pliers (Optional): For extra grip if the lock nut is stuck.
- Work Gloves: For gripping the blade during removal and installation.
- New Angle Grinder Blade: Make sure it’s the right size and type for your grinder and the material you’re working with.
Selecting the Right Blade
Choosing the correct blade is critical for both safety and performance. Different blades are designed for different materials:
- Cutting Discs: Thin, abrasive wheels used for cutting metal.
- Grinding Wheels: Thicker wheels used for grinding and smoothing metal surfaces.
- Diamond Blades: Used for cutting concrete, stone, and tile.
- Flap Discs: Used for sanding and blending metal.
- Wire Wheels: Used for removing rust and paint.
Table: Blade Types and Applications
| Blade Type | Material(s) | Application(s) |
|---|---|---|
| Cutting Disc | Metal, Some Plastics | Cutting, Slitting |
| Grinding Wheel | Metal | Grinding, Smoothing, Deburring |
| Diamond Blade | Concrete, Stone, Tile | Cutting |
| Flap Disc | Metal, Wood | Sanding, Blending, Finishing |
| Wire Wheel | Metal | Rust Removal, Paint Removal, Cleaning |
Step-by-Step: Angle Grinder Blade Removal and Installation
Now, let’s get down to the actual process of angle grinder blade installation. Follow these steps carefully:
Step 1: Unplug the Grinder!
This is the most important safety precaution. Make absolutely sure the grinder is unplugged from the power source before you start working on it. This prevents accidental activation and serious injury. Double-check!
Step 2: Locate the Spindle Lock
The spindle lock is basically a button or lever on your grinder. When you press it, it keeps the spinning shaft from turning. This lets you easily loosen or tighten the nut when you need to make adjustments. While the exact spot depends on your specific model, you’ll usually find it right near the motor..
Step 3: Engage the Spindle Lock
Press and hold the spindle lock while rotating the blade by hand until the spindle lock engages. You should feel it click into place. If it doesn’t engage, try rotating the blade slightly until it does.
Step 4: Loosen the Lock Nut
Using the spanner wrench, insert the pins into the corresponding holes on the lock nut. Turn the wrench counterclockwise to loosen the nut. It might be tight, especially if it hasn’t been removed in a while. If it’s extremely stubborn, try using locking pliers to get a better grip on the wrench. Be careful not to damage the nut.
Table: Troubleshooting a Stuck Lock Nut
| Problem | Solution |
|---|---|
| Nut is too tight | Use locking pliers for extra grip on the spanner wrench. |
| Nut is corroded | Apply penetrating oil (like WD-40) and let it sit for a few minutes before trying again. |
| Spindle lock slipping | Make sure the spindle lock is fully engaged. If it’s worn, you may need to replace it. |
| Wrong direction | Ensure you are turning the wrench counterclockwise. Some grinders have a reverse-threaded nut. Check your manual to confirm. Usually, it’s counterclockwise. |
Step 5: Remove the Old Blade
Once the lock nut is loose, you should be able to unscrew it by hand. Remove the outer flange (the metal disc under the nut) and then carefully remove the old blade. Note the order of the components as you remove them. This will help you reassemble everything correctly.
Step 6: Inspect the Flanges
Before installing the new blade, inspect both flanges for damage or wear. Look for cracks, bends, or excessive rust. Damaged flanges can cause the blade to vibrate or even break, so replace them if necessary.
Step 7: Install the New Blade
Place the inner flange back onto the spindle, followed by the new blade. Make sure the blade is seated properly against the flange. The blade should have an arrow indicating the direction of rotation. Make sure the arrow points in the same direction as the grinder’s rotation.
Step 8: Reinstall the Lock Nut
Place the outer flange back onto the spindle, followed by the lock nut. Tighten the nut by hand.
Step 9: Tighten the Lock Nut with the Spanner Wrench
Engage the spindle lock again and use the spanner wrench to tighten the lock nut securely. Don’t overtighten it, as this can damage the nut or the spindle. A firm, snug fit is sufficient.
Step 10: Release the Spindle Lock
Release the spindle lock and try rotating the blade by hand. It should spin freely without any wobbling or binding. If it doesn’t, recheck your work and make sure everything is properly aligned and tightened.
Step 11: Inspect the Guard
Make sure the blade guard is properly installed and secure. The guard is designed to protect you from flying debris and accidental contact with the blade. Never use an angle grinder without the guard in place.
Step 12: Test Run (Safely!)
Before using the grinder for actual work, plug it in and run it briefly to make sure the blade is running smoothly and there are no unusual vibrations or noises. Stand to the side of the grinder during this test run, just in case.
Angle Grinder Blade Change Safety Considerations
Beyond basic PPE, there are other safety precautions to keep in mind:
- Work in a Well-Ventilated Area: Grinding can produce a lot of dust and fumes. Work in a well-ventilated area to avoid inhaling harmful substances.
- Keep Your Work Area Clean: Remove any flammable materials from your work area to prevent fires.
- Use the Correct Blade for the Material: Using the wrong blade can be dangerous. Make sure the blade is rated for the material you’re working with.
- Don’t Apply Excessive Pressure: Let the blade do the work. Applying excessive pressure can cause the blade to break or kick back.
- Be Aware of Kickback: Kickback is a sudden, violent reaction that can occur when the blade gets pinched or snagged. Be prepared for it and maintain a firm grip on the grinder.
- Inspect Blades Regularly: Check your blades for cracks, chips, or other damage before each use. Discard damaged blades immediately.
Recognizing and Preventing Kickback
Kickback is one of the most common and dangerous hazards associated with angle grinders. It occurs when the blade binds, snags, or pinches in the material being cut, causing the grinder to suddenly jerk back towards the operator. Here’s how to prevent it:
- Use a Sharp Blade: A dull blade is more likely to bind and cause kickback.
- Maintain a Proper Angle: Keep the grinder at the correct angle to the workpiece.
- Don’t Force the Grinder: Let the blade do the work. Forcing the grinder can cause it to bind.
- Secure the Workpiece: Make sure the material you’re working on is securely clamped or held in place.
- Use a Grinder with Anti-Kickback Features: Some grinders have features that help to prevent or reduce kickback.
- Stand to the Side: Position yourself to the side of the grinder, not directly in line with the blade. This will reduce the risk of injury if kickback occurs.
Disposal of Old Blades
Used grinding wheels can still cause harm if not disposed of correctly. Always wrap the used blade in cardboard or heavy paper and mark it clearly as “Broken Grinding Wheel” or “Used Blade”. This will protect sanitation workers from accidental cuts. Check your local regulations for specific disposal guidelines.
Troubleshooting Common Problems
- Blade Wobbles: This could indicate a damaged blade, a bent spindle, or improperly installed flanges. Check all components and replace any damaged parts.
- Grinder Vibrates Excessively: This could be due to an unbalanced blade, a worn spindle bearing, or loose components. Inspect the grinder and tighten any loose parts.
- Blade Binds or Stalls: This could be caused by using the wrong blade for the material, applying excessive pressure, or kickback. Adjust your technique and use the correct blade.
FAQ: Removing Grinding Wheel and Blade Issues
- What is the best way to remove a stuck grinding wheel? Use penetrating oil and a spanner wrench with locking pliers for added grip.
- Can I use any blade on my angle grinder? No, only use blades that are the correct size and rated for the speed of your grinder.
- Why does my angle grinder keep kicking back? This could be due to a dull blade, improper technique, or binding in the material. See the section on Preventing Kickback above.
- How often should I replace my angle grinder blade? Replace your blade whenever it becomes dull, damaged, or worn. Regularly inspect the blade before each use.
- Is it safe to use a cracked angle grinder blade? No, never use a cracked or damaged blade. It could shatter during use and cause serious injury.
- Who is responsible for safety when using an angle grinder? You are. It is your responsibility to use the tool safely and follow all safety guidelines.
- What is the purpose of the blade guard? The blade guard protects you from flying debris and accidental contact with the blade. Never use an angle grinder without the guard in place.
Changing the blade on an angle grinder is a straightforward process, but it requires attention to detail and a strong focus on safety. By following these steps and heeding the safety precautions, you can ensure a safe and efficient angle grinder disc replacement every time.

Hi, I’m Larry Fish, the mind behind MyGrinderGuide.com.. With a passion for all things kitchen appliances, I created this blog to share my hands-on experience and expert knowledge. Whether it’s helping you choose the right tools for your culinary adventures or offering tips to make your kitchen more efficient, I’m here to guide you. My goal is to make your time in the kitchen not only easier but also enjoyable! Welcome to my world of kitchen mastery!