
Can you grind beef without a grinder? Yes, you absolutely can! While a meat grinder makes the process easier, it’s not the only way to create ground beef at home. Whether you’re looking for a ground beef alternative, want to make DIY ground beef, or simply need homemade ground beef and don’t have the right equipment, several methods can help you achieve the perfect texture. This guide will walk you through each technique for making beef mince without a grinder, including using a food processor, blender, or even just a knife. We’ll explore how to make food processor ground beef, blender ground beef, knife minced beef, and hand ground beef, ensuring you have a good substitute for ground beef whenever you need it. Learn how to mince beef at home with these simple methods.
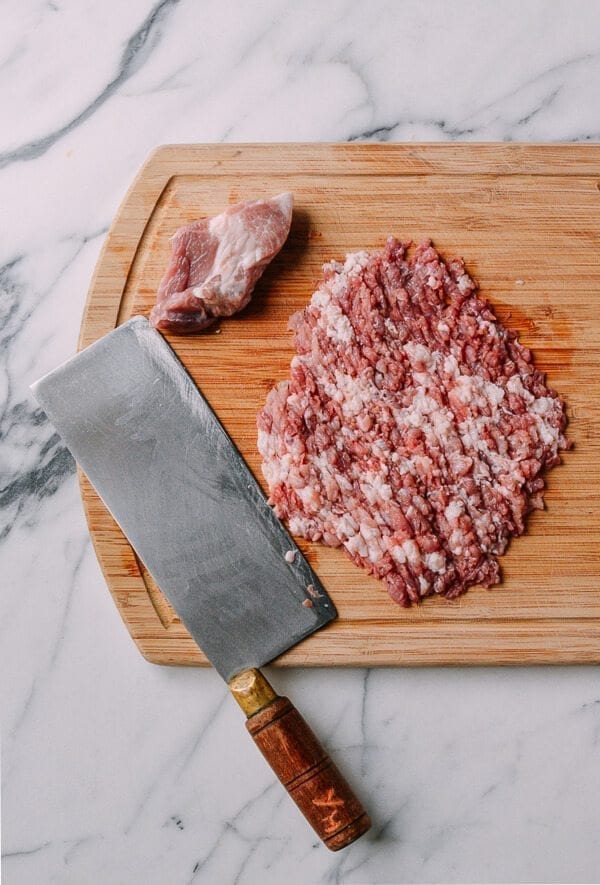
Image Source: thewoksoflife.com
Choosing Your Beef Cut
The first step in grinding beef, with or without a grinder, is selecting the right cut. The cut you choose will significantly affect the flavor and fat content of your homemade ground beef.
Chuck: This is a popular and affordable option for DIY ground beef. It has a good balance of flavor and fat (around 15-20%). This makes for tasty and juicy ground beef alternative.
Sirloin: A leaner cut, sirloin provides a robust flavor. If you prefer leaner beef mince without grinder, this is a great choice. You might want to add a bit of fat (beef suet or a fattier cut) to prevent it from being too dry.
Round: Even leaner than sirloin, round is best used if you’re very conscious of fat content. Like sirloin, adding some extra fat is advisable.
Brisket: A rich and flavorful cut that’s typically used for smoking, brisket can also be ground. Its high fat content makes for very flavorful food processor ground beef or blender ground beef.
Short Rib: Similar to brisket in terms of flavor and fat, short rib makes excellent homemade ground beef if you’re looking for something decadent.
Tips for Selecting Beef:
- Look for beef that is bright red in color, not brown.
- The beef should be firm to the touch.
- Check the expiration date to ensure freshness.
- For the best flavor, opt for USDA Prime or Choice grades.
Method 1: Using a Food Processor
A food processor is a readily available tool for making food processor ground beef. It’s a quick and efficient ground beef alternative. Here’s how to do it:
Preparing the Beef
- Chill the Beef: Place the beef in the freezer for 30-60 minutes before grinding. This helps it stay firm and prevents it from turning into a paste in the food processor. Cold beef is easier to work with.
- Cut into Cubes: Cut the beef into 1-inch cubes. This ensures even processing and prevents the food processor from getting overloaded.
Processing the Beef
- Load the Food Processor: Place a portion of the cubed beef into the food processor. Don’t overcrowd it. Work in batches to maintain control over the texture.
- Pulse: Pulse the food processor in short bursts (1-2 seconds each). Keep a close eye on the texture. You want it to resemble ground beef, not purée.
- Check the Texture: After a few pulses, check the texture. If it’s too coarse, pulse a few more times. If it’s too fine, you’ve over-processed it.
- Repeat: Remove the homemade ground beef from the food processor and repeat the process with the remaining beef.
Achieving the Desired Texture
- For a coarse grind, use shorter pulses.
- For a finer grind, use slightly longer pulses, but be careful not to over-process.
- If the beef starts to warm up during processing, return it to the freezer for a few minutes before continuing.
| Feature | Details |
|---|---|
| Meat Preparation | Chill beef for 30-60 minutes; cut into 1-inch cubes |
| Food Processor | Use in pulses to prevent over-processing |
| Batch Size | Process in small batches for even grinding |
| Texture | Monitor closely to achieve desired coarseness or fineness |
Method 2: Using a Blender
While not as ideal as a food processor, a blender can be used to create blender ground beef if you don’t have other options. Keep in mind that it’s easy to over-process beef in a blender, resulting in a mushy texture.
Preparing the Beef
- Freeze: Freeze the beef for about an hour to make it very firm. This helps prevent it from becoming a paste when blended.
- Cube: Cut the beef into small cubes, about ½ inch in size. Smaller pieces will blend more evenly.
Blending the Beef
- Load the Blender: Add a small amount of cubed beef to the blender. Don’t fill it more than halfway.
- Pulse: Use the pulse function on your blender. Pulse in very short bursts (1 second or less). Watch closely to prevent over-processing.
- Check Texture: After each pulse, check the texture. Aim for a coarse, ground-like consistency.
- Repeat: Remove the blended beef and repeat with the remaining beef.
Important Considerations
- Blenders are more likely to create a purée than a ground texture. Be extra careful with pulsing.
- High-powered blenders are more efficient but also more prone to over-processing.
- If the beef starts to get warm, stop and freeze it again before continuing.
Method 3: Knife Mincing (Hand Grinding)
Making knife minced beef or hand ground beef is the most labor-intensive but offers the most control over the texture. This method is ideal if you want a truly artisanal homemade ground beef or a more rustic ground beef alternative.
Preparing the Beef
- Chill: Chill the beef thoroughly, similar to the other methods.
- Slice: Cut the beef into thin slices against the grain. This makes it easier to mince.
- Stack and Cut: Stack a few slices on top of each other and cut them into thin strips.
- Mince: Gather the strips together and begin mincing them finely with a sharp knife. Use a rocking motion, keeping the tip of the knife on the cutting board.
- Continue: Continue mincing until you achieve the desired texture.
Techniques for Efficient Mincing
- Use a very sharp knife. A dull knife will make the process much harder and more dangerous.
- Keep the beef cold throughout the process.
- Work in small batches to maintain control.
- A mezzaluna (a curved, rocking blade) can be helpful for mincing larger quantities of beef.
| Feature | Details |
|---|---|
| Meat Preparation | Chill beef, slice against the grain, stack slices |
| Knife | Use a sharp knife; rocking motion for efficient mincing |
| Technique | Work in small batches; maintain cold temperature |
| Texture Control | Offers the most control over the final texture |
Method 4: Using a Meat Tenderizer
Believe it or not, a meat tenderizer can be used as a ground beef alternative, although it requires patience.
Preparing the Beef
- Freeze: Partially freeze the beef for about 30-45 minutes. The meat should be firm but not completely frozen.
- Cut: Cut the beef into smaller, manageable pieces, about 1-inch thick.
Tenderizing the Beef
- Pound: Place a piece of beef on a cutting board and use the flat side of a meat tenderizer to pound the beef.
- Flatten: Flatten the meat and then use the textured side of the tenderizer to break down the meat fibers. Continue pounding until the beef starts to resemble ground meat.
- Repeat: Repeat the process for each piece of beef.
Tips for Effective Tenderizing
- Use a heavy-duty meat tenderizer for best results.
- Place the beef between two sheets of plastic wrap to prevent sticking and splattering.
- Be patient. This method takes time and effort.
Achieving the Perfect Texture: General Tips
Regardless of the method you choose, here are some general tips for achieving the perfect texture for your homemade ground beef:
- Keep it Cold: Cold beef is crucial. It prevents the fat from melting and the meat from turning into a paste.
- Work in Batches: Overloading your food processor or blender will lead to uneven results.
- Don’t Over-Process: The key to good DIY ground beef is to stop processing before it becomes a purée.
- Adjust Fat Content: If you’re using a lean cut, consider adding some beef suet or a fattier cut to improve the flavor and texture.
- Cleanliness: Ensure all your equipment and surfaces are clean to prevent bacterial contamination.
What about Fat Content?
The fat content of your ground beef alternative is crucial for flavor and texture. If you’re using a lean cut, you might need to add some fat.
- Beef Suet: This is the hard fat found around the kidneys and loins of beef. It adds richness and flavor.
- Bacon: Adding a small amount of finely chopped bacon can boost the fat content and add a smoky flavor.
- Pork Fat: If you don’t have beef fat, pork fat is a viable substitute.
Ideal Fat Ratios:
- Lean: 90% lean, 10% fat
- Medium: 85% lean, 15% fat
- Regular: 80% lean, 20% fat
You can adjust the fat content to your preference by adding fat strategically during the grinding process.
Using Your Homemade Ground Beef
Once you’ve made your homemade ground beef, the possibilities are endless. Here are a few ideas:
- Burgers: Homemade burgers are a classic. Season the beef simply with salt and pepper for the best flavor.
- Meatloaf: Ground beef is the base of most meatloaf recipes.
- Tacos: Brown the ground beef with taco seasoning for a quick and easy taco filling.
- Chili: Ground beef adds heartiness to chili.
- Pasta Sauce: Brown ground beef and add it to your favorite pasta sauce for extra flavor.
Safety First: Preventing Bacterial Contamination
Working with raw meat requires careful attention to hygiene. Here are some essential safety tips:
- Wash Hands: Wash your hands thoroughly with soap and water before and after handling raw beef.
- Clean Surfaces: Clean and sanitize all surfaces that come into contact with raw beef.
- Use Separate Cutting Boards: Use a separate cutting board for raw meat to prevent cross-contamination.
- Cook Thoroughly: Cook ground beef to an internal temperature of 160°F (71°C) to kill harmful bacteria.
- Refrigerate Promptly: Refrigerate or freeze ground beef promptly after grinding. Don’t leave it at room temperature for more than two hours.
Fathoming the Cost Savings
Making DIY ground beef can save you money compared to buying pre-ground beef, especially if you buy larger cuts of beef on sale. You also have more control over the quality and fat content.
Take a look at the price of different beef cuts and compare them to what you pay for pre-ground beef. You might be actually surprised by how much cash you can save. On top of that, you’re getting much better meat, and you won’t have to worry about any hidden ingredients mixed in.
Frequently Asked Questions (FAQ)
Q: What is the best cut of beef to grind without a grinder?
A: Chuck is often the best choice due to its balance of flavor and fat. Sirloin and round can also work but may require adding extra fat.
Q: Can I use frozen beef to make ground beef without a grinder?
A: Partially frozen beef is ideal. It needs to be firm enough to handle easily but not so frozen that it’s impossible to cut.
Q: Who should consider grinding their own beef?
A: Anyone who wants better control over the quality, fat content, and freshness of their ground beef, or those who want to save money by buying larger cuts on sale.
Q: Is it safe to make ground beef at home without a grinder?
A: Yes, as long as you follow strict hygiene practices, keep the beef cold, and cook it to a safe internal temperature.
Q: What is the best way to clean a food processor after grinding beef?
A: Disassemble the food processor and wash all parts thoroughly with hot, soapy water. Sanitize with a diluted bleach solution for extra safety.
Q: How long does homemade ground beef last in the refrigerator?
A: Use it within 1-2 days. For longer storage, freeze it immediately after grinding.
Q: What are some recipes best suited for homemade ground beef?
A: Burgers, meatloaf, chili, tacos, and pasta sauces are all excellent choices.
By following these methods and tips, you can easily create delicious homemade ground beef without a grinder. Whether you choose the food processor, blender, or knife method, you’ll have a tasty ground beef alternative that is perfect for your favorite recipes.

Hi, I’m Larry Fish, the mind behind MyGrinderGuide.com.. With a passion for all things kitchen appliances, I created this blog to share my hands-on experience and expert knowledge. Whether it’s helping you choose the right tools for your culinary adventures or offering tips to make your kitchen more efficient, I’m here to guide you. My goal is to make your time in the kitchen not only easier but also enjoyable! Welcome to my world of kitchen mastery!