
Can you grind meat without a grinder? Yes, you absolutely can! This guide explores various meat grinding alternatives, offering a comprehensive look at DIY meat grinder options and manual meat grinding methods. Whether you’re looking for food processor meat grinding, blender meat grinding, or simply improving your knife meat mincing skills, this guide will teach you how to create delicious homemade ground meat without specialized equipment. We’ll also cover tips like freezing meat for grinding, choosing the best meat cuts for grinding, and even some inexpensive meat grinding approaches.
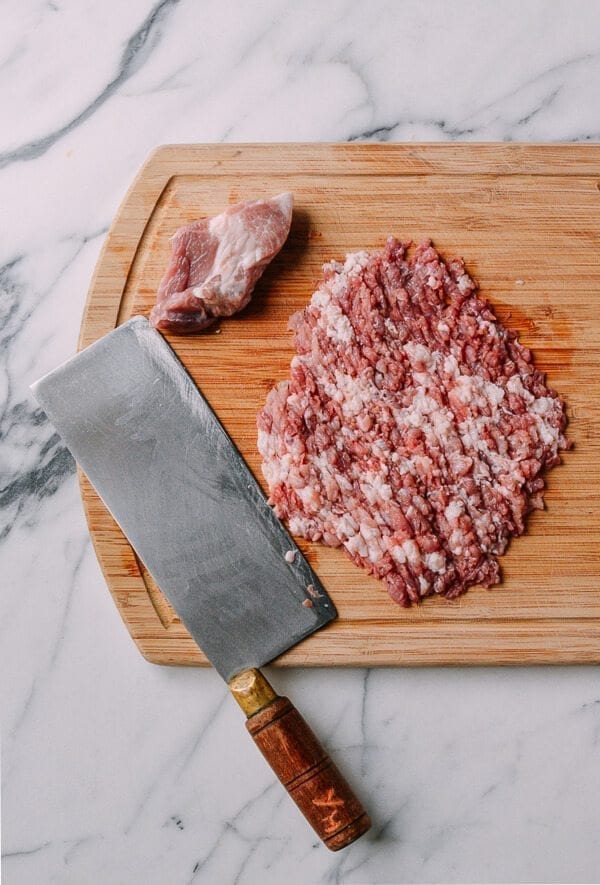
Image Source: thewoksoflife.com
Deciphering Meat Grinding Alternatives
Not everyone has a meat grinder at home, and even if you do, you might need a backup plan now and then. Maybe your machine is broken, or you just don’t want to deal with the messy cleanup for a small amount of meat. Whatever the reason, knowing your other options is key to still getting that delicious meal on the table.
Why Grind Meat at Home?
- Freshness: You control the quality and freshness of the meat.
- Cost Savings: Often, buying whole cuts of meat and grinding them yourself is cheaper than buying pre-ground meat.
- Customization: You can tailor the fat content and blend different cuts for unique flavor profiles.
- Control: You know exactly what goes into your ground meat – no hidden additives or fillers.
Manual Meat Grinding Methods
Before the advent of electric appliances, people relied on their own strength and skill. These methods, while requiring more effort, are still viable options today.
Knife Mincing: The Classic Approach
What is Knife Mincing? Knife mincing involves finely chopping meat with a knife until it reaches a ground consistency. This method is best for small quantities of meat and requires a sharp knife and some patience.
Equipment You’ll Need:
- Sharp Chef’s Knife: A large, sharp chef’s knife is essential.
- Cutting Board: A stable cutting board.
- Optional: Butcher’s Knife or Cleaver: Can be useful for larger cuts.
Step-by-Step Guide:
- Chill the Meat: Place the meat in the freezer for 15-20 minutes to firm it up. This makes it easier to cut.
- Slice the Meat: Cut the meat into thin strips against the grain. Aim for strips about 1/4 inch thick.
- Stack and Dice: Stack a few strips together and dice them into small cubes.
- Mince with a Rocking Motion: Use a rocking motion with your knife, keeping the tip on the cutting board, to finely mince the meat.
- Repeat: Continue mincing until the meat reaches the desired consistency.
Tips for Successful Knife Mincing:
- Sharp Knife is Key: A dull knife will make the process much harder and more dangerous.
- Work in Small Batches: Avoid overcrowding the cutting board.
- Keep the Meat Cold: If the meat starts to warm up, return it to the freezer for a few minutes.
- Even Cuts: Aim for uniform pieces for even cooking.
Table: Knife Mincing Pros and Cons
| Pros | Cons |
|---|---|
| No special equipment needed | Time-consuming |
| Good control over texture | Requires significant effort |
| Easy cleanup | Can be uneven if not done carefully |
Power Tool Alternatives for Grinding Meat
For those looking for faster and less labor-intensive options, kitchen appliances like food processors and blenders can be adapted for meat grinding.
Food Processor Meat Grinding: A Convenient Option
What is Food Processor Meat Grinding? A food processor can quickly and efficiently grind meat. However, it’s important to use it correctly to avoid turning the meat into a paste.
Equipment You’ll Need:
- Food Processor: Choose one with a sharp blade.
- Freezer: For chilling the meat.
Step-by-Step Guide:
- Chill the Meat: Freeze the meat for 30-45 minutes, until it’s firm but not frozen solid. Cut into 1-inch cubes.
- Pulse, Don’t Grind: Place a small batch of meat cubes into the food processor. Pulse in short bursts (1-2 seconds) until the meat is coarsely ground.
- Avoid Over-Processing: Be careful not to over-process the meat, which can result in a mushy texture.
- Repeat: Continue pulsing in small batches until all the meat is ground.
Tips for Successful Food Processor Grinding:
- Don’t Overfill: Work in small batches to ensure even grinding.
- Pulse Action: The pulse function is crucial for preventing a paste-like consistency.
- Cold Meat is Essential: Warm meat will become mushy quickly.
- Clean Thoroughly: Food processors can be difficult to clean, so disassemble and wash all parts immediately after use.
Table: Food Processor Grinding Pros and Cons
| Pros | Cons |
|---|---|
| Faster than knife mincing | Can easily over-process the meat |
| Easier than manual methods | Requires careful monitoring |
| Relatively easy cleanup | May require multiple batches |
Blender Meat Grinding: When In a Pinch
What is Blender Meat Grinding? While not ideal, a blender can be used to grind meat in a pinch. The key is to use a high-powered blender and follow specific techniques to avoid a pureed result.
Equipment You’ll Need:
- High-Powered Blender: A powerful blender is crucial for achieving a ground texture.
- Freezer: For chilling the meat.
Step-by-Step Guide:
- Chill the Meat: Freeze the meat for 45-60 minutes, until it’s very firm but not frozen solid. Cut into small (1/2 inch) cubes.
- Small Batches: Place a very small amount of meat cubes into the blender.
- Pulse Briefly: Pulse the blender in short, quick bursts. Monitor the consistency closely.
- Stop Frequently: Check the meat’s texture frequently to avoid over-processing.
- Repeat: Continue pulsing in small batches until all the meat is ground.
Tips for Successful Blender Grinding:
- Use a High-Powered Blender: A weak blender will struggle and may overheat.
- Extremely Cold Meat: The meat must be very cold to prevent it from turning into a paste.
- Minimal Liquid: Avoid adding any liquid unless absolutely necessary, and then only a tiny amount.
- Watch Carefully: The process happens quickly, so stay vigilant.
Table: Blender Grinding Pros and Cons
| Pros | Cons |
|---|---|
| Can be done with common appliance | High risk of over-processing |
| Faster than knife mincing | Requires a very powerful blender |
| Useful in emergency situations | Difficult to achieve even texture |
Freezing Meat for Grinding: A Crucial Step
Why freeze meat for grinding? Freezing meat, regardless of your grinding method, is essential for several reasons:
- Easier Cutting: Firm meat is easier to slice and dice into uniform pieces.
- Prevents Mushiness: Cold meat stays separate during grinding, preventing it from turning into a paste.
- Maintains Temperature: Keeping the meat cold helps prevent bacterial growth.
Best Practices for Freezing Meat:
- Partial Freeze: Aim for a semi-frozen state where the meat is firm but not rock solid.
- Cut Before Freezing: Cut the meat into cubes or strips before freezing to save time and effort later.
- Even Distribution: Spread the meat pieces in a single layer on a baking sheet before freezing to prevent them from sticking together.
Best Meat Cuts for Grinding: Flavor and Texture
Choosing the right cuts of meat is crucial for achieving the desired flavor and texture in your homemade ground meat.
Popular Cuts and Their Characteristics:
- Chuck: A good balance of flavor and fat, making it a popular choice for burgers and meatloaf.
- Sirloin: Leaner than chuck, ideal for those watching their fat intake.
- Round: Very lean, best used in combination with fattier cuts.
- Brisket: Rich and flavorful, often used in blends for a unique taste.
- Short Ribs: High in fat and flavor, adds richness to ground meat blends.
Creating Custom Blends:
Experimenting with different cuts allows you to create custom ground meat blends tailored to your preferences.
Example Blends:
- Burger Blend: 80% Chuck, 20% Brisket
- Lean Blend: 70% Sirloin, 30% Chuck
- Rich Blend: 60% Chuck, 40% Short Ribs
Table: Meat Cut Recommendations for Grinding
| Meat Cut | Characteristics | Ideal Use |
|---|---|---|
| Chuck | Flavorful, good fat | Burgers, meatloaf, chili |
| Sirloin | Lean, tender | Lean burgers, ground beef |
| Round | Very lean | Mixed with fattier cuts |
| Brisket | Rich, flavorful | Blended for burgers |
| Short Ribs | High fat, flavorful | Blended for added richness |
Homemade Ground Meat: Safety and Storage
Ensuring the safety and proper storage of your homemade ground meat is paramount.
Safety Guidelines:
- Keep it Cold: Maintain cold temperatures throughout the grinding process.
- Cleanliness: Thoroughly clean all surfaces and equipment before and after use.
- Cook Thoroughly: Cook ground meat to an internal temperature of 160°F (71°C) to kill harmful bacteria.
Storage Recommendations:
- Refrigerate: Store ground meat in the refrigerator for no more than 1-2 days.
- Freeze: Freeze ground meat in airtight containers or freezer bags for up to 3-4 months.
- Thawing: Thaw frozen ground meat in the refrigerator, not at room temperature.
Inexpensive Meat Grinding: Tips for Budget-Conscious Cooks
Grinding your own meat can save money, especially if you follow these tips:
- Buy in Bulk: Purchase larger cuts of meat when they are on sale and freeze them for later grinding.
- Utilize Leftovers: Grind leftover cooked meat for use in dishes like shepherd’s pie or tacos.
- Consider Less Expensive Cuts: Round and other leaner cuts are often more affordable.
Fathoming Flavor Enhancement Techniques
Beyond the cuts of meat, there are other ways to enhance the flavor of your homemade ground meat.
Seasoning Before Grinding:
Adding seasonings before grinding allows the flavors to permeate the meat evenly.
Suggested Seasonings:
- Salt and Pepper: The basics.
- Garlic Powder: Adds savory depth.
- Onion Powder: Provides a subtle sweetness.
- Smoked Paprika: Adds a smoky flavor.
- Chili Powder: For a spicy kick.
Adding Fat for Flavor and Moisture:
If using lean cuts, consider adding some fat for flavor and moisture.
Fat Options:
- Beef Suet: Rendered beef fat, adds rich flavor.
- Bacon Ends: Adds a smoky, salty flavor.
- Pork Fat: A neutral-flavored option.
FAQ: Frequently Asked Questions
What is the best meat for grinding?
- Chuck is generally considered the best due to its balance of flavor and fat.
Can I grind frozen meat?
- While it’s best to partially freeze meat, grinding fully frozen meat is not recommended as it can damage your equipment.
How do I prevent ground meat from becoming mushy?
- Keep the meat very cold and avoid over-processing. Use the pulse function on your food processor or blender.
What’s the best way to clean a food processor after grinding meat?
- Disassemble all parts and wash them thoroughly with hot, soapy water. Sanitize if desired.
Is it safe to grind meat at home?
- Yes, as long as you follow proper food safety guidelines, including keeping the meat cold and cooking it to a safe internal temperature.
Can I use a hand-crank meat grinder if I don’t have an electric one?
- Yes, a hand-crank meat grinder is a great alternative, especially if you want more control over the grinding process.
What is the ideal fat content for ground beef?
- The ideal fat content depends on your preference and intended use. 80/20 (80% lean, 20% fat) is a common choice for burgers, while leaner options are better for tacos or chili.
This guide provides a comprehensive overview of how to grind meat without a grinder. By mastering these meat grinding alternatives, you can enjoy fresh, customized homemade ground meat whenever you want, regardless of whether you have specialized equipment.

Hi, I’m Larry Fish, the mind behind MyGrinderGuide.com.. With a passion for all things kitchen appliances, I created this blog to share my hands-on experience and expert knowledge. Whether it’s helping you choose the right tools for your culinary adventures or offering tips to make your kitchen more efficient, I’m here to guide you. My goal is to make your time in the kitchen not only easier but also enjoyable! Welcome to my world of kitchen mastery!