
How do you remove a grinder wheel? The process involves disconnecting the power, securing the grinder, using the appropriate tools (typically a wrench), and carefully loosening the locking nut or flange. This guide details the grinder wheel removal steps and ensures you do it safely.
Grinders are essential tools for cutting, grinding, and polishing various materials. A key part of grinder maintenance is changing the wheel. Knowing how to remove and replace a worn or damaged wheel is crucial for safety and performance. Removing grinding disc safely requires caution and the right technique. This guide provides a detailed, step-by-step approach to safely replacing abrasive wheel grinder.
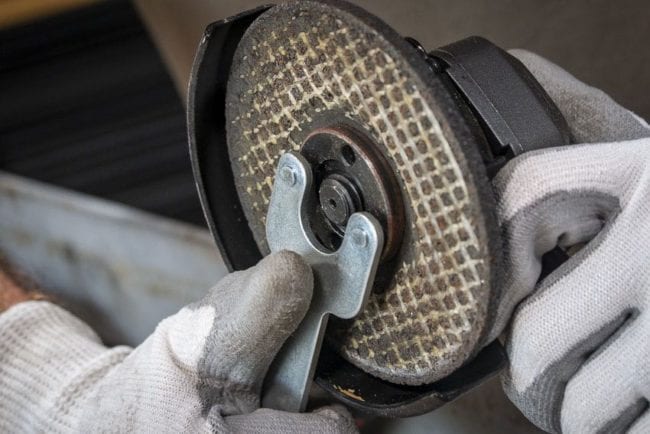
Image Source: www.protoolreviews.com
Safety First: Preparing for Grinder Wheel Removal
Before you try to take the wheel off a grinder, you have to put safety first. If you don’t follow the right safety steps, you could end up getting seriously hurt. It’s better to take a second to be careful than to risk an accident.
Essential Safety Gear
- Safety Glasses or Face Shield: Protect your eyes from flying debris.
- Gloves: Protect your hands from sharp edges and abrasive materials.
- Dust Mask or Respirator: Avoid inhaling dust particles, especially when working with certain materials.
- Ear Protection: Grinders can be very loud; use earplugs or earmuffs.
- Apron or Work Clothes: Protect your clothing from sparks and debris.
Preparing Your Work Area
- Clear the Area: Remove any flammable materials or obstructions from your workspace.
- Good Lighting: Ensure you have adequate lighting to see clearly.
- Stable Surface: Work on a stable, non-slip surface.
- Ventilation: Work in a well-ventilated area to avoid inhaling dust.
Disconnecting Power
- Unplug the Grinder: Always disconnect the power cord from the outlet before any maintenance. This prevents accidental starts.
- Battery Removal (Cordless Grinders): For cordless grinders, remove the battery pack.
Step-by-Step Guide to Removing a Grinder Wheel
Follow these grinder wheel removal steps to safely and efficiently replace your grinder wheel.
Step 1: Secure the Grinder
- Bench Grinders: Bench grinders are typically bolted to a workbench, providing stability.
- Angle Grinders: Angle grinders require careful handling. You can use a vise (with soft jaws) to secure it, but avoid over-tightening. Another option is to place the grinder on a non-slip surface.
Step 2: Locate the Locking Nut or Flange
- Identifying the Nut: The locking nut or flange is what holds the grinder wheel in place. It’s usually located in the center of the wheel.
- Types of Locking Mechanisms: Some grinders have a single nut, while others have a two-piece flange system. Familiarize yourself with your grinder’s specific design.
Step 3: Using the Correct Grinder Wheel Removal Tool
- Spanner Wrench: Most grinders come with a spanner wrench designed to fit the locking nut or flange.
- Pin Wrench: Some grinders may use a pin wrench.
- Adjustable Wrench (if Necessary): If you don’t have the correct wrench, an adjustable wrench can work in a pinch, but be very careful to avoid slipping.
- Grinder wheel removal without wrench: Use a vise grip to secure the grinder wheel lock nut to remove grinder wheel.
Step 4: Loosening the Locking Nut
This is a critical step. The direction to loosen the nut depends on the grinder’s design. Most grinders have a reverse thread on one side.
- Engage the Spanner Wrench: Insert the spanner wrench pins into the corresponding holes on the locking nut.
- Apply Force: Apply steady, firm pressure to loosen the nut.
- Direction Matters: On most angle grinders, the nut is tightened by the rotation of the motor. This means you usually turn the wrench clockwise to loosen the nut on the right side of the grinder (as you hold it) and counter-clockwise on the left side. However, always check your grinder’s manual.
- How to loosen grinder wheel: Turn the wrench in the correct direction. Use firm, steady pressure. Avoid jerky movements.
Step 5: Removing a Stuck Grinder Wheel
Sometimes, the locking nut can be very tight or even stuck due to rust or debris. Here’s how to handle a stuck grinder wheel removal:
- Apply Penetrating Oil: Spray penetrating oil (like WD-40 or similar) around the nut and let it sit for 15-30 minutes.
- Gentle Tapping: Gently tap the wrench with a hammer to help loosen the nut. Avoid excessive force.
- Heat (Use with Caution): In extreme cases, a heat gun can be used to carefully heat the nut. Be extremely cautious to avoid damaging the grinder or causing a fire. Never use an open flame.
- Specialized Tools: Consider using a specialized nut removal tool designed for stuck nuts.
- Professional Help: If you are still unable to remove the nut, consider taking it to a professional.
Step 6: Removing the Wheel
- Once Loosened: Once the nut is loose, you should be able to unscrew it by hand.
- Remove the Outer Flange: Remove the outer flange or washer.
- Slide the Wheel Off: Carefully slide the grinder wheel off the spindle.
- Inspect Components: Inspect the wheel, flanges, and spindle for any damage or wear.
Step 7: Inspecting the Grinder
- Check the Spindle: Ensure the spindle is clean and free from damage.
- Inspect the Flanges: Check the flanges for wear or damage. Replace if necessary.
- Clean Threads: Clean the threads on the spindle and nut.
Replacing the Grinder Wheel
After removing the old wheel, follow these steps for replacing abrasive wheel grinder.
Step 1: Selecting the Right Wheel
- Wheel Type: Choose the correct type of wheel for your application (grinding, cutting, polishing, etc.).
- Wheel Size: Ensure the wheel is the correct diameter and thickness for your grinder.
- Arbor Size: The arbor size (center hole) must match the grinder’s spindle.
- Maximum RPM: Never use a wheel with a lower maximum RPM rating than your grinder’s RPM.
- Material Compatibility: Choose a wheel designed for the material you will be working with (metal, concrete, wood, etc.).
Step 2: Mounting the New Wheel
- Clean the Flanges: Ensure the flanges are clean and free from debris.
- Place the Inner Flange: Place the inner flange onto the spindle.
- Slide on the Wheel: Carefully slide the new grinder wheel onto the spindle, ensuring it sits flush against the inner flange.
- Place the Outer Flange: Place the outer flange onto the spindle.
- Secure the Locking Nut: Screw the locking nut onto the spindle by hand.
Step 3: Tightening the Locking Nut
- Use the Spanner Wrench: Use the spanner wrench to tighten the locking nut.
- Proper Torque: Tighten the nut securely, but avoid over-tightening. Follow the manufacturer’s recommendations for torque.
- Engage the Spindle Lock: Many grinders have a spindle lock button. Press and hold the spindle lock while tightening the nut.
- Direction Matters: Remember the thread direction when tightening.
Step 4: Testing the Wheel
- Visual Inspection: Before turning on the grinder, visually inspect the wheel for any signs of damage or improper mounting.
- Sound Test: Tap the wheel gently with a non-metallic object. A clear, ringing sound indicates a properly mounted wheel. A dull thud may indicate cracks or improper mounting.
- Initial Run: Turn on the grinder and let it run for a minute in a safe area. Stand to the side during this initial run.
Angle Grinder Wheel Change: Specific Considerations
Changing cut off wheel grinder (or any wheel on an angle grinder) requires some specific techniques due to its design.
Using the Spindle Lock
- Engage the Lock: Locate the spindle lock button on your angle grinder.
- Press and Hold: Press and hold the spindle lock button. This will prevent the spindle from rotating while you loosen or tighten the locking nut.
- Loosening/Tightening: While holding the spindle lock, use the spanner wrench to loosen or tighten the nut.
Two-Wrench Method
- Using Two Wrenches: If the spindle lock is not functioning properly, you can use two spanner wrenches.
- Secure One Wrench: Secure one wrench on the locking nut.
- Use the Second Wrench: Use the second wrench to hold the spindle in place while you loosen or tighten the nut.
Direction of Rotation
- Check the Manual: Always check your angle grinder’s manual to determine the correct direction for loosening and tightening the locking nut.
- Common Configuration: Typically, the nut tightens in the direction of wheel rotation. This means that to loosen the nut, you’ll often turn it clockwise on one side and counter-clockwise on the other.
Grinder Maintenance Wheel Replacement: Regular Checks
Regular grinder maintenance ensures safety and prolongs the life of your tool.
Routine Inspections
- Wheel Condition: Regularly check the condition of your grinder wheel for cracks, chips, or excessive wear.
- Flange Condition: Inspect the flanges for wear, damage, or distortion.
- Spindle Condition: Check the spindle for damage or bent threads.
- Power Cord: Inspect the power cord for damage or fraying.
- Guards: Ensure all safety guards are in place and functioning properly.
Cleaning
- Clean After Each Use: Clean the grinder after each use to remove dust and debris.
- Lubricate Threads: Periodically lubricate the threads on the spindle and nut to prevent seizing.
Storage
- Proper Storage: Store your grinder in a dry, safe place.
- Protect Wheels: Store grinder wheels in a way that protects them from damage.
Troubleshooting Common Problems
Here are some solutions to common problems encountered during grinder wheel removal and replacement.
| Problem | Possible Cause | Solution |
|---|---|---|
| Locking nut is stuck | Rust, debris, over-tightening | Apply penetrating oil, gently tap with a hammer, use heat (cautiously), use a specialized nut removal tool |
| Wheel vibrates excessively | Damaged wheel, improper mounting, incorrect wheel | Replace the wheel, ensure proper mounting, use the correct wheel for your application |
| Grinder overheats | Overuse, dull wheel, inadequate ventilation | Allow the grinder to cool down, replace the wheel, ensure adequate ventilation |
| Spindle lock doesn’t work | Damaged spindle lock mechanism | Try the two-wrench method, take the grinder to a professional for repair |
| Wheel shatters | Exceeding wheel’s maximum RPM, damaged wheel, misuse | Use the correct wheel for your application, inspect the wheel before use, follow safety guidelines |
FAQ: Grinder Wheel Removal
What is the best way to remove a stuck grinder wheel? The best approach involves applying penetrating oil, gently tapping the wrench with a hammer, and, as a last resort, carefully using heat.
Can I use any wrench to remove a grinder wheel? While an adjustable wrench can work, it’s best to use the spanner wrench that came with your grinder for a secure fit.
Who is responsible if a grinder wheel shatters and causes injury? Responsibility can vary depending on the circumstances, but factors like proper wheel selection, grinder maintenance, and adherence to safety guidelines are crucial.
How to loosen grinder wheel if the spindle lock is broken? Use two wrenches to hold the spindle.
Replacing abrasive wheel grinder, how often should I do it? Replace the wheel when it is worn down, damaged, or no longer effective for your application. Regularly inspect the wheel for signs of wear.
Changing cut off wheel grinder, how do I know what size wheel to get? Check your grinder’s manual or the grinder itself for the specified wheel diameter and arbor size.
Grinder maintenance wheel replacement, what should I do with old wheels? Dispose of used grinder wheels properly. Check your local regulations for disposal guidelines.
Mastering grinder wheel removal is a crucial skill for anyone working with these tools. By following these grinder wheel removal steps and prioritizing safety, you can maintain your grinder, replace worn wheels, and ensure your work is both efficient and safe. Remember, proper grinder maintenance wheel replacement practices not only extend the life of your tools but also protect you from potential injuries.

Hi, I’m Larry Fish, the mind behind MyGrinderGuide.com.. With a passion for all things kitchen appliances, I created this blog to share my hands-on experience and expert knowledge. Whether it’s helping you choose the right tools for your culinary adventures or offering tips to make your kitchen more efficient, I’m here to guide you. My goal is to make your time in the kitchen not only easier but also enjoyable! Welcome to my world of kitchen mastery!