
Changing a grinder wheel might seem daunting, but it’s a necessary task for maintaining your tools and ensuring safe and efficient work. How do you replace a grinder wheel? Replacing a grinder wheel involves several steps: first, disconnect the power; second, remove the wheel guard; third, loosen the locking nut or flange; fourth, remove the old wheel; fifth, inspect the new wheel; sixth, mount the new wheel; seventh, tighten the locking nut or flange; eighth, replace the wheel guard; and finally, test the grinder. It’s a process that demands attention to detail and, most importantly, adherence to safety protocols. This comprehensive guide will walk you through the process of grinder wheel replacement, covering both angle grinders and bench grinders. We’ll also emphasize grinder wheel safety throughout.
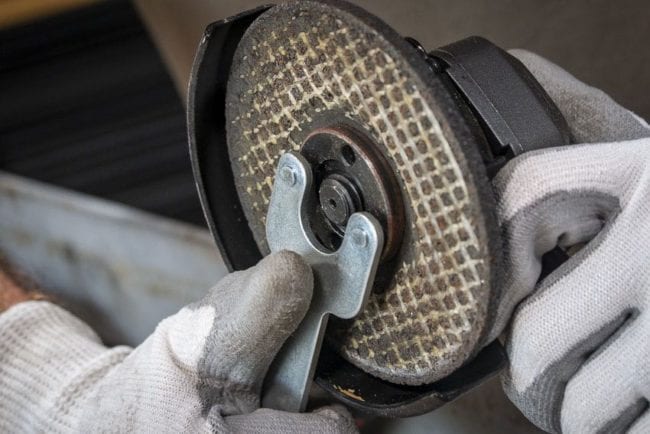
Image Source: www.protoolreviews.com
Why Replacing a Worn Grinder Wheel is Important
Ignoring a worn grinder wheel is a recipe for disaster. Here’s why worn grinder wheel replacement is essential:
- Safety: Worn wheels are prone to cracking and disintegration, posing a significant risk of injury from flying debris.
- Efficiency: A worn wheel requires more pressure to achieve the same grinding effect, leading to slower work and increased fatigue.
- Finish Quality: An uneven or damaged wheel produces inconsistent and often poor-quality finishes.
- Tool Longevity: Overworking the grinder with a worn wheel can strain the motor and shorten the tool’s lifespan.
Recognizing When a Grinder Wheel Needs Replacing
Several telltale signs indicate it’s time for grinder wheel replacement:
- Visible Cracks or Chips: Any visible damage is a clear indication that the wheel is compromised.
- Excessive Vibration: Unusual vibration during use suggests an imbalance or internal damage.
- Reduced Grinding Performance: If the wheel struggles to remove material or requires excessive pressure.
- Diameter Reduction: Check the maximum RPM rating on the wheel and ensure you’re not exceeding the manufacturer’s recommended minimum diameter. This is particularly critical for bench grinders.
Safety First: Essential Precautions Before You Start
Safety should always be your number one priority when working with grinder wheels. Before you try to take a wheel off or put a new one on, you need to follow these important steps:
- Disconnect the Power: Always unplug the grinder from the power source (or remove the battery for cordless models). This prevents accidental activation during the grinder wheel replacement process.
- Wear Personal Protective Equipment (PPE): At a minimum, wear safety glasses, a face shield, gloves, and hearing protection. A dust mask is also recommended, especially when working with materials that produce fine particles.
- Inspect the Work Area: Ensure the work area is clear of obstructions and well-ventilated.
- Read the Manual: Consult your grinder’s manual for specific instructions and safety guidelines relevant to your model.
- Check Wheel Compatibility: Make sure the new grinder wheel is compatible with your grinder’s arbor size and maximum RPM rating.
Replacing Grinding Disc: A Step-by-Step Guide
This section details the process of how to change grinding wheel, covering both angle grinders and bench grinders.
Angle Grinder Wheel Change: Step-by-Step
Tools You’ll Need:
- New grinding wheel
- Angle grinder wrench (usually comes with the grinder)
- Safety glasses, face shield, gloves, hearing protection, dust mask
Step 1: Power Down and Prepare
- Unplug the angle grinder from the power source.
- Put on your safety glasses, face shield, gloves, hearing protection, and dust mask.
Step 2: Locate the Spindle Lock
- The spindle lock is usually a button or switch located near the grinder’s head. This lock prevents the spindle from rotating, allowing you to loosen the locking nut.
Step 3: Loosen the Locking Nut
- Press and hold the spindle lock.
- Use the angle grinder wrench to loosen the locking nut (also called a flange). The direction to loosen it is usually indicated on the grinder (often with arrows). It’s typically counter-clockwise.
- If the nut is stuck, try tapping the wrench gently with a rubber mallet. Avoid excessive force.
Step 4: Remove the Old Wheel
- Once the locking nut is loose, remove it completely.
- Carefully remove the old grinding wheel.
Step 5: Inspect the Components
- Inspect the locking nut (flange) and the grinder’s spindle for any damage or wear. Replace any damaged parts.
- Clean the spindle and the locking nut with a wire brush to remove any debris.
Step 6: Install the New Wheel
- Make sure the new grinder wheel is clean and free from defects.
- Mount the new grinder wheel onto the spindle, ensuring it sits flush against the flange. Pay attention to the wheel’s rotation direction, which is typically marked on the wheel.
Step 7: Tighten the Locking Nut
- Replace the locking nut.
- Press and hold the spindle lock.
- Use the angle grinder wrench to tighten the locking nut securely. Avoid over-tightening.
Step 8: Replace the Wheel Guard
- Ensure the wheel guard is properly positioned and securely fastened.
Step 9: Test the Grinder
- Plug the grinder back into the power source.
- Turn on the grinder and let it run for a few seconds in a safe area, away from yourself and others. Listen for any unusual noises or vibrations.
- If everything sounds and feels normal, you’re ready to grind.
Bench Grinder Wheel Replacement: A Step-by-Step Guide
Tools You’ll Need:
- New grinding wheel
- Wrench (size varies depending on your bench grinder)
- Screwdriver (for removing the wheel guard)
- Safety glasses, face shield, gloves, hearing protection, dust mask
- Wheel dressing tool (optional, for truing the wheel)
Step 1: Power Down and Prepare
- Unplug the bench grinder from the power source.
- Put on your safety glasses, face shield, gloves, hearing protection, and dust mask.
Step 2: Remove the Wheel Guard
- Use a screwdriver to remove the screws holding the wheel guard in place.
- Carefully remove the wheel guard.
Step 3: Loosen the Locking Nut
- Use a wrench to loosen the locking nut on the side you’re replacing the wheel on.
- The direction to loosen it is usually indicated on the grinder (often with arrows).
- You may need to hold the wheel to prevent it from rotating while loosening the nut.
Step 4: Remove the Outer Flange and Wheel
- Carefully remove the outer flange.
- Remove the old grinding wheel.
- Important: Note the position of any blotters (cardboard or paper discs) that are present on either side of the wheel. These help distribute pressure and prevent damage.
Step 5: Inspect the Components
- Inspect the flanges and the grinder’s spindle for any damage or wear. Replace any damaged parts.
- Clean the spindle and flanges with a wire brush to remove any debris.
Step 6: Install the New Wheel
- Make sure the new grinder wheel is clean and free from defects.
- Place the inner flange on the spindle.
- Mount the new grinding wheel onto the spindle.
- Replace the outer flange, ensuring it’s properly aligned.
- If blotters were present on the old wheel, make sure to reinstall them on either side of the new wheel.
Step 7: Tighten the Locking Nut
- Replace the locking nut.
- Use a wrench to tighten the locking nut securely. Avoid over-tightening.
Step 8: Replace the Wheel Guard
- Ensure the wheel guard is properly positioned and securely fastened with the screws.
Step 9: Test the Grinder
- Plug the grinder back into the power source.
- Turn on the grinder and let it run for a minute in a safe area, away from yourself and others. Listen for any unusual noises or vibrations.
- If the wheel runs true (without wobbling), you’re ready to grind. If it wobbles, you may need to dress the wheel.
Fathoming Grinder Wheel Types and Selection
Choosing the correct grinding wheel is crucial for both safety and performance. Different wheels are designed for different materials and applications. Here’s a basic overview:
| Wheel Type | Material | Application |
|---|---|---|
| Aluminum Oxide | Steel, ferrous metals | General-purpose grinding, deburring, sharpening |
| Silicon Carbide | Non-ferrous metals, stone, masonry | Grinding aluminum, brass, concrete, ceramics |
| Ceramic | Hardened steel, alloys | High-performance grinding, precision work |
| Diamond | Carbide, glass, ceramics | Sharpening carbide tools, cutting glass and ceramics |
| CBN (Cubic Boron Nitride) | Hardened steel, high-speed steel | Precision grinding of hardened steels |
Key Considerations When Selecting a Grinder Wheel:
- Material: Choose a wheel specifically designed for the material you’ll be grinding.
- Grit Size: Coarser grits remove material faster, while finer grits produce smoother finishes.
- Wheel Diameter and Thickness: Match the wheel’s dimensions to your grinder’s specifications.
- Arbor Size: Ensure the wheel’s arbor hole matches the grinder’s spindle size.
- Maximum RPM: Never exceed the wheel’s maximum RPM rating.
Mounting Grinding Wheel: Ensuring Correct Installation
Correctly mounting grinding wheel is paramount for safety and performance. Here are some critical points:
- Cleanliness: Ensure all surfaces (spindle, flanges, wheel) are clean and free from debris.
- Flange Condition: Inspect the flanges for damage, wear, or distortion. Replace if necessary.
- Blotters: Use blotters (if required) to distribute pressure evenly and prevent damage to the wheel.
- Tightening Torque: Tighten the locking nut securely, but avoid over-tightening, which can damage the wheel.
- Wheel Orientation: Pay attention to the wheel’s rotation direction (if marked) and install it accordingly.
Identifying Common Problems and Solutions during Grinder Wheel Replacement
Even with careful preparation, you might encounter issues during the grinder wheel replacement process. Here are some common problems and how to address them:
- Problem: The locking nut is stuck.
- Solution: Apply penetrating oil and let it sit for a few minutes. Try tapping the wrench gently with a rubber mallet. Avoid excessive force, as you could damage the spindle or nut.
- Problem: The new wheel doesn’t fit on the spindle.
- Solution: Double-check that the wheel’s arbor hole matches the grinder’s spindle size. Return the wheel and purchase the correct size.
- Problem: The grinder vibrates excessively after replacing the wheel.
- Solution: Ensure the wheel is properly mounted and tightened. Check the wheel for damage or imbalance. You may need to dress the wheel to true it up.
- Problem: The wheel guard doesn’t fit properly after replacing the wheel.
- Solution: Make sure the wheel guard is correctly aligned and that the new wheel’s thickness doesn’t exceed the guard’s capacity.
Grinder Wheel Safety: Avoiding Accidents and Injuries
Grinder wheel safety is not just a set of rules; it’s a mindset. Always prioritize safety when working with grinders. Here are some key safety tips:
- Never Exceed the Maximum RPM: Exceeding the wheel’s maximum RPM can cause it to shatter.
- Inspect Wheels Before Use: Check for cracks, chips, or other damage. Discard any damaged wheels.
- Use the Correct Wheel for the Application: Using the wrong wheel can lead to premature wear, poor performance, and increased risk of injury.
- Don’t Apply Excessive Pressure: Let the wheel do the work. Applying too much pressure can cause the wheel to overheat and break.
- Grind on the Wheel’s Face: Avoid grinding on the wheel’s side, as this can weaken it and cause it to shatter.
- Keep the Wheel Guard in Place: The wheel guard is designed to protect you from flying debris. Never remove it.
- Store Grinding Wheels Properly: Store wheels in a dry, cool place, away from direct sunlight and extreme temperatures.
- Dispose of Worn Wheels Safely: Dispose of worn or damaged wheels according to local regulations.
- Be Aware of Your Surroundings: Ensure your work area is clear of obstructions and that no one is in the path of flying debris.
- Take Breaks: Grinding can be physically demanding. Take frequent breaks to avoid fatigue and maintain focus.
FAQ: Frequently Asked Questions about Grinder Wheel Replacement
- Can I use a grinding wheel that’s slightly larger than the original? No. Always use a grinder wheel that matches the original specifications for diameter, thickness, and arbor size. Using an oversized wheel can overload the grinder’s motor and create a safety hazard.
- What is the best way to dispose of a worn grinding wheel? The best method for grinder wheel disposal depends on local regulations. In general, you should wrap the wheel securely in heavy-duty paper or cardboard and label it as “Abrasive Waste.” Contact your local waste management authority for specific guidelines.
- How often should I replace my grinding wheel? The frequency of grinder wheel replacement depends on usage. Inspect the wheel regularly for signs of wear or damage and replace it as needed. If you notice reduced grinding performance, excessive vibration, or visible cracks, it’s time for a new wheel.
- What happens if I over-tighten the locking nut? Over-tightening the locking nut can damage the wheel and the grinder’s spindle. It can also make it difficult to remove the wheel later. Tighten the nut securely, but avoid excessive force.
- Is it safe to use a grinding wheel that has been dropped? No. Dropping a grinding wheel can cause internal damage that may not be visible. It’s best to discard any wheel that has been dropped, even if it appears to be undamaged.
Replacing a grinder wheel is a straightforward task when performed with care and attention to safety. By following these steps and prioritizing grinder wheel safety, you can ensure efficient and safe grinding operations. Remember to always wear appropriate PPE, inspect your equipment regularly, and choose the right grinding wheel for the job. Regularly replacing grinding disc will keep you safe and improve the efficiency of your grinding operations.

Hi, I’m Larry Fish, the mind behind MyGrinderGuide.com.. With a passion for all things kitchen appliances, I created this blog to share my hands-on experience and expert knowledge. Whether it’s helping you choose the right tools for your culinary adventures or offering tips to make your kitchen more efficient, I’m here to guide you. My goal is to make your time in the kitchen not only easier but also enjoyable! Welcome to my world of kitchen mastery!