
Can you sharpen a drill bit with a bench grinder? Yes, you can absolutely sharpen a drill bit with a bench grinder! Learning how to do it properly will save you money, extend the life of your drill bits, and ensure you’re always drilling with precision. This comprehensive guide will walk you through everything you need to know, from essential safety precautions to achieving professional-quality results.
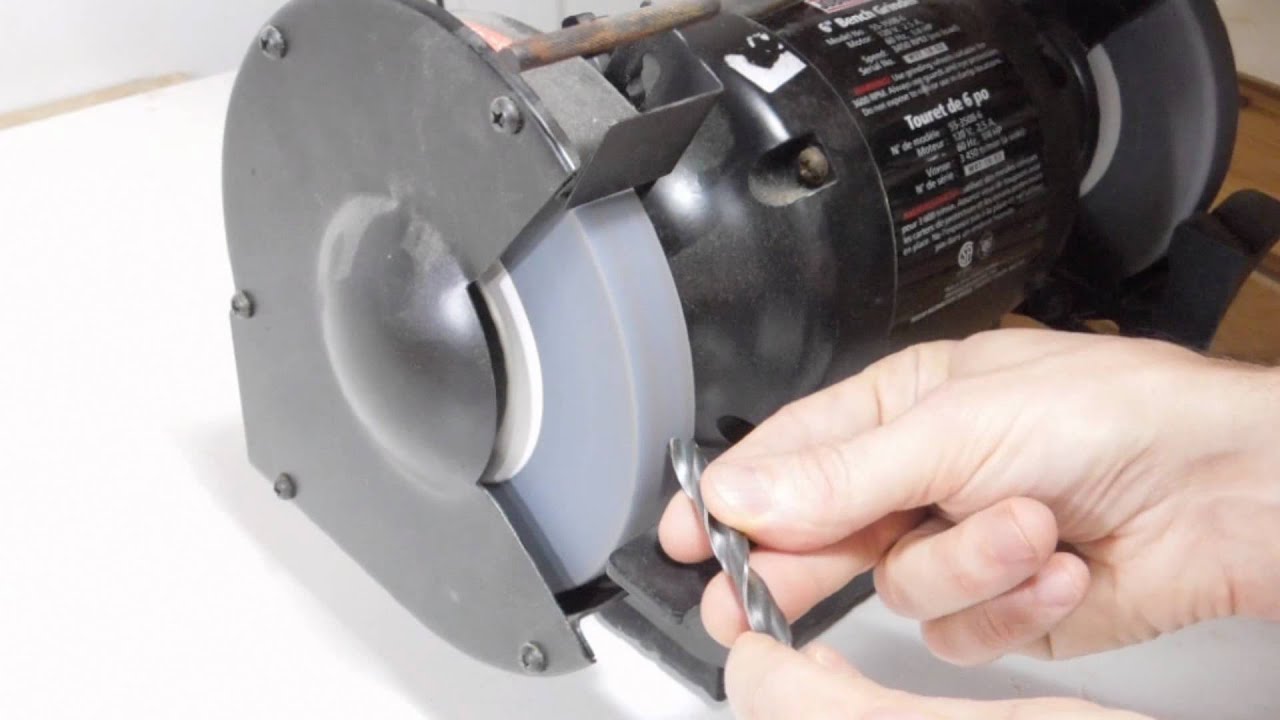
Image Source: i.ytimg.com
The Importance of Sharp Drill Bits
Dull drill bits are more than just an inconvenience; they can lead to several problems:
- Increased Effort: You’ll need to apply more pressure to get the drill bit to penetrate the material.
- Overheating: Friction from a dull bit generates excessive heat, potentially damaging both the drill bit and the material being drilled.
- Inaccurate Holes: Dull bits can wander, creating holes that are not in the intended location or are the wrong size.
- Increased Risk of Breakage: A dull bit is more likely to break or snap under pressure.
- Torn or Ragged Edges: Instead of cleanly cutting through the material, a dull bit can tear and leave ragged edges.
Therefore, learning drill bit sharpening at home is an invaluable skill for any DIY enthusiast or professional.
Preparing to Sharpen Your Drill Bit
Before you even think about touching a drill bit to a bench grinder, preparation is key.
Safety First
- Wear Safety Glasses: Metal fragments and sparks can fly off the grinding wheel at high speed. Always wear safety glasses to protect your eyes.
- Use a Dust Mask or Respirator: Grinding creates dust that can be harmful to your lungs. A dust mask or respirator will prevent inhalation of these particles.
- Wear Gloves: Gloves protect your hands from heat and sharp edges.
- Ensure Proper Ventilation: Work in a well-ventilated area to avoid breathing in grinding dust.
- Secure the Bench Grinder: Make sure your bench grinder is securely mounted to a stable surface to prevent it from moving during operation.
Gathering Your Tools and Materials
- Bench Grinder: A bench grinder is a stationary power tool with abrasive wheels used for shaping and sharpening metal. Choosing the best bench grinder for sharpening drill bits will depend on your budget and frequency of use. Look for a model with adjustable tool rests.
- Grinding Wheel: Use the correct grinding wheel for drill bits. An aluminum oxide wheel with a medium grit (60-80 grit) is generally suitable for sharpening high speed steel drill bits.
- Water or Cutting Fluid: Keep a container of water or cutting fluid nearby to cool the drill bit during grinding. This prevents overheating and preserves the temper of the steel.
- Magnifying Glass (Optional): A magnifying glass can help you inspect the cutting edges for sharpness.
- Drill Bit Gauge or Protractor (Optional): This tool helps you to check the drill bit sharpening angle for accuracy.
- Drill Bit Sharpening Jig (Optional): A drill bit sharpening jig can make the process easier and more consistent, especially for beginners.
Inspecting the Drill Bit
Carefully examine the drill bit before you begin. Look for:
- Rounded Cutting Edges: This is the most common sign of a dull drill bit.
- Chips or Cracks: Significant damage may require replacing the drill bit. Minor chips can sometimes be ground out.
- Uneven Wear: One cutting edge may be more worn than the other, indicating improper use or sharpening in the past.
Bench Grinder Sharpening Techniques
The core of how to sharpen a drill bit with a bench grinder lies in mastering the technique. Whether you’re sharpening drill bits freehand or using a jig, the principles remain the same.
Setting Up Your Bench Grinder
- Wheel Condition: Ensure your grinding wheel is clean and in good condition. A worn or clogged wheel will not sharpen effectively. Use a dressing tool to clean and true the wheel if necessary.
- Tool Rest Adjustment: Adjust the tool rest so that it is close to the grinding wheel, leaving a gap of no more than 1/8 inch. This provides support for the drill bit and prevents it from being pulled into the wheel. Adjust the angle of the tool rest to be slightly below the cutting edge angle of the drill bit (typically 59 degrees).
- Lighting: Ensure adequate lighting to clearly see the cutting edges of the drill bit.
The Four-Step Sharpening Process
The key to successful bench grinder sharpening techniques is to follow a consistent process. This four-step method is widely used and produces excellent results.
-
The Heel Grind (Primary Relief):
- Hold the drill bit at the correct drill bit sharpening angle against the grinding wheel, typically around 59 degrees.
- Rest the shank of the drill bit on the tool rest.
- Gently bring the cutting edge into contact with the grinding wheel.
- Rotate the drill bit downwards and slightly to the left (for a right-hand drill bit) while maintaining the angle. This creates the primary relief angle behind the cutting edge.
- Grind a small amount of material away, focusing on the heel of the drill bit.
- Cool the drill bit frequently in water to prevent overheating.
- Repeat this process until the heel is ground down evenly.
-
The Flute Grind (Secondary Relief):
- This step creates the secondary relief angle, which provides clearance for the drill bit to cut efficiently.
- Slightly lower the angle of the drill bit relative to the grinding wheel.
- Grind a small amount of material away from the flute of the drill bit, just behind the cutting edge.
- This creates a concave shape that allows the cutting edge to dig into the material being drilled.
- Cool the drill bit frequently.
- Repeat until the flute is ground evenly.
-
The Lip Grind (Cutting Edge Formation):
- This step establishes the sharp cutting edge of the drill bit.
- Hold the drill bit so the cutting edge is parallel to the grinding wheel.
- Lightly touch the cutting edge to the grinding wheel, removing a minimal amount of material.
- This creates a sharp, clean cutting edge.
- Cool the drill bit frequently.
-
The Point Split (Optional):
- A point split, or web thinning, reduces the amount of pressure required to start a hole. This is especially useful for larger drill bits.
- Hold the drill bit vertically with the point facing upwards.
- Lightly touch each side of the point to the grinding wheel, creating a small notch.
- Be careful not to remove too much material, as this can weaken the drill bit.
Tips for Success
- Consistency is Key: Maintain a consistent angle and pressure throughout the sharpening process.
- Light Touches: Use light, even touches. Avoid applying too much pressure, as this can overheat the drill bit and damage the grinding wheel.
- Cool Frequently: Dip the drill bit in water or cutting fluid frequently to prevent overheating.
- Practice Makes Perfect: Sharpening drill bits takes practice. Don’t be discouraged if your first attempts are not perfect.
- Check Your Work: After each step, inspect the drill bit to ensure that you are grinding evenly and creating the desired angles. Use a drill bit gauge or protractor to check the drill bit sharpening angle.
Table: Troubleshooting Common Sharpening Problems
| Problem | Possible Cause(s) | Solution(s) |
|---|---|---|
| Uneven Cutting Edges | Inconsistent angle or pressure during grinding | Pay closer attention to maintaining a consistent angle and pressure. Use a jig for added stability. |
| Overheated Drill Bit | Excessive pressure, insufficient cooling | Use lighter touches and cool the drill bit more frequently. |
| Rounded Cutting Edges After Sharpening | Insufficient grinding of the lip (cutting edge) | Ensure that you are grinding the cutting edge until it is sharp. |
| Drill Bit Catches or Breaks Easily | Incorrect relief angle, too much material removed from the point | Check the relief angle and adjust accordingly. Avoid removing too much material from the point split. |
| Drill Bit Wanders When Drilling | Uneven cutting edges, incorrect point angle | Ensure that the cutting edges are even and the point angle is correct. Use a drill bit gauge to check the point angle. |
Using a Drill Bit Sharpening Jig
For those who struggle with sharpening drill bits freehand, a drill bit sharpening jig can be a valuable tool. A jig provides a stable platform and guides the drill bit at the correct angle, making the process more consistent and accurate.
Types of Jigs
- Simple Angle Guides: These jigs provide a fixed angle for grinding the cutting edges.
- Adjustable Jigs: These jigs allow you to adjust the angle to match the specific drill bit being sharpened.
- Powered Sharpeners: These are specialized machines designed specifically for sharpening drill bits.
How to Use a Jig
- Mount the Jig: Secure the jig to your bench grinder or work surface.
- Insert the Drill Bit: Place the drill bit into the jig, ensuring that it is properly aligned.
- Adjust the Angle: Set the angle of the jig to match the desired drill bit sharpening angle.
- Grind the Cutting Edges: Follow the manufacturer’s instructions for grinding the cutting edges. Use light touches and cool the drill bit frequently.
- Inspect and Adjust: After grinding each cutting edge, inspect it for sharpness and adjust the jig as needed.
Benefits of Using a Jig
- Increased Accuracy: Jigs help to maintain a consistent angle, resulting in more accurate sharpening.
- Improved Consistency: Jigs ensure that both cutting edges are ground evenly.
- Reduced Learning Curve: Jigs make the sharpening process easier to learn, especially for beginners.
- Faster Sharpening: With practice, jigs can speed up the sharpening process.
Choosing the Right Grinding Wheel
The grinding wheel for drill bits is a critical factor in achieving good results. Using the wrong wheel can damage the drill bit or result in a poor-quality edge.
Types of Grinding Wheels
- Aluminum Oxide: This is the most common type of grinding wheel for sharpening high-speed steel drill bits. It is durable and relatively inexpensive.
- Silicon Carbide: This type of wheel is harder than aluminum oxide and is suitable for grinding harder materials such as carbide.
- CBN (Cubic Boron Nitride): CBN wheels are extremely hard and are ideal for sharpening carbide drill bits.
- Diamond Wheels: Diamond wheels are also suitable for sharpening carbide drill bits.
Grit Size
The grit size of the grinding wheel determines the fineness of the finish.
- Coarse Grit (40-60): Use for removing large amounts of material or for shaping.
- Medium Grit (60-80): Use for general-purpose sharpening.
- Fine Grit (100-120): Use for finishing and polishing.
For sharpening high speed steel drill bits, a medium-grit aluminum oxide wheel (60-80 grit) is generally recommended.
Fathoming Drill Bit Sharpening Angle
The drill bit sharpening angle is crucial for proper cutting performance. The standard angle for general-purpose drill bits is 118 degrees (59 degrees per side). However, different materials may require different angles.
Common Drill Bit Angles
- 118 Degrees: General-purpose drilling in steel, wood, and plastic.
- 135 Degrees: Drilling in harder materials like stainless steel and cast iron. This angle provides a more aggressive cutting action.
- 90 Degrees: Drilling in soft materials like aluminum and brass. This angle prevents the drill bit from grabbing or tearing the material.
Checking the Angle
Use a drill bit gauge or protractor to check the drill bit sharpening angle. These tools provide a template for comparing the angle of the drill bit to the desired angle.
Final Inspection and Testing
Once you’ve finished sharpening, take a close look at your drill bit to make sure the cutting edges are sharp and look the same on both sides. It’s a good idea to use a magnifying glass so you can spot any tiny chips or rough spots that might be hard to see with just your eyes.
Testing the Drill Bit
Test the sharpened drill bit by drilling a hole in a piece of scrap material. If the drill bit cuts cleanly and efficiently, you have successfully sharpened it. If the drill bit wanders or requires excessive pressure, you may need to re-sharpen it.
Conclusion
Mastering the art of how to sharpen a drill bit with a bench grinder is a valuable skill that will save you time and money. By following the steps outlined in this drill bit sharpening guide, and with practice and patience, you can achieve professional-quality results and keep your drill bits performing at their best. Remember to prioritize safety, use the correct tools and techniques, and take your time to ensure that the cutting edges are sharp and even. Happy sharpening!
Frequently Asked Questions (FAQ)
How often should I sharpen my drill bits? Sharpen drill bits whenever they become dull or show signs of wear. The frequency will depend on the type of material you are drilling and the frequency of use.
Can I sharpen carbide drill bits on a bench grinder? Yes, but you will need to use a grinding wheel specifically designed for carbide, such as a silicon carbide, CBN, or diamond wheel.
What is the best way to cool a drill bit during sharpening? Dip the drill bit in water or cutting fluid frequently to prevent overheating.
What if I remove too much material from the drill bit? If you remove too much material, the drill bit may become weakened or lose its proper geometry. In this case, it may be necessary to replace the drill bit.
Is it worth buying a drill bit sharpening jig? If you struggle with sharpening drill bits freehand or want to achieve more consistent results, a jig can be a worthwhile investment.
Where can I find a good drill bit sharpening tutorial? There are many excellent drill bit sharpening tutorial videos available on YouTube and other online platforms. Watching these videos can provide visual guidance and help you to master the sharpening process.
How can I tell if a drill bit is sharp enough? A sharp drill bit will cut cleanly and efficiently, producing smooth, even chips. A dull drill bit will require more pressure and may produce ragged edges or no chips at all.
What is web thinning (point splitting) and why is it important? Web thinning reduces the chisel edge on a drill bit. The chisel edge is in the center of the drill bit and does not cut, it just pushes the material out of the way. Thinning this area reduces the amount of pressure needed to force the bit through the work piece, and significantly reduces heat buildup.

Hi, I’m Larry Fish, the mind behind MyGrinderGuide.com.. With a passion for all things kitchen appliances, I created this blog to share my hands-on experience and expert knowledge. Whether it’s helping you choose the right tools for your culinary adventures or offering tips to make your kitchen more efficient, I’m here to guide you. My goal is to make your time in the kitchen not only easier but also enjoyable! Welcome to my world of kitchen mastery!