
Taking off a grinder wheel involves a few simple steps. This article will cover the safe and easy ways for removing grinder wheel, including dealing with a stuck grinder wheel, replacing grinding wheel and how to safely perform an angle grinder wheel change.
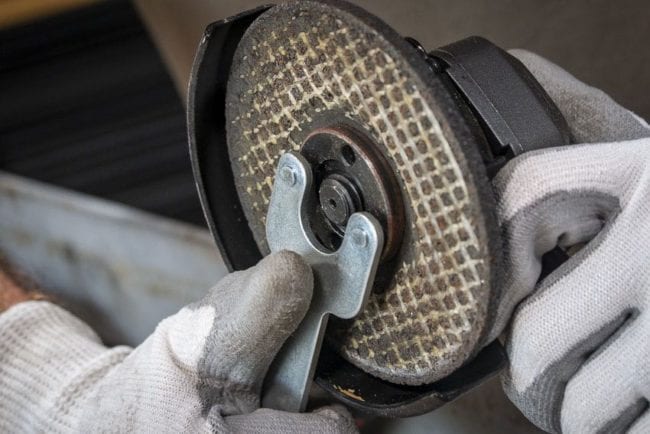
Image Source: www.protoolreviews.com
Safety First: Gear Up Before You Start
Before you even think about loosening grinder wheel or changing grinder disc, remember that safety is paramount. Grinder wheels can shatter or throw off debris, so protect yourself:
- Safety Glasses: Always wear safety glasses or a face shield. Flying sparks and fragments are common.
- Gloves: Protect your hands from sharp edges and debris.
- Dust Mask: Grinding creates dust, especially with abrasive materials. A dust mask or respirator is essential.
- Hearing Protection: Grinders are loud. Earplugs or earmuffs will prevent hearing damage.
- Appropriate Clothing: Wear long sleeves and pants to protect your skin.
Choosing the Right Grinder Wheel Removal Tool
The standard grinder wheel removal tool is the spanner wrench (also known as a pin spanner or locknut wrench) that comes with most angle grinders. However, there are alternatives if you lose the original or need a different approach for a stuck grinder wheel:
- Spanner Wrench (Pin Spanner): This is the most common tool. It has two pins that fit into the corresponding holes on the grinder’s locknut.
- Adjustable Wrench: An adjustable wrench can be used, but it’s less secure than a spanner wrench and more likely to slip. Use with caution.
- Locking Pliers (Vise-Grips): As a last resort, locking pliers can grip the locknut. Be careful not to damage the nut.
Step-by-Step Guide: Removing a Grinder Wheel
Here’s a detailed guide on how to take off grinder wheel, covering both standard removal and dealing with stubborn situations:
1. Unplug the Grinder
This is the most critical step. Never attempt to remove a grinder wheel while the grinder is plugged in. Accidental activation can lead to serious injury.
2. Locate the Spindle Lock
Most angle grinders have a spindle lock button. This button prevents the spindle (the rotating shaft where the wheel is mounted) from turning, allowing you to loosen the locknut.
3. Engage the Spindle Lock
Press and hold the spindle lock button. You may need to rotate the wheel slightly until the lock engages fully. You’ll feel or hear a click when it’s engaged.
4. Loosen the Locknut
To take the disc off your angle grinder, take the spanner wrench and fit its pins into the holes on the locknut. Instead of the usual way, you’ll need to turn the wrench clockwise to loosen it.
It’s a bit confusing, but the threads on these tools are often reversed. This is a safety feature to make sure the nut doesn’t spin itself off while the tool is running. Just remember that the old saying “righty-tighty, lefty-loosey” works backward here!
5. Remove the Locknut and Wheel
Once the locknut is loose, remove it completely. Then, carefully remove the old grinder wheel. Take note of the order of any washers or flanges for reassembly.
Dealing With a Stuck Grinder Wheel
Sometimes, the locknut can become extremely tight or rusted, making grinder wheel removal difficult. Here are a few methods to try if you encounter a stuck grinder wheel:
- Apply Penetrating Oil: Spray penetrating oil (like WD-40 or Liquid Wrench) around the locknut and let it soak for at least 15-30 minutes. This can help loosen rust and corrosion.
- Tap the Wrench: Gently tap the spanner wrench with a rubber mallet or hammer. This can help break the bond between the locknut and the spindle. Be careful not to damage the wrench or the grinder.
- Heat (Use Caution): Applying heat can expand the metal and loosen the nut. Use a heat gun or propane torch sparingly, and only if you’re comfortable doing so. Be extremely careful not to overheat the grinder or damage any plastic parts. Wear appropriate heat-resistant gloves.
- Use a Breaker Bar: If the spanner wrench isn’t providing enough leverage, try using a breaker bar or cheater bar for extra torque. Attach the breaker bar to the spanner wrench to increase its length and leverage.
- Grinder Wheel Removal Tool Alternatives: If the spanner wrench fails or has broken, consider using alternatives like locking pliers or an adjustable wrench as described above. Be extra cautious when using these tools.
- Professional Help: If you’ve tried everything and the wheel still won’t budge, consider taking the grinder to a professional repair shop. They have specialized tools and experience dealing with stubborn fasteners.
Replacing the Grinder Wheel
Replacing grinding wheel requires carefully following the correct procedure to ensure safety and proper functionality:
- Inspect the New Wheel: Before installing a new grinding wheel, carefully inspect it for any cracks, chips, or other damage. Never use a damaged wheel.
- Check Wheel Compatibility: Make sure the new wheel is compatible with your grinder’s size and speed rating. The wheel’s maximum RPM (revolutions per minute) must be equal to or greater than the grinder’s RPM.
- Install Washers and Flanges: Reinstall any washers or flanges in the correct order. These components help distribute pressure evenly and prevent the wheel from cracking.
- Mount the New Wheel: Place the new wheel onto the spindle.
- Tighten the Locknut: Using the spanner wrench, tighten the locknut counter-clockwise (remember the reversed threads). Tighten it securely, but don’t overtighten it.
- Test the Wheel: Before using the grinder, run it briefly at its maximum speed in a safe area. This will help ensure that the wheel is properly installed and balanced.
Table: Troubleshooting Common Grinder Wheel Removal Problems
| Problem | Possible Cause(s) | Solution(s) |
|---|---|---|
| Locknut is too tight | Overtightening during previous installation, rust, debris | Apply penetrating oil, tap the wrench, use a breaker bar, heat the nut (with caution), consider professional help |
| Spindle lock not engaging | Debris in the mechanism, worn-out lock | Clean the spindle lock area, try rotating the wheel slightly, check if the lock is damaged; if so, consider professional repair |
| Spanner wrench slipping | Worn-out wrench, incorrect size, damaged locknut holes | Use a new or different wrench, ensure the wrench fits properly, consider using locking pliers or an adjustable wrench (with caution), replace the locknut if the holes are damaged |
| Wheel won’t come off spindle | Rust, debris | Apply penetrating oil, gently pry the wheel off the spindle (be careful not to damage the grinder or wheel), consider using a wheel puller |
| Damaged locknut | Overtightening, using the wrong tools | Replace the locknut |
Different Types of Grinder Wheels
Choosing the right grinder wheel is essential for safety and efficiency. Here’s a brief overview of common types:
- Grinding Wheels (Abrasive Wheels): These are used for removing material, sharpening tools, and cleaning metal. They come in various grits (coarseness) for different applications.
- Aluminum Oxide: General purpose grinding. Good for steel and ferrous metals.
- Silicon Carbide: Best for non-ferrous metals like aluminum, brass, and stone.
- Ceramic: Fast cutting and long-lasting, ideal for hardened steels and demanding applications.
- Cutting Wheels (Cut-Off Wheels): Thin, reinforced wheels used for cutting metal, tile, and other materials.
- Flap Discs: These consist of overlapping abrasive flaps attached to a backing plate. They’re used for grinding, blending, and finishing.
- Wire Wheels: Used for removing rust, paint, and scale. They come in different wire types (steel, stainless steel, brass) and configurations (cup, wheel, brush).
- Polishing Wheels: Used with polishing compounds to create a smooth, shiny finish on metal.
Understanding Angle Grinder Disc Removal
Angle grinder disc removal follows the same steps as removing a grinding wheel. The key is to ensure the grinder is unplugged, the spindle lock is engaged, and you’re using the correct tool (usually a spanner wrench) to loosen the locknut. The term “disc” is often used interchangeably with “wheel.”
Tips for Extending the Life of Your Grinder Wheels
- Store Wheels Properly: Store grinder wheels in a dry, safe place where they won’t be damaged.
- Use the Correct Wheel for the Job: Using the wrong wheel can cause it to wear out quickly or even shatter.
- Apply Moderate Pressure: Don’t force the grinder. Let the wheel do the work. Applying too much pressure can cause the wheel to overheat and wear out faster.
- Clean the Grinder Regularly: Keeping the grinder clean can prevent debris from interfering with the wheel and locknut.
- Inspect Wheels Before Each Use: Check for any signs of damage before using a grinder wheel.
Final Thoughts on Safe Grinder Wheel Removal
Removing grinder wheel is a straightforward process when done correctly and safely. Always prioritize safety by wearing appropriate personal protective equipment, unplugging the grinder, and using the correct tools. If you encounter a stuck grinder wheel, don’t force it. Try the methods described above, and if all else fails, seek professional help. Regular maintenance and proper wheel selection will prolong the life of your grinder and ensure safe operation.
Frequently Asked Questions (FAQ)
Q: What is the easiest way of removing a grinder wheel?
The easiest way to remove a grinder wheel is to use the correct spanner wrench that comes with the grinder while engaging the spindle lock. Turn the wrench clockwise to loosen the nut (remember, threads are often reversed).
Q: Can I use WD-40 to loosen a stuck grinder wheel?
Yes, WD-40 or other penetrating oils can help loosen a stuck grinder wheel by breaking down rust and corrosion around the locknut. Allow it to soak for at least 15-30 minutes before attempting to remove the wheel.
Q: Who is responsible if a grinder wheel shatters and causes injury?
Responsibility for injury caused by a shattered grinder wheel can vary based on the circumstances. It could fall on the manufacturer if the wheel was defective, the user if they misused the tool or didn’t follow safety precautions, or even a combination of factors.
Q: What are the risks if I don’t unplug the grinder before changing the wheel?
The main risk is accidental activation of the grinder, which can cause serious injury from the spinning wheel.
Q: How can I prevent the grinder wheel from getting stuck in the first place?
To prevent the wheel from getting stuck, avoid overtightening the locknut, clean the grinder regularly to remove debris, and apply a thin coat of anti-seize compound to the spindle threads during wheel installation.

Hi, I’m Larry Fish, the mind behind MyGrinderGuide.com.. With a passion for all things kitchen appliances, I created this blog to share my hands-on experience and expert knowledge. Whether it’s helping you choose the right tools for your culinary adventures or offering tips to make your kitchen more efficient, I’m here to guide you. My goal is to make your time in the kitchen not only easier but also enjoyable! Welcome to my world of kitchen mastery!