
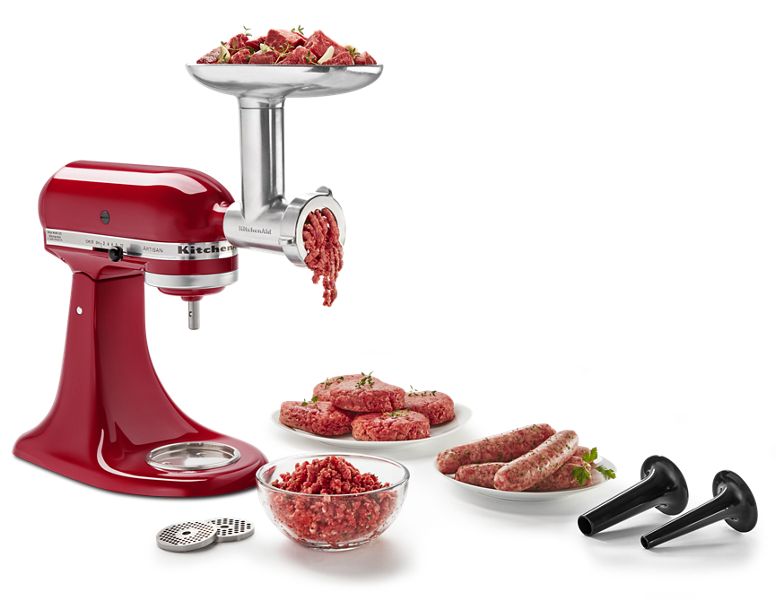
Using a KitchenAid meat grinder is a great way to make sure your ground meat is fresh and high quality. You might ask, “Can I really grind meat at home with my stand mixer?” Yes, you absolutely can! This guide walks you through every step, from putting the attachment together to cleaning it up, so you can feel confident making your own meat for tasty meals. We will also check out the different attachments available, look at other ways to use the grinder, and even share a few recipes to get you started.
Image Source: www.kitchenaid.com
Getting Started: KitchenAid Meat Grinder Assembly
Before you can start grinding, you need to put the meat grinder attachment together. Here’s how:
Parts You’ll Need
- Grinder Body
- Grinding Worm (Auger)
- Cutting Blade
- Grinding Plate (Fine, Medium, or Coarse)
- Locking Ring
- Food Pusher
Step-by-Step Assembly
- Attach the Grinder Body to the Mixer: Make sure your KitchenAid stand mixer is turned off. Attach the grinder body to the power hub at the front of the mixer. Tighten the knob to secure it.
- Insert the Grinding Worm: Slide the grinding worm (also called the auger) into the grinder body. The longer end should go in first, fitting snugly.
- Place the Cutting Blade: Put the cutting blade on the end of the grinding worm. The blade should fit against the worm with the flat side facing outward.
- Choose a Grinding Plate: Pick the grinding plate you want to use (fine, medium, or coarse). Place the plate against the cutting blade.
- Secure the Locking Ring: Screw the locking ring onto the grinder body to hold everything in place. Don’t overtighten it.
Visual Aid
| Step | Description |
|---|---|
| 1 | Attach grinder to mixer power hub. |
| 2 | Insert grinding worm into the grinder body. |
| 3 | Place cutting blade against the worm. |
| 4 | Add grinding plate (fine, medium, coarse). |
| 5 | Tighten the locking ring. |
Preparing the Meat: Best Meat for KitchenAid Grinder
What is the best meat to grind with a KitchenAid? The best meat for your KitchenAid grinder is meat that’s cold and well-trimmed.
Choosing Your Meat
- Beef: Chuck roast is a great choice for ground beef. It has a good balance of meat and fat.
- Pork: Pork shoulder (also called Boston butt) is ideal for ground pork.
- Chicken/Turkey: Use boneless, skinless chicken or turkey thighs for best results.
- Venison: Venison can be ground but often needs added fat due to its leanness.
Trimming and Cooling
- Trim the Meat: Cut away any excess fat, gristle, or bone from the meat. Too much fat can clog the grinder.
- Cut into Strips or Cubes: Cut the meat into 1-inch strips or cubes. This makes it easier for the grinder to process.
- Chill the Meat: Place the cut meat in the freezer for 30-60 minutes before grinding. The meat should be very cold but not frozen solid. This helps it grind more cleanly.
Grinding Meat at Home with KitchenAid
Now that your grinder is assembled and your meat is prepped, let’s start grinding!
Step-by-Step Grinding Process
- Attach the Grinder: Ensure the grinder is securely attached to your KitchenAid mixer.
- Set the Speed: Set the mixer to speed 4. This is usually the ideal speed for grinding.
- Feed the Meat: Slowly feed the meat into the grinder opening. Use the food pusher to gently push the meat down. Do not use your fingers!
- Catch the Ground Meat: Place a bowl under the grinder to catch the ground meat as it comes out.
- Regrind (Optional): For a finer grind, you can grind the meat a second time using a finer grinding plate.
Tips for Successful Grinding
- Keep the Meat Cold: If the meat starts to warm up during grinding, return it to the freezer for a short time.
- Don’t Overload the Grinder: Feed the meat in at a steady pace, but don’t force too much in at once.
- Check the Grind: Periodically check the consistency of the ground meat. Adjust the grinding plate if needed.
Exploring KitchenAid Meat Grinder Attachments
The KitchenAid meat grinder isn’t just for grinding meat! There are several KitchenAid meat grinder attachments that expand its capabilities:
- Sausage Stuffer Attachment: This attachment lets you make homemade sausage. It includes different sized tubes for various sausage types.
- Food Tray: This large tray attaches to the top of the grinder and holds more meat.
- Fine, Medium, and Coarse Grinding Plates: These allow you to customize the texture of your ground meat.
Homemade Sausage with KitchenAid Grinder
One of the most popular KitchenAid food grinder uses is making homemade sausage. Here’s how:
Ingredients
- Ground meat (pork, beef, or a combination)
- Sausage seasoning (salt, pepper, herbs, spices)
- Natural sausage casings
- Water or other liquid (optional)
Steps
- Prepare the Meat: Grind the meat using the grinder attachment.
- Mix in Seasonings: Combine the ground meat with your desired sausage seasoning. Add a little water or other liquid if needed to help bind the mixture.
- Attach Sausage Stuffer: Attach the sausage stuffer attachment to the grinder.
- Load the Casing: Slide a sausage casing onto the sausage stuffer tube.
- Stuff the Sausage: Slowly feed the meat mixture into the grinder, filling the casing. Twist the casing to create links.
KitchenAid Meat Grinder Recipes
What can you make with your KitchenAid meat grinder? Here are a few KitchenAid meat grinder recipes to get you started:
- Homemade Burgers: Grind your own beef for juicy, flavorful burgers.
- Sausage: Make your own breakfast sausage, Italian sausage, or bratwurst.
- Meatloaf: Grind your own meat for a meatloaf with superior texture and flavor.
- Chili: Use freshly ground meat for a hearty and delicious chili.
- Shepherd’s Pie: Grind lamb or beef for a classic shepherd’s pie.
KitchenAid Meat Grinder Safety
KitchenAid meat grinder safety is paramount. Always follow these safety tips:
- Read the Manual: Always read the instruction manual before using the grinder.
- Keep Fingers Away: Never put your fingers near the moving parts of the grinder. Always use the food pusher.
- Turn Off the Mixer: Always turn off and unplug the mixer before disassembling or cleaning the grinder.
- Supervise Children: Keep children away from the mixer and grinder while in use.
KitchenAid Meat Grinder Cleaning
Proper KitchenAid meat grinder cleaning is crucial for hygiene and longevity.
Step-by-Step Cleaning
- Unplug and Disassemble: Turn off the mixer and unplug it. Disassemble the grinder attachment completely.
- Wash the Parts: Wash all the parts (grinder body, worm, blade, plate, locking ring) in hot, soapy water. Use a brush to remove any meat residue.
- Dry Thoroughly: Dry all the parts completely with a clean towel. Moisture can cause rust.
- Apply Mineral Oil: Lightly coat the grinding worm and plates with mineral oil to prevent rust.
- Reassemble and Store: Reassemble the grinder and store it in a dry place.
Additional Cleaning Tips
- Dishwasher Safe? Check your manual. Some parts are dishwasher safe, but hand washing is often recommended for better results.
- Clean Immediately: Clean the grinder as soon as possible after use to prevent meat from drying and becoming difficult to remove.
KitchenAid Meat Grinder Maintenance
Proper KitchenAid meat grinder maintenance will keep your grinder in top condition.
- Regular Cleaning: Follow the cleaning steps above after each use.
- Sharpen Blades: If the cutting blade becomes dull, it can be sharpened. You can do this yourself with a sharpening stone or take it to a professional.
- Lubricate Moving Parts: Occasionally lubricate the moving parts with food-grade mineral oil.
- Inspect for Damage: Regularly inspect the grinder for any signs of damage, such as cracks or worn parts. Replace any damaged parts immediately.
Troubleshooting Common Issues
Here are some solutions to common issues you might encounter:
- Grinder is Clogging: Make sure the meat is cold enough and trimmed of excess fat. Don’t overload the grinder.
- Meat is Smearing: The blade may be dull. Sharpen or replace it. The meat may also be too warm.
- Grinder Won’t Assemble: Make sure all the parts are aligned correctly. Don’t force anything. Refer to the assembly instructions.
FAQ: Frequently Asked Questions
- Can I grind bones in my KitchenAid meat grinder? No, you should not grind bones. The KitchenAid meat grinder is not designed for grinding bones and doing so can damage it.
- Who is the KitchenAid meat grinder for? The KitchenAid meat grinder is for anyone who wants to grind their own meat at home for better quality, freshness, and control over ingredients.
- What is the lifespan of a KitchenAid meat grinder attachment? With proper care and maintenance, a KitchenAid meat grinder attachment can last for many years. The lifespan depends on how often it’s used and how well it’s maintained.
- Can I grind cooked meat? While possible, it’s generally not recommended. Cooked meat is often softer and stickier, which can clog the grinder more easily.
- What is the difference between the different grinding plates? A fine grinding plate produces a very fine grind, ideal for sausages or pâtés. A medium grinding plate is good for general-purpose ground meat, like for burgers or meatloaf. A coarse grinding plate creates a coarser grind, suitable for chili or sausages with a chunkier texture.
By following this guide, you’ll be well-equipped to use your KitchenAid meat grinder to create delicious and healthy meals for you and your family. Enjoy!

Hi, I’m Larry Fish, the mind behind MyGrinderGuide.com.. With a passion for all things kitchen appliances, I created this blog to share my hands-on experience and expert knowledge. Whether it’s helping you choose the right tools for your culinary adventures or offering tips to make your kitchen more efficient, I’m here to guide you. My goal is to make your time in the kitchen not only easier but also enjoyable! Welcome to my world of kitchen mastery!