
Can I sharpen drill bits at home? Yes, you can sharpen drill bits at home, and using a bench grinder is a common and effective method. This sharpening drill bits guide will provide you with step-by-step instructions and essential bench grinder sharpening techniques to restore your dull bits to their former glory. This grinding drill bits tutorial will help you safely and effectively sharpen your high-speed steel drill bits or other types of drill bits.
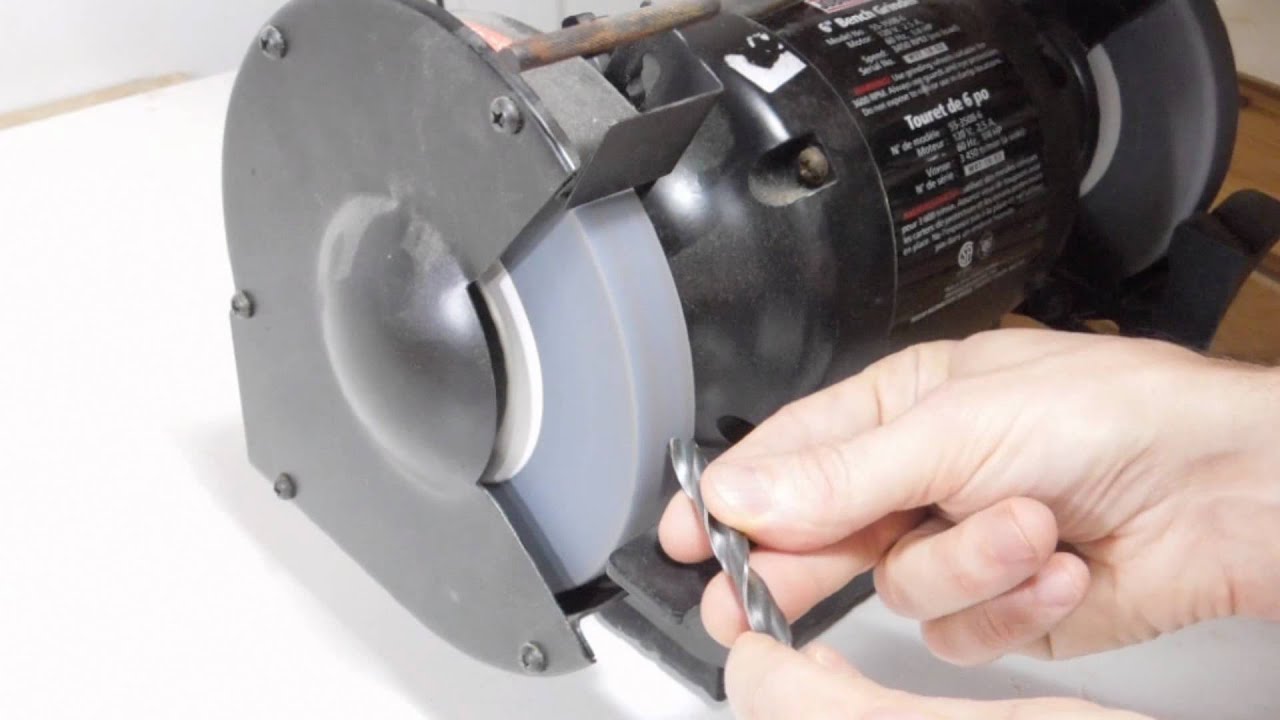
Image Source: i.ytimg.com
Why Sharpen Your Drill Bits?
Dull drill bits don’t just make your work harder; they can also be dangerous. A dull bit requires more force to penetrate the material, leading to:
- Increased risk of the drill bit slipping.
- Overheating of the drill bit, potentially damaging it or the workpiece.
- Torn or uneven holes.
- Increased wear and tear on your drill.
- Longer project completion times.
Sharpening your drill bits is a cost-effective way to extend their lifespan and ensure efficient, safe drilling.
Tools and Safety Equipment
Before you start, gather the necessary tools and safety equipment.
Required Tools
- Bench Grinder: A bench grinder with a medium-grit wheel is essential for drill bit sharpening.
- Safety Glasses: Protect your eyes from flying sparks and debris.
- Work Gloves: Provide a better grip and protect your hands from heat.
- Water Container: For cooling the drill bit to prevent overheating.
- Magnifying Glass (Optional): Helps to inspect the cutting edges.
- Drill Bit Gauge or Protractor (Optional): To check the drill bit sharpening angle.
- Bench Grinder Light (Optional): To provide additional illumination for enhanced precision and safety during the grinding process.
Safety Precautions
- Always wear safety glasses.
- Wear gloves to protect your hands.
- Keep a container of water nearby to cool the drill bit frequently.
- Ensure the bench grinder is securely mounted and in good working condition.
- Work in a well-lit and ventilated area.
- Do not wear loose clothing or jewelry that could get caught in the grinder.
Preparing the Bench Grinder
Before you begin sharpening, ensure your bench grinder is properly set up.
Inspect the Grinding Wheel
Take a close look at the grinding wheel to see if there are any cracks, chips, or spots where it’s worn down unevenly. Using a damaged wheel is really dangerous. If it looks a bit rough or out of shape, you’ll need to “dress” the wheel to get it back to being flat and smooth.
Adjust the Tool Rest
The tool rest should be adjusted so that it is close to the grinding wheel, typically about 1/8 inch away. This provides support for the drill bit and helps maintain control during sharpening. Ensure the tool rest is at the correct angle to support your sharpening drill bits at home task.
Turn on the Bench Grinder
Turn on the bench grinder and let it reach its full speed before you start sharpening.
The Drill Bit Anatomy: Key Features for Sharpening
To effectively sharpen a drill bit, you need to know its parts.
- Point: The very tip of the drill bit, where the cutting action begins.
- Cutting Edges (Lips): The sharp edges that shave away material.
- Heel: The back side of the cutting edge.
- Flutes: The grooves that run along the body of the drill bit, allowing chips to escape.
- Chisel Edge: The edge that connects the two cutting edges at the point.
- Lip Relief Angle: The angle between the cutting edge and the heel. This is crucial for efficient cutting.
Deciphering Drill Bit Angles
Grasping drill bit angles is vital for effective sharpening. The most important angles are:
- Point Angle: This is the angle formed by the two cutting edges. A standard angle for general-purpose drilling is 118 degrees. Softer materials might require a more acute angle, while harder materials benefit from a more obtuse angle.
- Lip Relief Angle: This angle provides clearance behind the cutting edge, preventing the heel from rubbing against the material being drilled. A typical lip relief angle is 8-12 degrees. Getting this angle right is critical for efficient cutting and preventing the drill bit from “walking” or chattering.
- Chisel Edge Angle: This is the angle between the chisel edge and the cutting edges. This angle affects the amount of force required to start a hole.
| Drill Bit Type | Point Angle | Lip Relief Angle |
|---|---|---|
| General Purpose | 118 degrees | 8-12 degrees |
| Soft Materials (Aluminum, Wood) | 90 degrees | 12-15 degrees |
| Hard Materials (Steel, Stainless Steel) | 135 degrees | 6-8 degrees |
Step-by-Step Guide to Sharpening a Drill Bit
Follow these steps for drill bit sharpening bench grinder process:
Step 1: Inspect the Drill Bit
Before you start, carefully examine the drill bit to identify any damage or wear. This will help you determine how much material needs to be removed.
Step 2: Establish a Stable Grip
Hold the drill bit firmly with both hands. Position your hands close to the grinding wheel for better control.
Step 3: Grind the First Cutting Edge
- Hold the drill bit at the correct drill bit sharpening angle against the grinding wheel. Start with one cutting edge.
- Rest the shank of the drill bit on the tool rest and gently bring the cutting edge into contact with the wheel.
- Use a smooth, controlled motion to grind the cutting edge. Rotate the drill bit downward and slightly to the side, following the original angle of the cutting edge.
- Apply light pressure and avoid overheating the drill bit.
Step 4: Cool the Drill Bit
After a few seconds of grinding, dip the drill bit in the water container to cool it down. Overheating can cause the steel to lose its temper and become brittle.
Step 5: Grind the Second Cutting Edge
Repeat the process on the second cutting edge, taking care to grind it to the same angle and length as the first. This is crucial for creating a balanced drill bit that drills straight and true.
Step 6: Check for Symmetry
After grinding both cutting edges, visually inspect the drill bit to ensure that they are symmetrical and have the same length and angle. Use a drill bit gauge or protractor for accuracy.
Step 7: Thin the Web (If Necessary)
If the chisel edge is too wide, you may need to thin the web. This involves grinding a small amount of material from the chisel edge to reduce the amount of force required to start a hole. This is an advanced technique and should only be performed if necessary.
Step 8: Hone the Cutting Edges (Optional)
For an even sharper edge, you can hone the cutting edges using a fine-grit honing stone. This will remove any burrs or imperfections and improve the cutting performance of the drill bit.
Tips for Achieving Optimal Results
Here are some valuable bench grinder drill bit sharpening tips to help you achieve the best results:
- Maintain a Consistent Angle: Keeping the drill bit at the correct angle is crucial for creating a sharp and balanced cutting edge. Use a drill bit gauge or protractor to check the angle frequently.
- Use Light Pressure: Applying too much pressure can overheat the drill bit and damage the grinding wheel. Use light, controlled pressure and let the wheel do the work.
- Cool the Drill Bit Frequently: Dipping the drill bit in water frequently will prevent overheating and preserve the temper of the steel.
- Take Your Time: Sharpening drill bits is a skill that takes practice. Don’t rush the process. Take your time and focus on maintaining the correct angle and symmetry.
- Practice Makes Perfect: Don’t be discouraged if your first attempts aren’t perfect. Keep practicing, and you’ll eventually develop the skill and technique required to sharpen drill bits effectively.
- Consider a Drill Bit Sharpening Jig: A drill bit sharpening jig bench grinder attachment can help you maintain the correct angle and consistency, especially if you’re new to sharpening.
- Use the Right Wheel: Select a wheel appropriate for your drill bit material. For most sharpening high-speed steel drill bits, a medium grit aluminum oxide wheel works well.
- Dress the Wheel Regularly: A dressing tool keeps the grinding wheel clean, sharp, and flat.
Common Mistakes to Avoid
- Overheating the Drill Bit: This can ruin the temper of the steel, making it brittle and prone to breaking.
- Grinding at the Wrong Angle: This can create an unbalanced cutting edge that won’t drill straight.
- Applying Too Much Pressure: This can damage the drill bit and the grinding wheel.
- Not Cooling the Drill Bit: This can cause the steel to overheat and lose its hardness.
- Ignoring Safety Precautions: Always wear safety glasses and gloves to protect yourself from injury.
Advanced Sharpening Techniques
Once you’ve mastered the basic sharpening techniques, you can explore some advanced methods to improve the performance of your drill bits.
Split Pointing
Split pointing involves grinding a small notch in the chisel edge to create two smaller cutting edges. This reduces the amount of force required to start a hole and improves the drill bit’s ability to self-center.
Back Tapering
Back tapering involves grinding a slight taper along the cutting edges to reduce friction and improve chip flow. This is particularly useful for drilling deep holes in hard materials.
Troubleshooting Common Problems
- Drill Bit Not Cutting: Check the cutting edges for sharpness and symmetry. Ensure the lip relief angle is correct.
- Drill Bit Walking: This is usually caused by an unbalanced cutting edge or an incorrect point angle.
- Drill Bit Overheating: Reduce the pressure and cool the drill bit more frequently.
- Uneven Holes: Ensure the cutting edges are the same length and angle.
Alternative Sharpening Methods
While using a bench grinder is a popular method, there are other ways to sharpen drill bits.
- Drill Bit Sharpening Attachment: These attachments can be used with a standard drill to sharpen drill bits.
- Dedicated Drill Bit Sharpeners: These are specialized machines designed specifically for sharpening drill bits. They offer more precision and consistency than other methods.
- Hand Sharpening with Files: While less common, small bits can be sharpened by hand using specialized files.
Maintenance of Sharpened Drill Bits
Proper maintenance will extend the life of your sharpened drill bits.
- Store Drill Bits Properly: Store drill bits in a drill bit index or case to protect them from damage.
- Use the Right Speed and Feed Rate: Using the correct speed and feed rate for the material you’re drilling will prevent premature wear.
- Apply Cutting Fluid: Using cutting fluid will reduce friction and heat, extending the life of your drill bits.
- Regular Inspection: Regularly inspect your drill bits for signs of wear or damage and sharpen them as needed.
Conclusion
Sharpening drill bits with a bench grinder is a valuable skill that can save you money and improve the efficiency of your projects. By following this sharpening drill bits guide and practicing the techniques, you can keep your drill bits sharp and performing at their best. Remember to prioritize safety and take your time to achieve optimal results. With a little practice, you’ll be able to sharpen dull drill bits like a pro.
Frequently Asked Questions (FAQ)
Q: How often should I sharpen my drill bits?
A: Sharpen your drill bits whenever you notice they are dull, require more force to drill, or are producing rough holes. Regular inspection will help you determine the frequency.
Q: What grit grinding wheel should I use?
A: A medium-grit (60-80 grit) aluminum oxide grinding wheel is suitable for most drill bit sharpening.
Q: Can I sharpen carbide drill bits with a bench grinder?
A: While possible, it’s not recommended. Carbide drill bits require a diamond grinding wheel and specialized techniques. It’s best to use a dedicated carbide drill bit sharpener or have them professionally sharpened.
Q: What if I overheat the drill bit?
A: If you overheat the drill bit (it turns blue), you’ve likely ruined the temper of the steel. The bit will become brittle and prone to breaking. You’ll need to discard it and start with a new bit.
Q: Is it difficult to use a drill bit sharpening jig bench grinder?
A: No, using a jig makes the process much easier, particularly for beginners, as it helps maintain the correct angle and consistency.
Q: Why is my drill bit still not cutting after sharpening?
A: Possible reasons include: incorrect grinding angle, uneven cutting edges, insufficient lip relief, or overheating during sharpening. Re-examine your technique and the drill bit itself.

Hi, I’m Larry Fish, the mind behind MyGrinderGuide.com.. With a passion for all things kitchen appliances, I created this blog to share my hands-on experience and expert knowledge. Whether it’s helping you choose the right tools for your culinary adventures or offering tips to make your kitchen more efficient, I’m here to guide you. My goal is to make your time in the kitchen not only easier but also enjoyable! Welcome to my world of kitchen mastery!